Forty-two. Exhibit at the 2014 Madison County, Montana, Fair

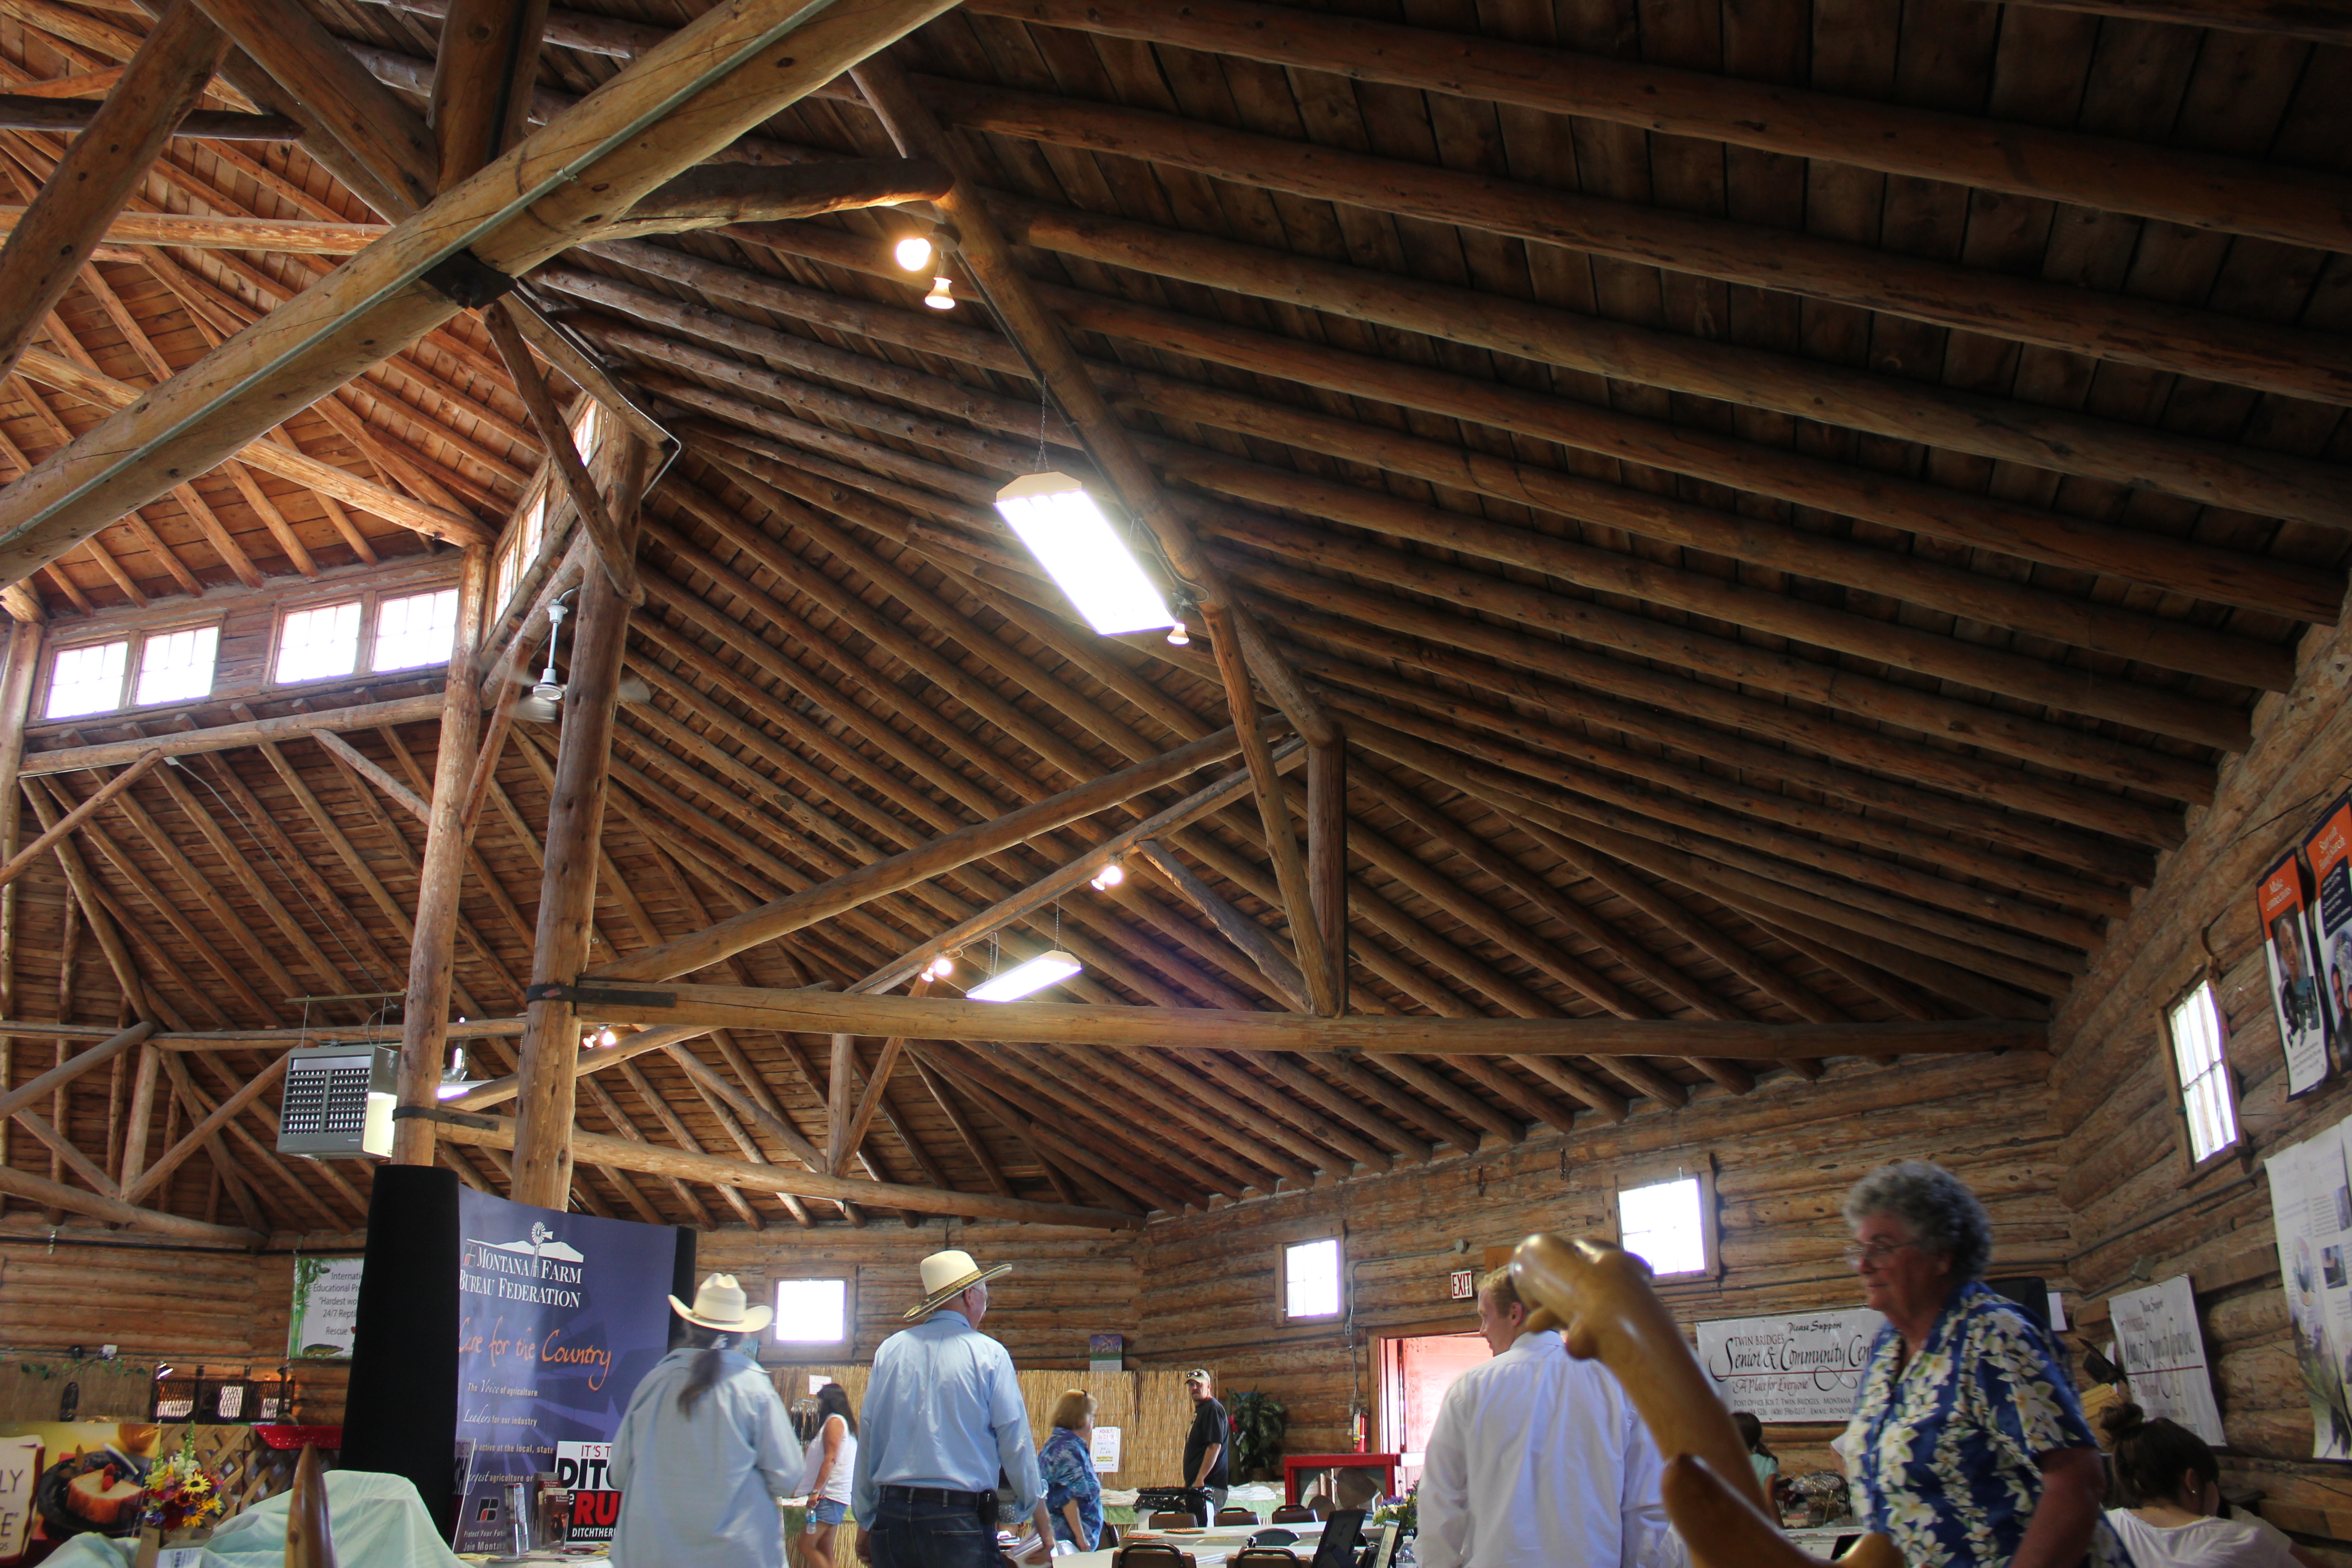
An important reason for my wanting to exhibit at the fair was/is my admiration for the octagonal log architecture of “The Pavilion.” Another reason is that our three families all live just across the Beaverhead River from the fairgrounds. Yet another reason is that the booth space was large enough to allow a collection of 11 pieces of furniture, as well as my shaving horse, tote box, and tool caddy.
I planned the exhibit as an educational display–about the trees, the designs, and the workmanship. It is yet another of my tributes to the contorted lodgepole pine trees.
It’s very likely that this will be my last public display, especially since we’re now thinking of furnishing our Virginia City home with these irreplaceable pieces of tree art furniture and sculpture.
I’m pleased that spending this time with the display has renewed our appreciation of the many artistic values embodied in each piece, and in the collection as a whole. It’s true that the pieces interact with each other, and that the whole display seems greater than the sum of its parts.
The entire collection represents thousands of hours of work–from the hunting/gathering of the trees, to the different stages of assemblage, cosmetic detailing, to the finish coats of varnish or wax–plus all the indirect labors, including storage, handling, marketing and sales.


Thirty-nine. “Old Faithful Inn’s Architectural Tree Art”
The following is the text of a brief article I wrote as an introduction, a first publication in an expanding series of articles and essays written as a tribute to the remarkable “Lodgepole” pine trees. My ultimate goal is to write a book, illustrated with photographs, titled Contorted Lodgepoles: A Poet’s Tribute. One chapter of that book will be an essay that expands on my observations about architect Robert Reamer’s “architectural tree art.”
Here’s the photograph that accompanied the article.

This photo dramatically illustrates the “architectural tree art” of the Inn’s lobby. Architect Reamer combined both the ideal and the deviant “Lodgepole” pine tree trunks. The photo also illustrates the elevations, processions, and ascensions that I mention in this article. The Crow’s Nest is “nestled” in the pinnacle of the vaulted ceiling. What a masterpiece it is …! (Jack Waller photo)
Explore Big Sky
August 8—22, 2013 issue, “BACK 40”
“Old Faithful Inn’s architectural tree art”
By Jack Waller, Explore Big Sky Contributor
I’m one among a multitude of admirers of Yellowstone National Park’s Old Faithful Inn.
Designed by architect Robert Reamer in 1903, the inn is a monumental example of rustic architecture. For well over a century, it’s been a destination for millions of visitors, and the voluminous subject matter of devoted scholars, historians, writers and photographers.
One essential element of its rustic appeal is what I call “architectural tree art,” the extensive use of lodgepole pine tree trunks both on the building’s exterior and interior.
Reamer’s design, especially in the lobby, combines the shapes of both the straight and the contorted types of the species, Pinus contorta var. latifolia. The magnitude of Reamer’s structural and decorative uses of these trees evokes amazement, awe and a sense of architectural mystery.
In the late 1980s, three seminal events led to my becoming a tree art furniture maker. I moved to southwest Montana to live in a lodgepole pine forest; I visited Old Faithful Inn for the first time; and I read Craig Gilborn’s Adirondack Furniture and the Rustic Tradition.
“Tree art” and “tree art furniture” are terms I first learned from Gilborn. For the most part, they refer to the use of recognizable tree shapes in the design and construction of rustic architecture and in furniture making, respectively.
In July 2012, after more than 20 years of making tree art furniture from contorted lodgepole pine trees, I took a private bellhop’s tour of the upper levels of the inn’s lobby.
Public access was closed in the late 1940s for safety reasons, due to the large numbers of inn visitors. Now twice a day, a group of four people can, by reservation only, accompany a bellhop to the inn’s rooftop either for the morning or evening raising or lowering of flags.
Ascending to the lobby’s upper levels, we arrived at the pinnacle of the lobby’s vaulted ceiling, and arrived at the crow’s nest. From its great height in the peak of the vaulted ceiling, it overlooks all the interior architectural tree art – the lobby floor, the surrounding column-brace-beam frameworks, and the lower balconies with their interconnecting staircases, catwalks and platforms.
A small, enclosed, cage-like structure, the crow’s nest epitomizes the inn’s architectural tree art. As a tree artist, I recognized the recurring motifs that I’ve identified in my own work: swan necks, tuning forks, alpenhorns, shepherd’s crooks and arches. I also saw there the mastery of the carpenters/tree artists who executed these elaborate designs.
The crow’s nest door is positioned near an exit staircase, with another door leading outside and up to the summit of the inn – a long, rectangular roof platform with panoramic views of the Old Faithful geyser basin.
During the tour I realized an essential element of Reamer’s plan was to provide all guests with the experience – both physical and psychological – of elevation, procession and ascension, all culminating on the rooftop.
Thirty-eight. The bench: my artist’s statement
(I originally posted this as a draft on July 22, 2013, which preceded post “Thirty-nine.” I decided today to go ahead an publish it.)
The architectural tree art of Old Faithful Inn was an original inspiration for me in the late 1980s. Since then I’ve made tree art furniture, sculpture, and architectural details, using contorted lodgepole pine trees.
From its beginning, I designed and made this bench with Old Faithful Inn in mind. As tree art furniture, its design echoes the architectural tree art of the Inn, especially that of the lobby’s log framework bracing, balconies, staircases, catwalks, and the “Crow’s Nest.”
In July of 2012, I took a private bellhop’s tour of the upper levels of the Inn’s lobby for the first time, ascending to “The Crow’s Nest,” and out onto the flat roof’s viewing platform. I repeated this privileged and inspirational tour in June of 2013.
These tours deepened my appreciation of the artistry of architect Robert Reamer’s designs and of the craftsmanship of those he employed to execute them. The tours also increased my sense of connection, as a tree art furniture maker, to the Inn’s architectural tree art and to the contorted lodgepole pine trees. And they also evoked a desire to exhibit my tree art furniture in the lobby of the Inn, for public use as seating, portrait photography, and to serve other educational values.
Lastly, the bench was made in conjunction with my writing of an essay titled “Architectural Tree Art of Old Faithful Inn”, for magazine publication and to later become a chapter in my forthcoming book length manuscript, Contorted Lodgepole Pines: A Poet’s Tribute.
“Tree working” Processes
I began the bench in December of 2012 and “finished” it in June of 2013. The various phases of the project are documented, in detail, on this blog.
Components
The design includes 19 individual, naturally grown, lodgepole pine tree trunks (no limbs or branches), and five tree art “motifs”: swan neck, alpenhorn, arch, ox-bow, and tuning fork.
I chose the individual trees and combined their shapes to serve both structural and decorative purposes. The overall design emphasizes the individual “character” of each tree, while also achieving a symmetrical pattern and functional unity. The natural “defects”—cracks, gnarly grain patterns, insect activity, discolorations—are essential rustic details of tree art furniture.
Joinery
The most-used joints are round mortise and tenon, saddle notch, and mate cut edge-to-edge butt joint (on the seat slabs). After gluing and clamping, most of the joints were reinforced with either wood dowels or wood screws.
Detailing and Finish
The project included tedious and time-consuming processes of cosmetic detailing: shaping of joints; chamfering of edges; filling holes and cracks; scraping and sanding away of coarse tool marks, wood filler, and excess glue. Stain pens were used to blend colors and to conceal cosmetic flaws.
I first applied two coats of penetrating natural Watco Danish Oil. The final finish is two top coats of satin polyurethane.
Specifications
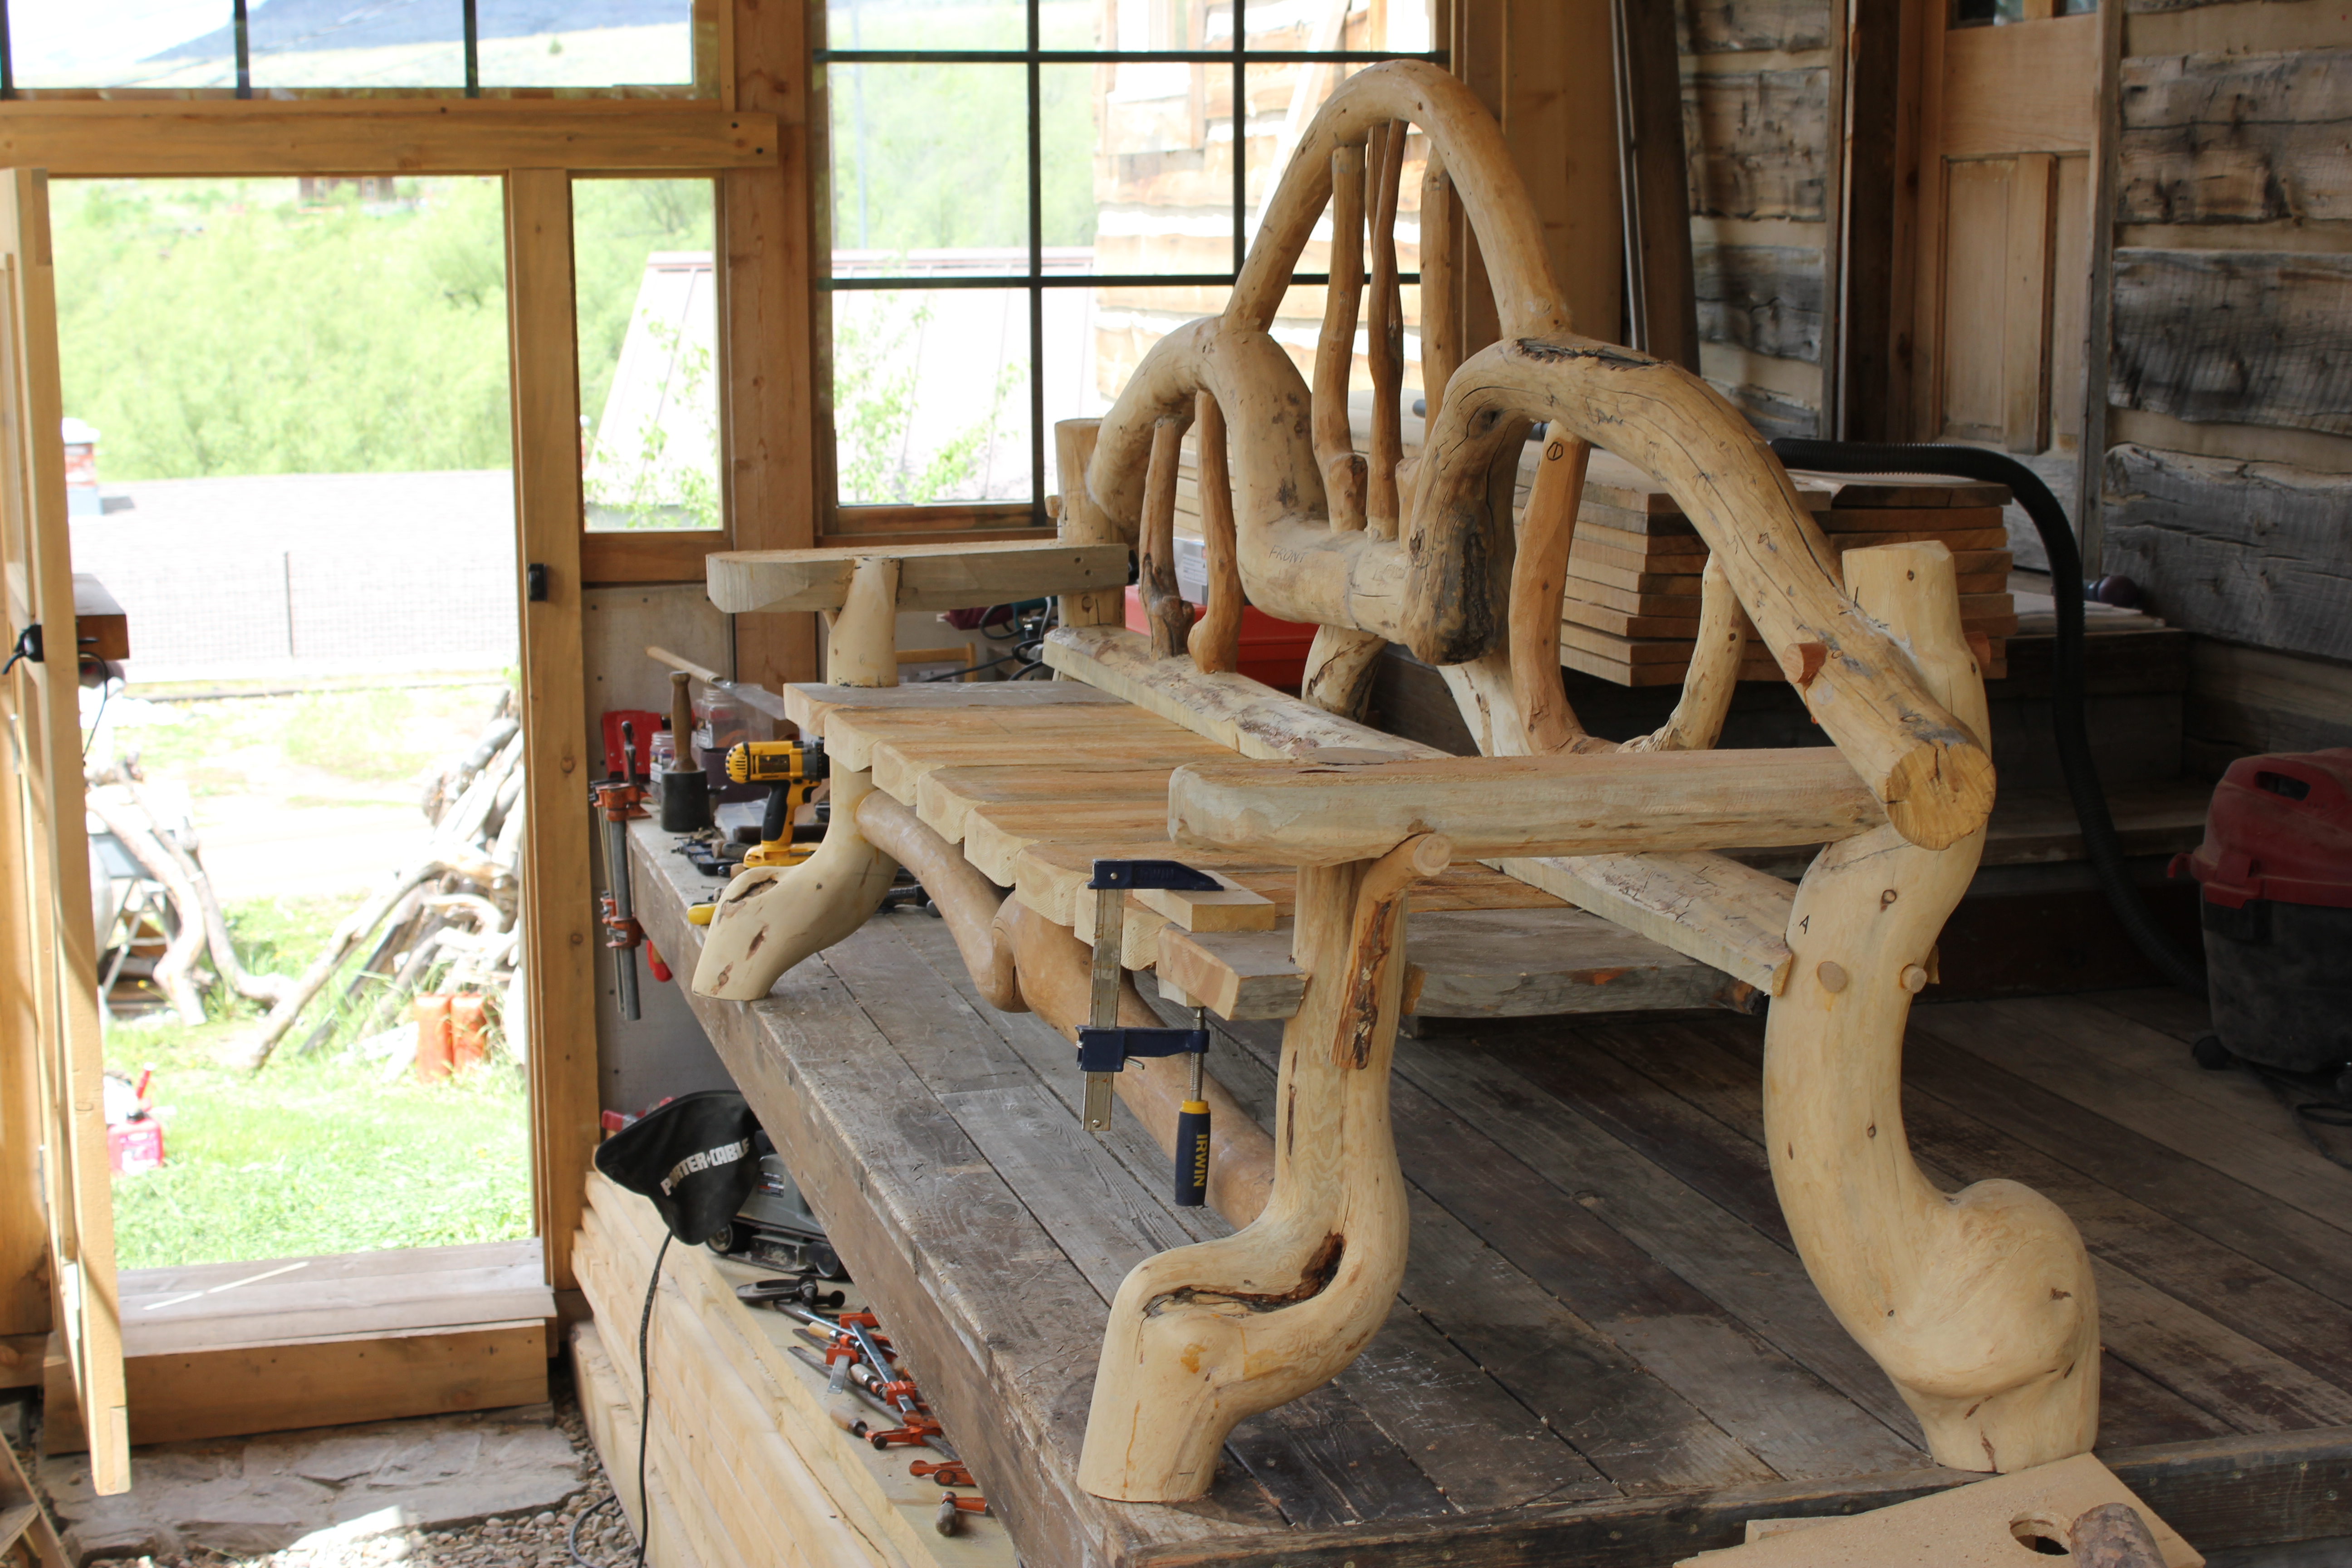
The bench is 8 feet long overall, with a backrest height of 46 inches. The slab wood seating area is 71 inches wide between the armrests. I estimate its weight at about 200 pounds.
Here are front and back views of the bench as it sits in our greenhouse-to-be …
______________________________________


Thirty-seven. Getting close …

After too many hours of fixing its cosmetic flaws, the bench now has two coats of penetrating Watco Danish oil (natural) and two top coats of satin polyurethane.

I wanted to preserve and enhance all the varied natural colors of the individual trees, but I did use some stains, especially Minwax stain pens, to conceal tiny blemishes and blend in wood fillers.

The horizontal pencil lines on the bottom of the two legs are guideline for a final trimming of the leg. Each of the bench’s four legs was marked to the same height from the floor by using a measuring block.

In this 3/4 rear view, I like the repeated and stacked use of five arched shapes, combining three tree trunk motifs–“ox-bow,” “C arch,” and “swan neck.”

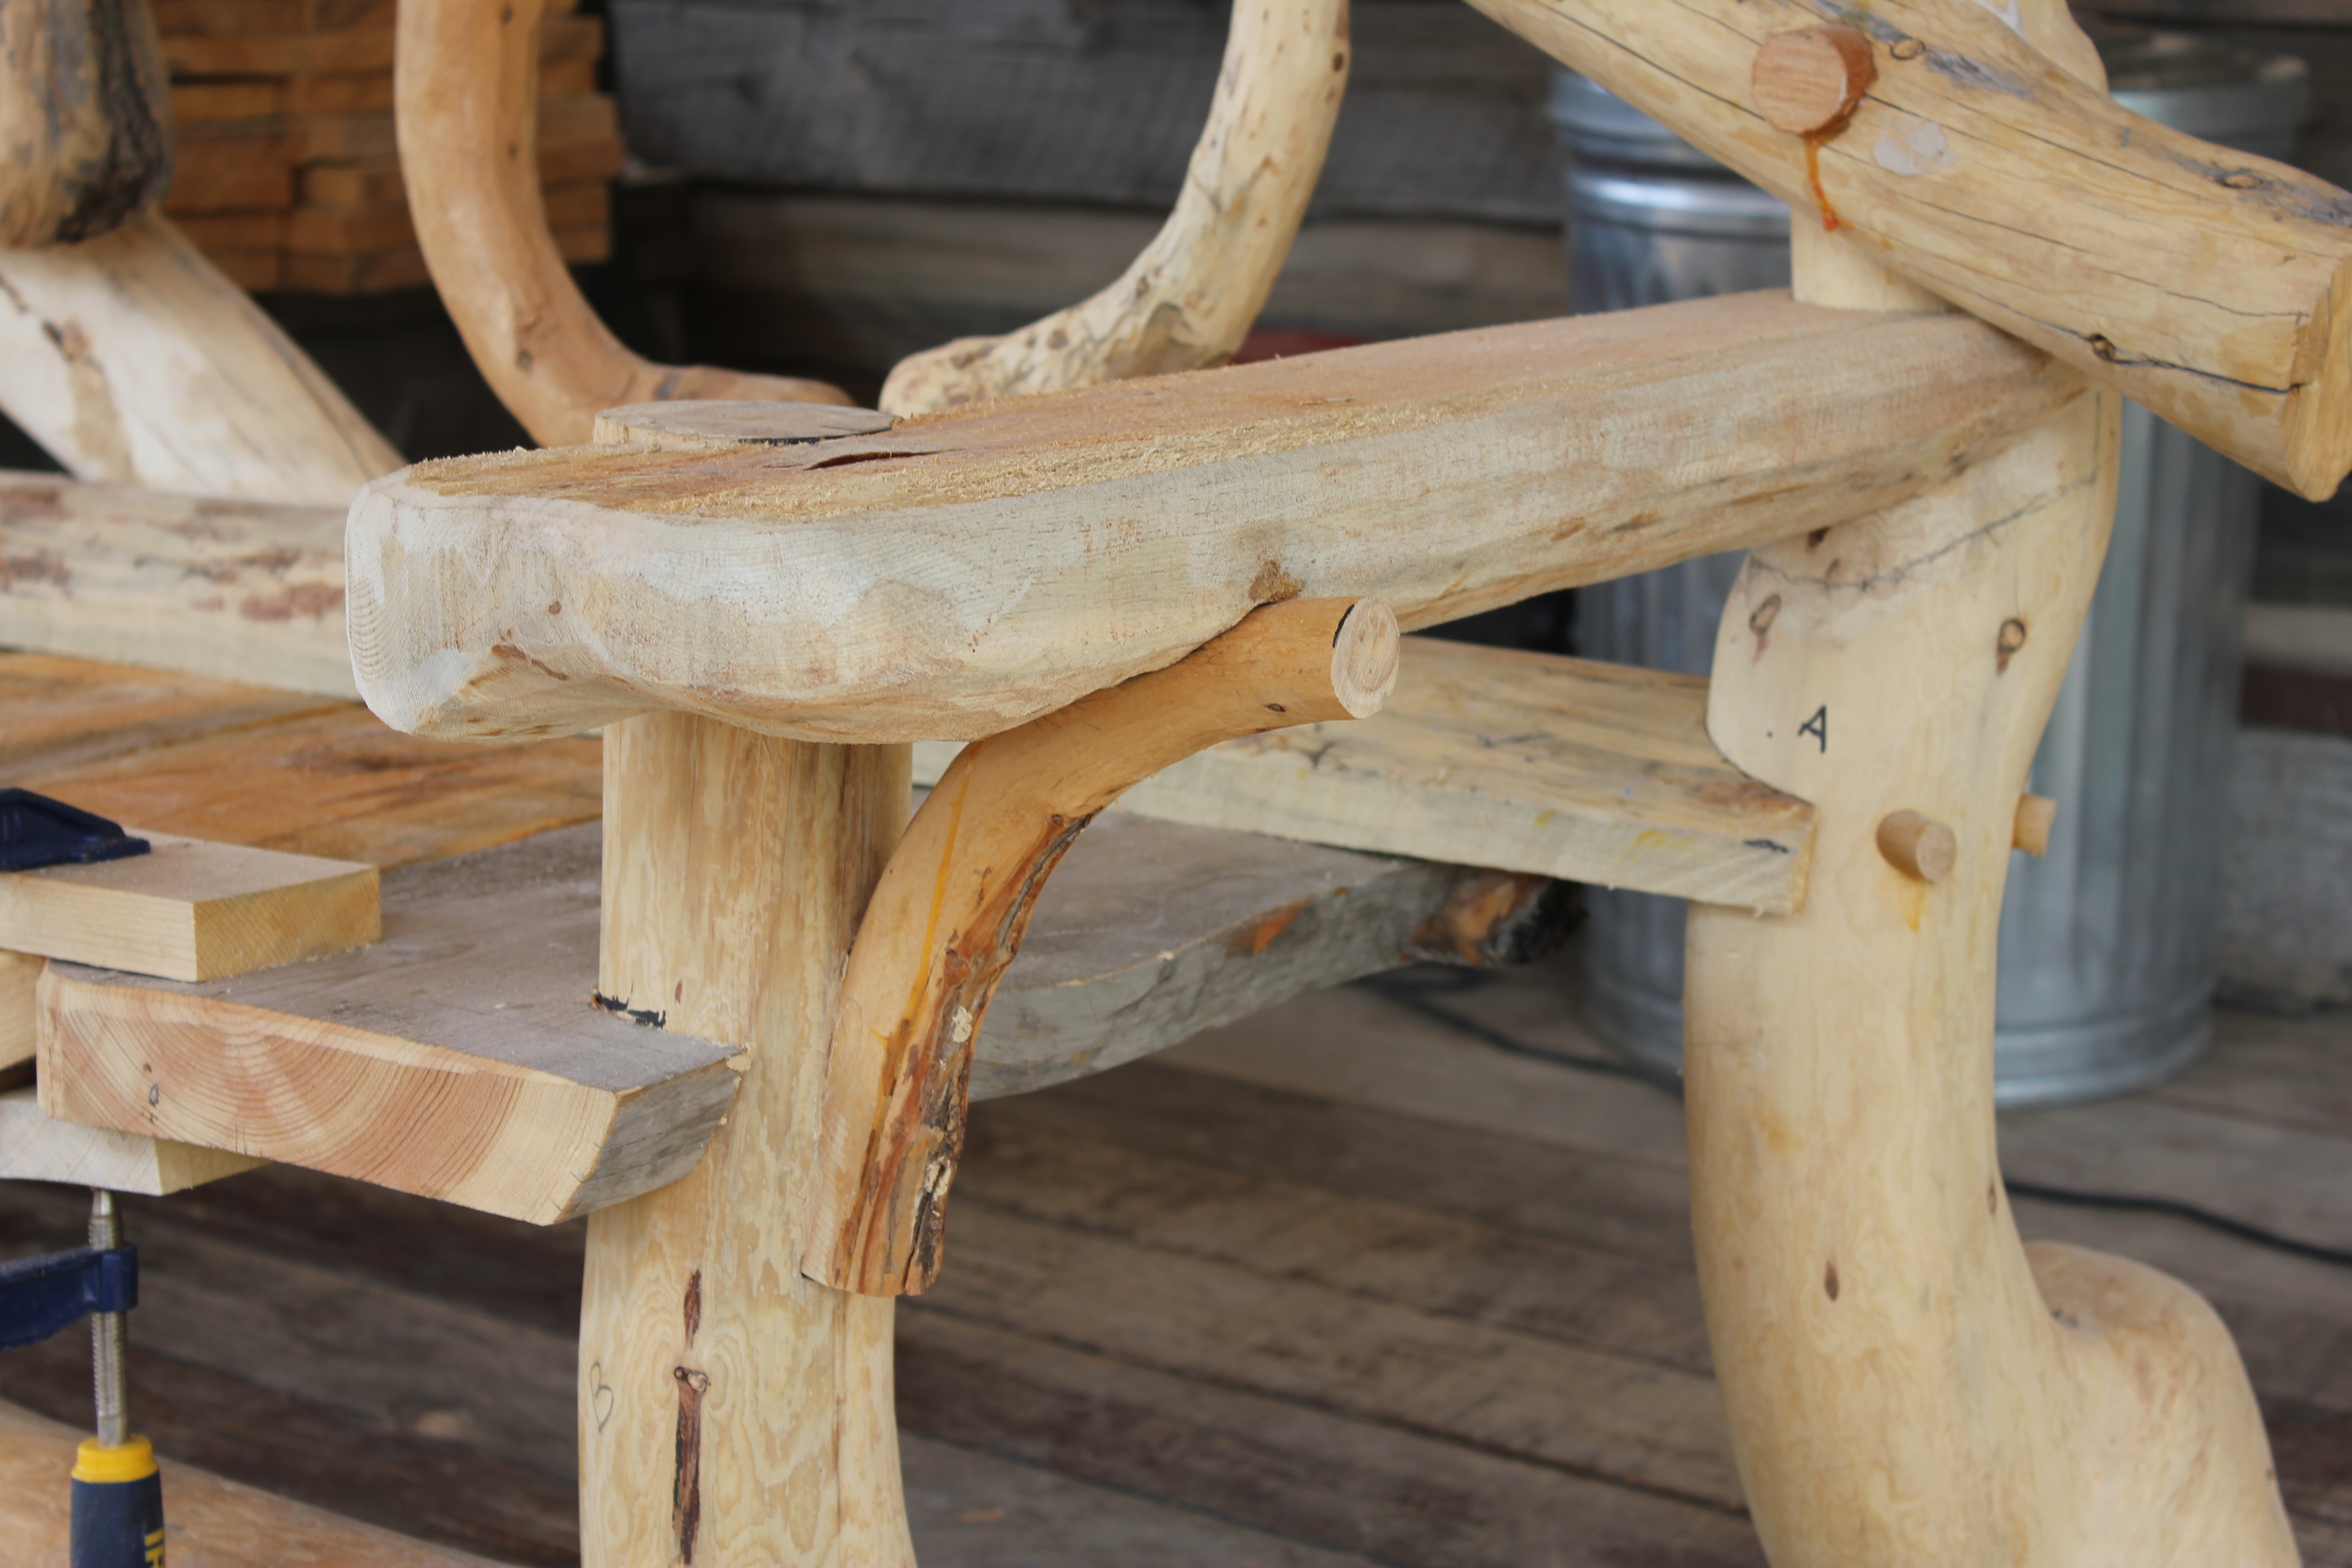
I took this photo as a close-up, primarily to show the variety and colors and grain flows. The leg and armrest are from beetle-killed trees.

This is the better of the two leg and armrest saddle notches.
Thirty-three. Armrests for the bench
With the addition of the armrests, the bench’s components are almost completed. As the armrest design evolved, I had to give up my plan to have the bench come apart in two sections. With the armrest’s fixed connection between front and back legs, the bench can no longer be disassembled.
I still have to add an “ox-bow” tree trunk stretcher between to two back legs. I’ll also add a horizontal brace under the front of the bench seat, using the front “ox-bow” for support.

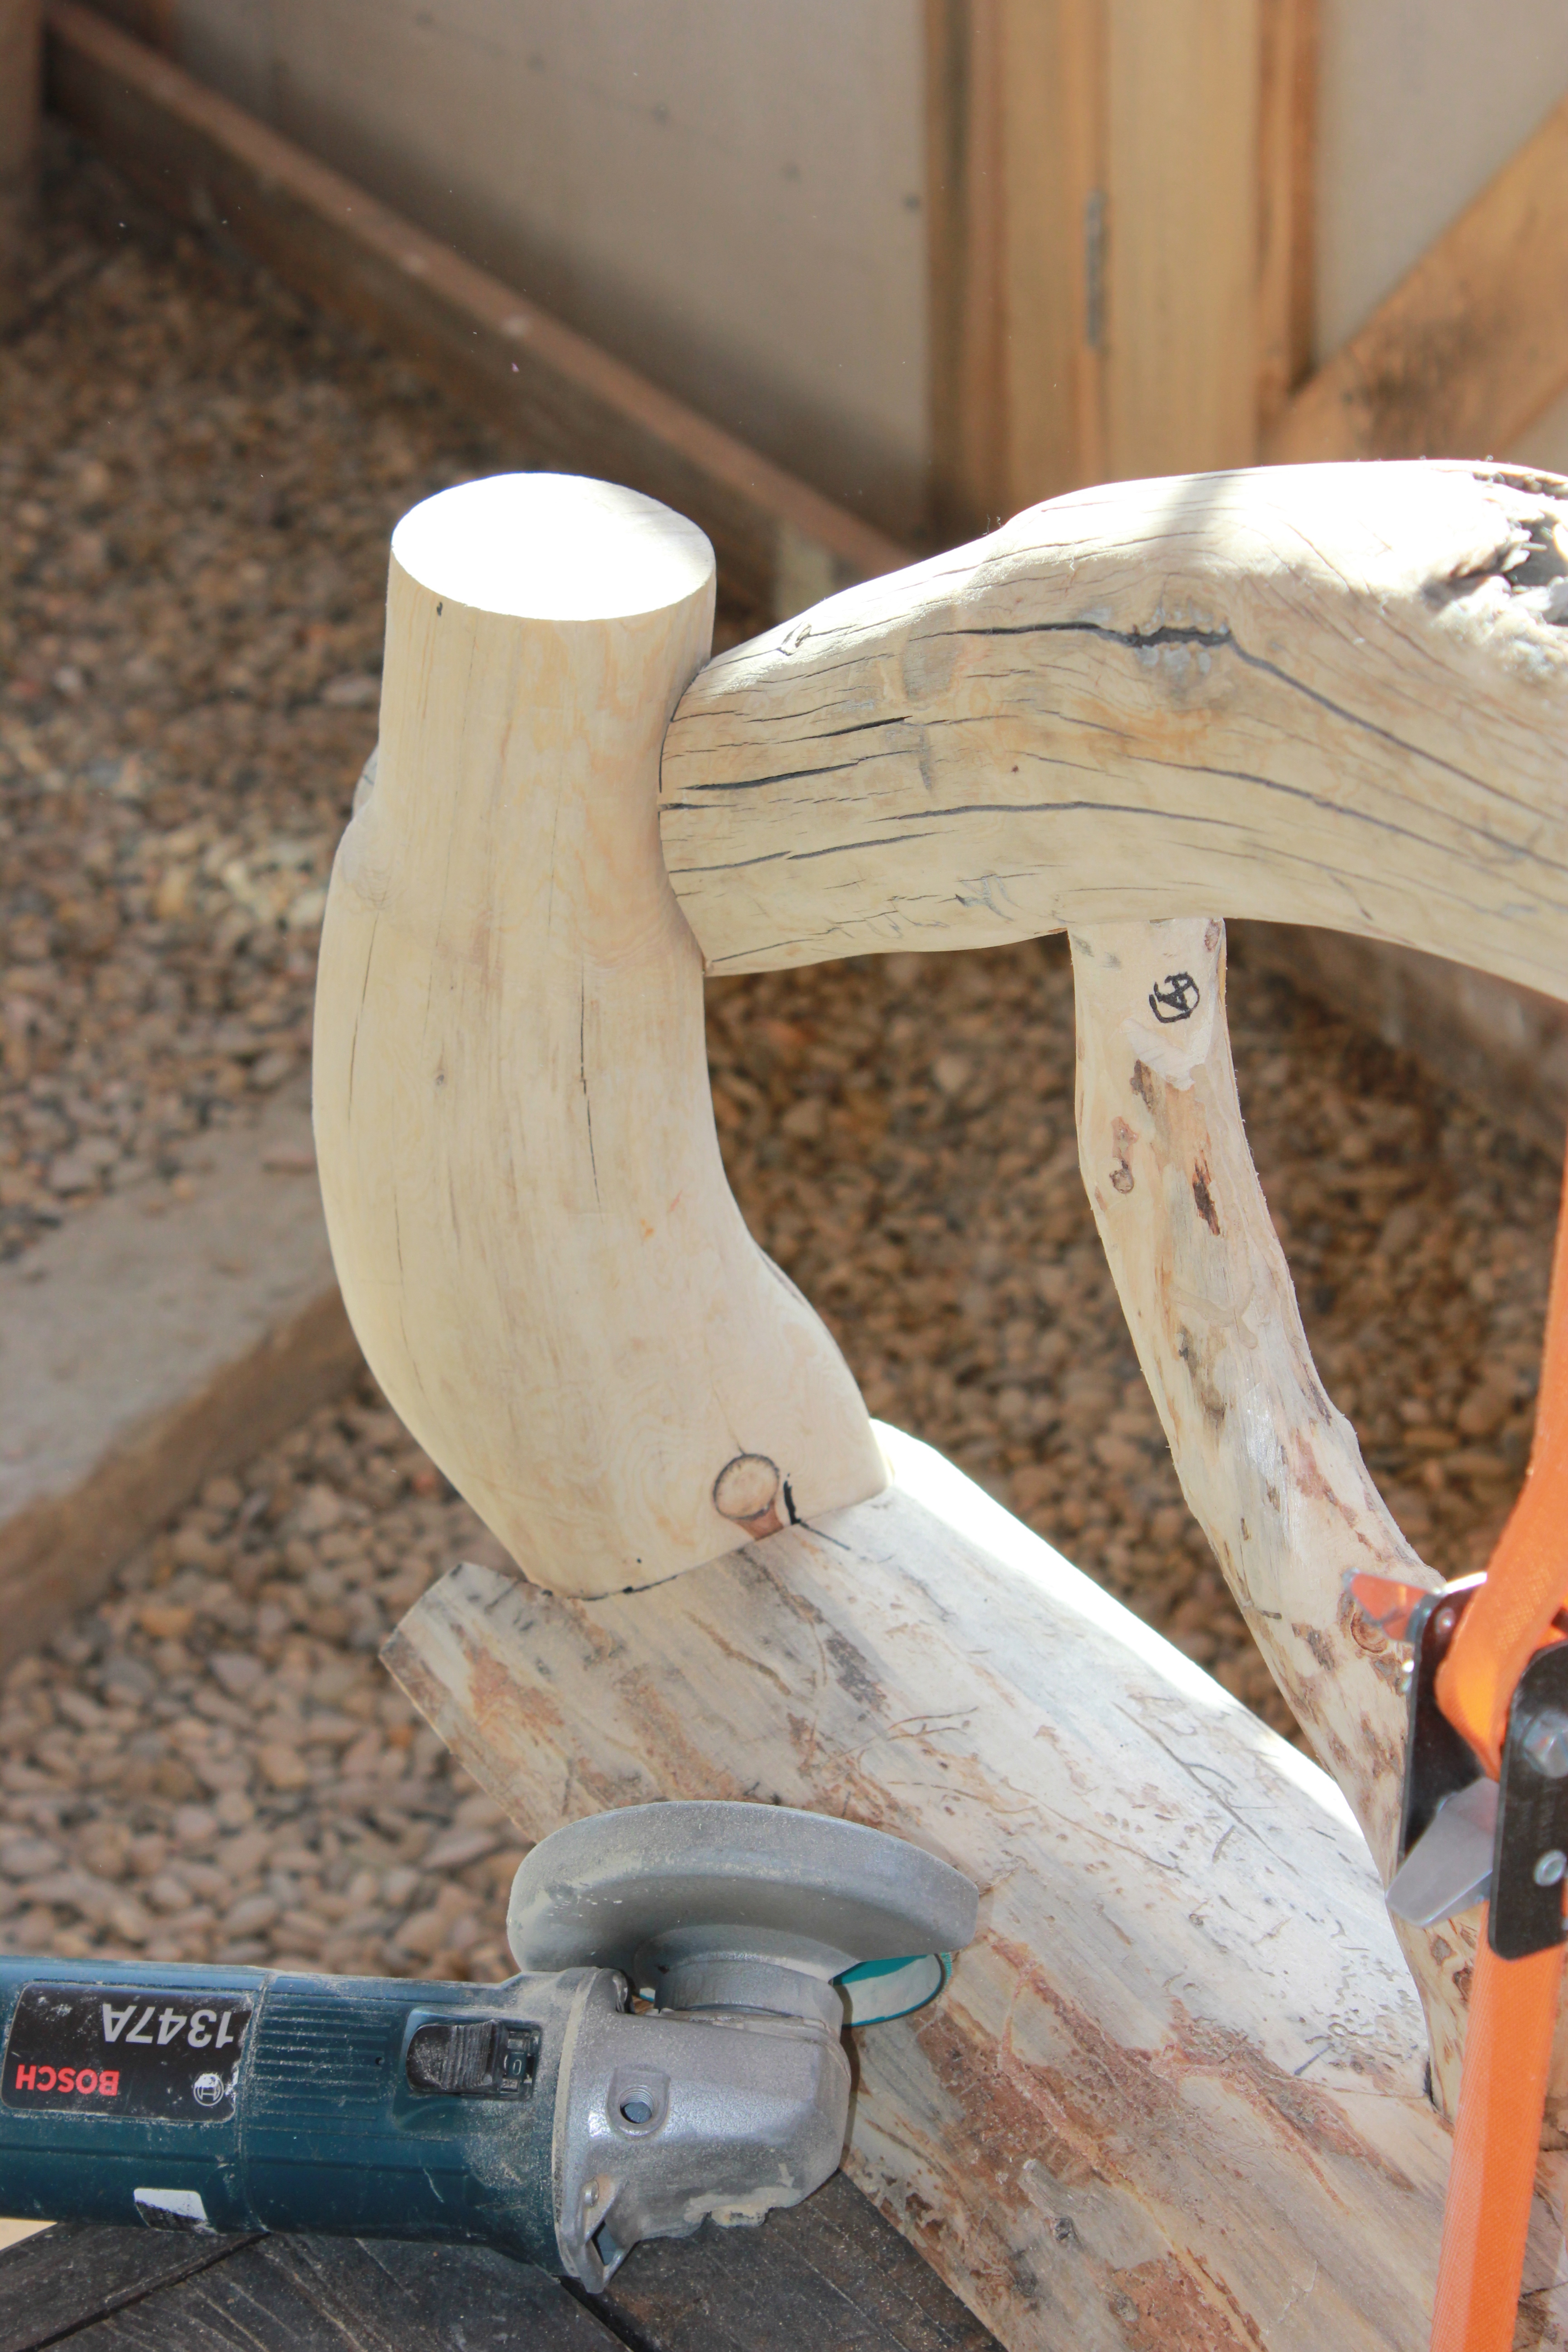
This 3/4 view from the back shows one armrest roughed-in. It also shows the growing number of the bench’s component tree trunks. There are, I think, sixteen tree trunks in this photo. When the bench is finished I’ll do an exact count.
In this 3/4 front view, both armrests show. Each is fashioned from a slab of lodgepole pine, with a curved underside and flat surface on top.
This close-up shows the armrest support brace, made of a segment cut from a little tree trunk naturally grown in an arched curve. For added strength, it is inset both into a recess in the front leg, and into a groove chiseled in the armrest. It is secured with Torx finish screws.

A view from the other end.
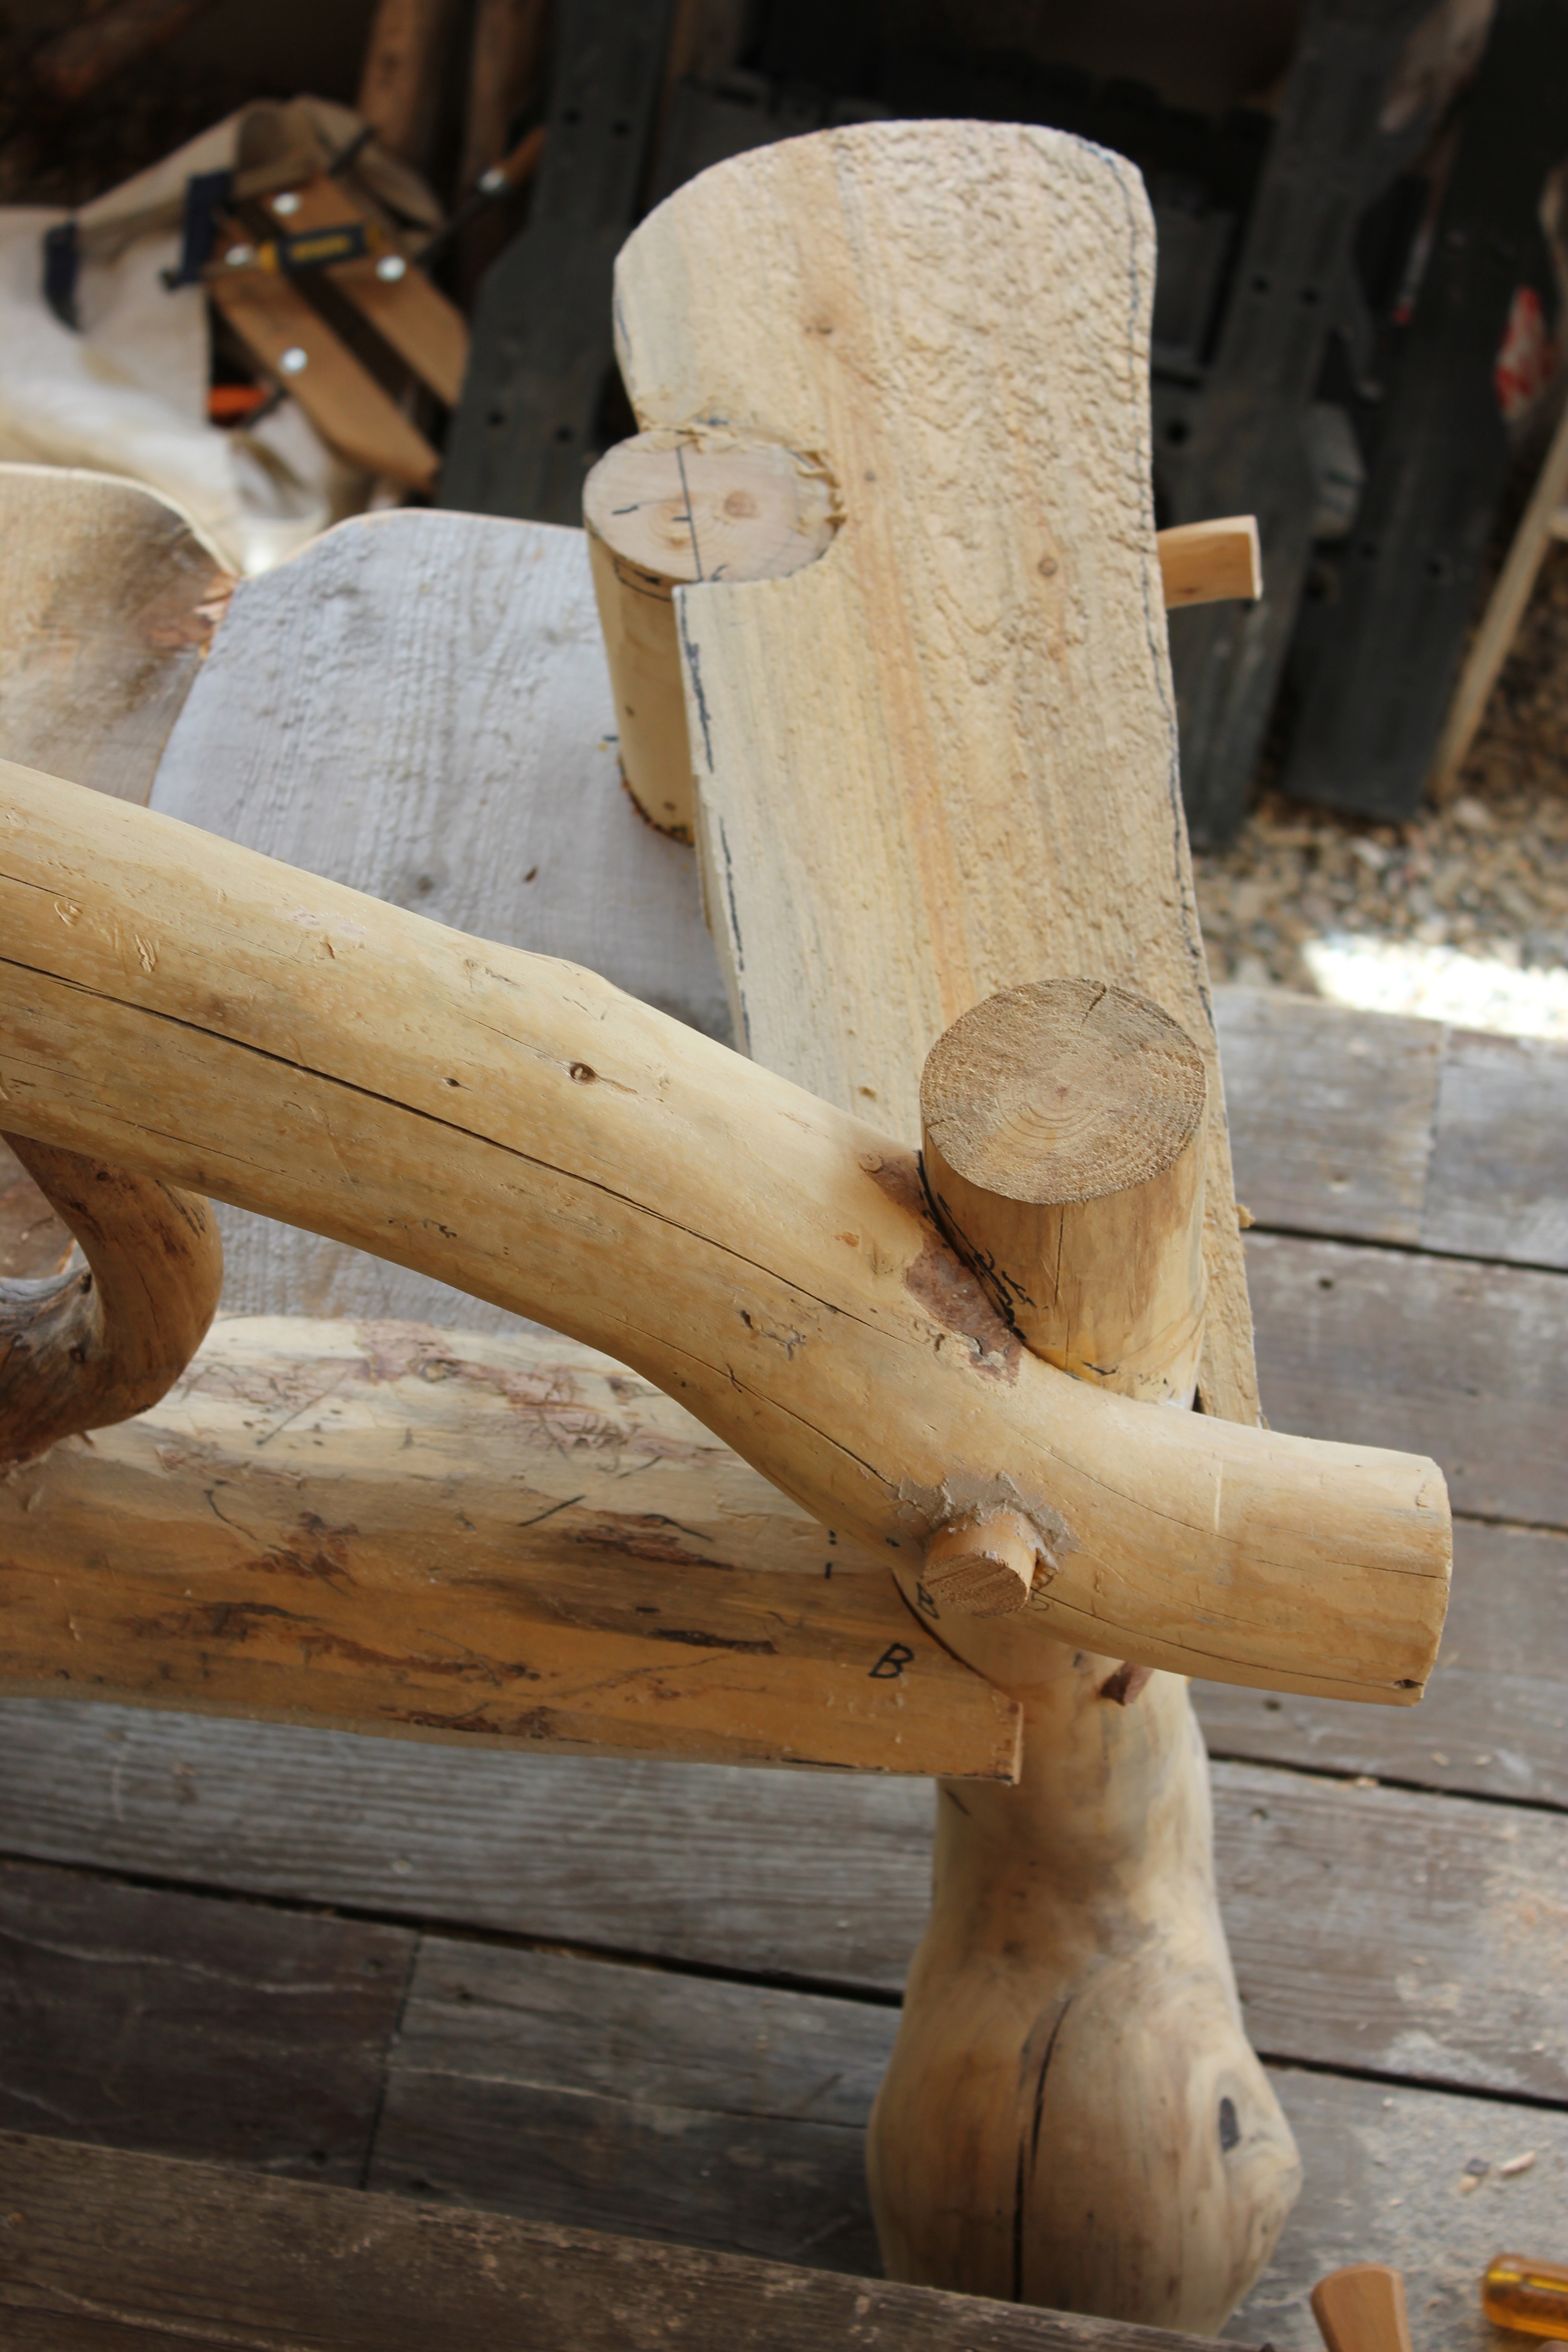
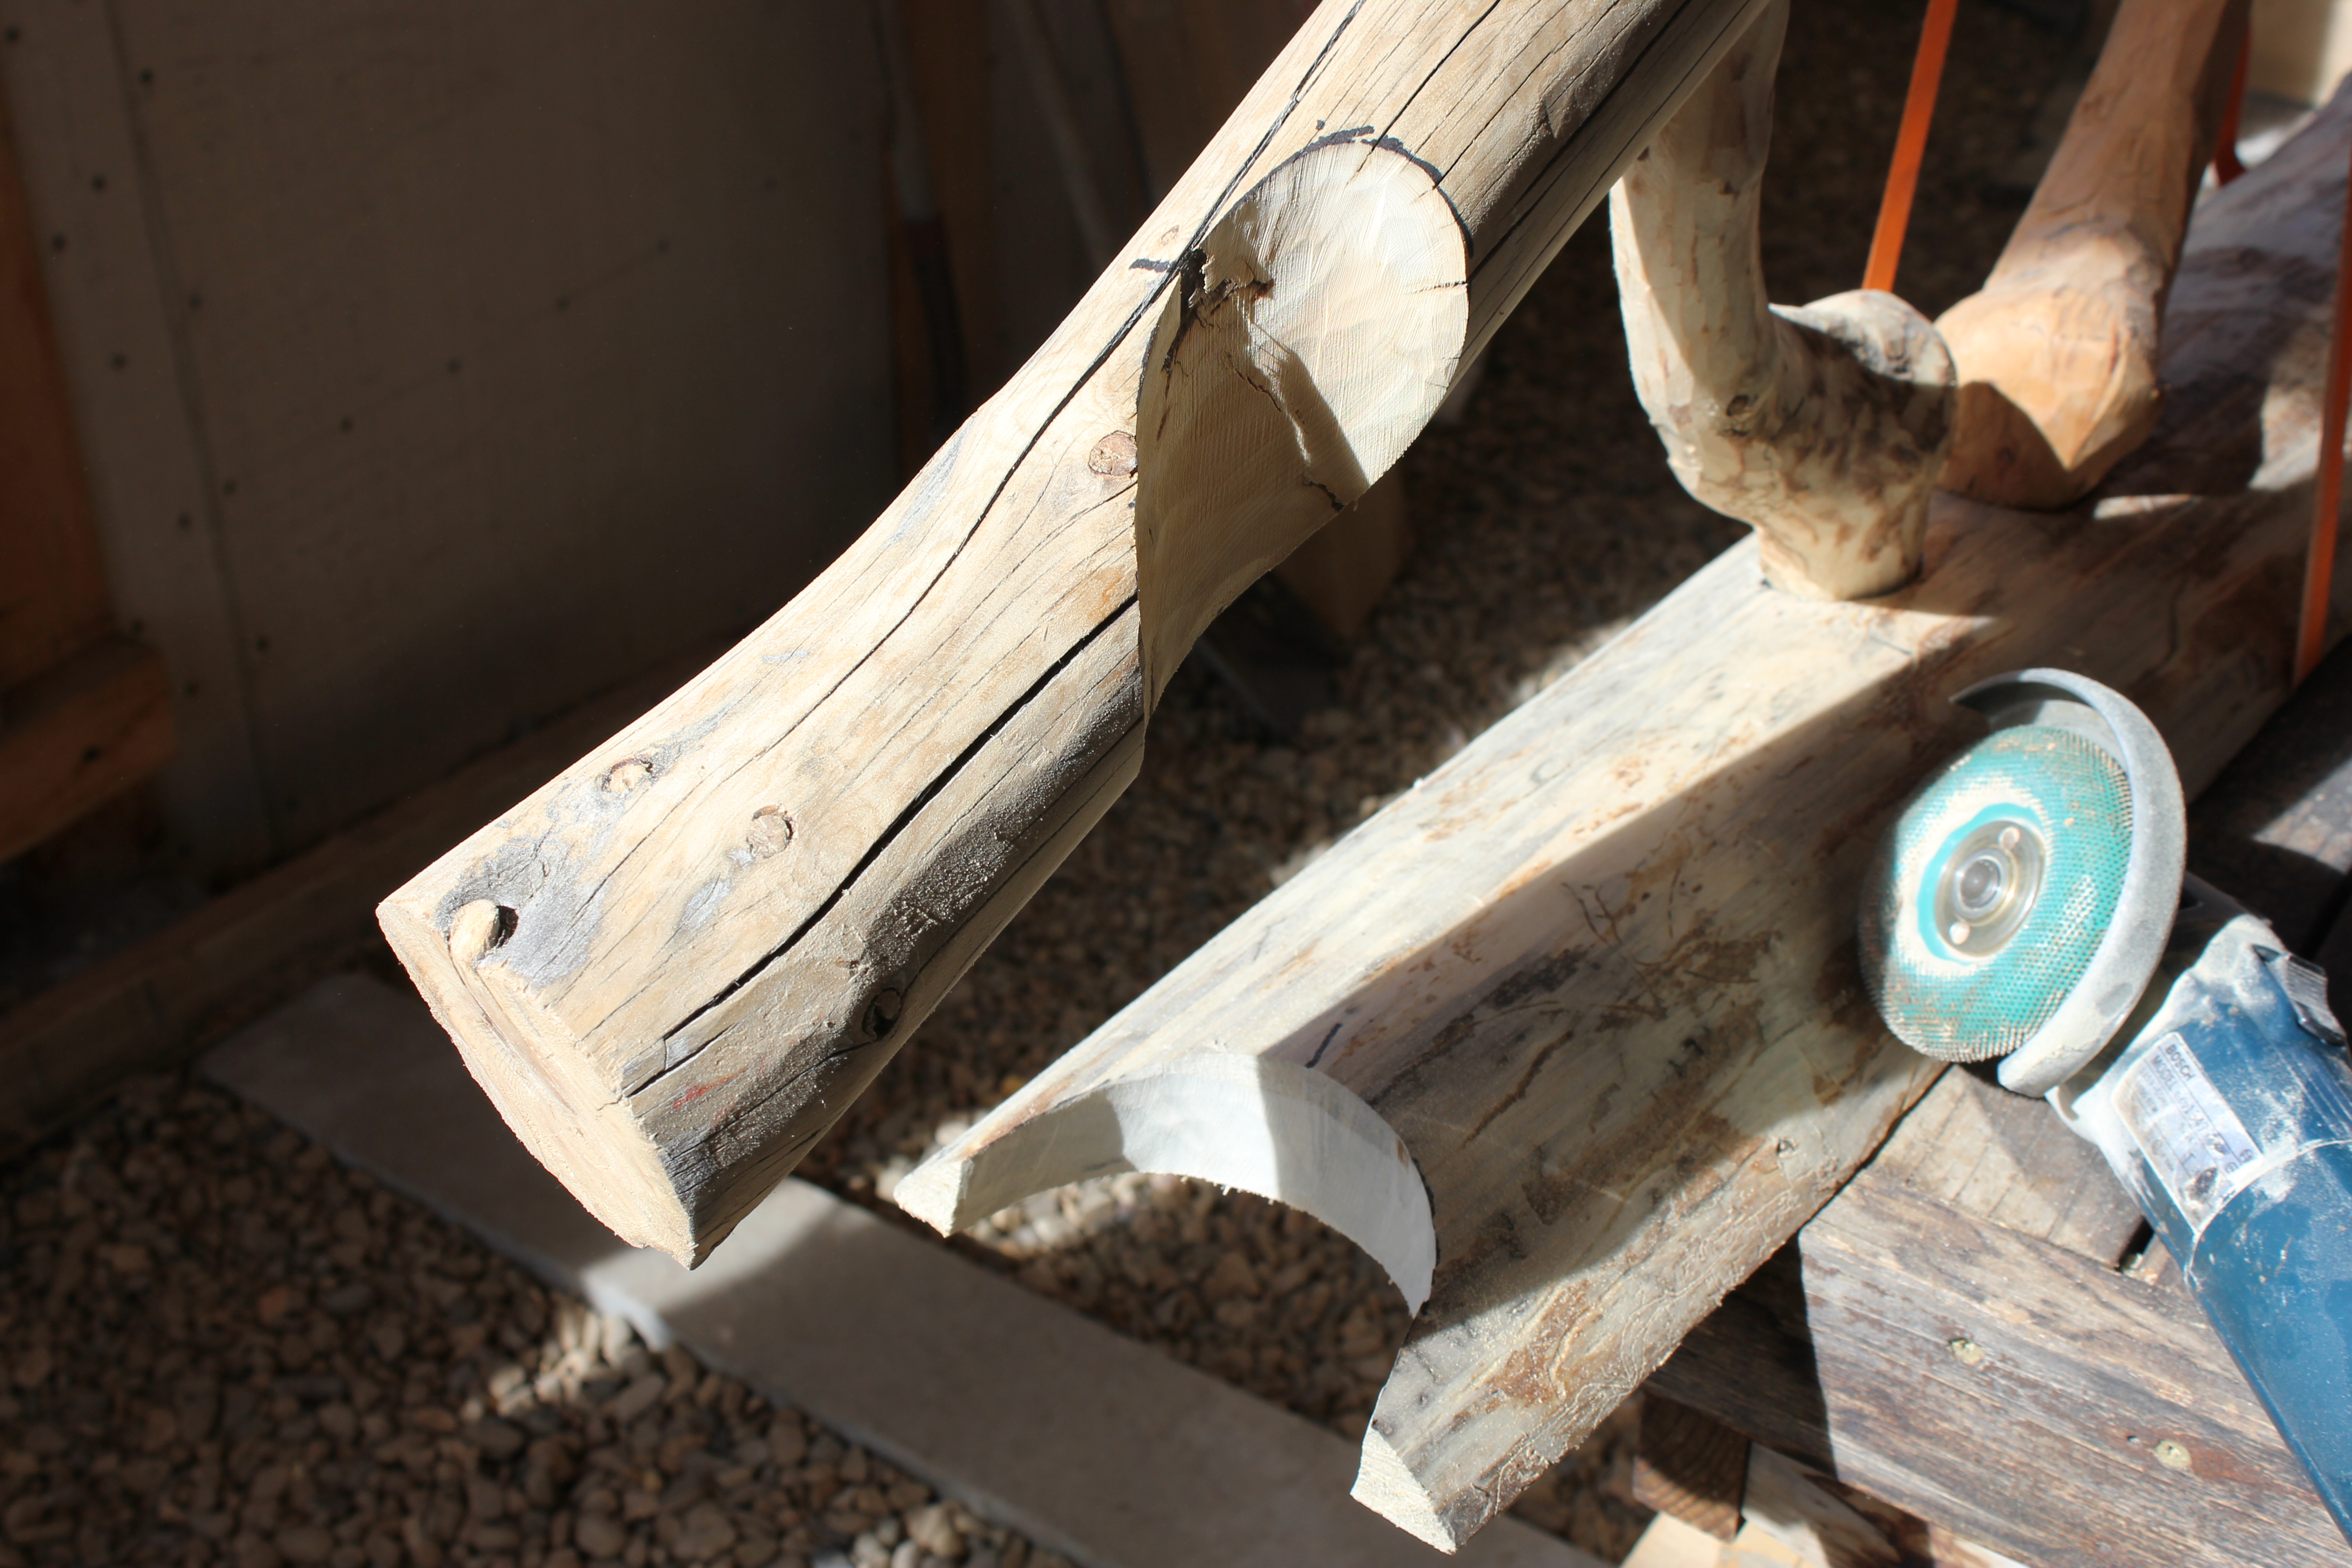
This top view at the bench’s right end shows the front leg and armrest joined by a coped saddle notch, with the arched support left “wild” for later trimming. The bottom of the photo shows more of the coped saddle joinery, four at each end of the bench, used as a key element of the bench’s design and its structural strength.

Here are the two coped saddle notches of the armrest. Sequence was critical in cutting them. The first notch had to be cut and fitted to the back leg, because the armrest moved the depth of the notch toward the back. Once the back notch was finished, I could accurately lay out the front notch. Such double joineries require multiple attempts at fittings.
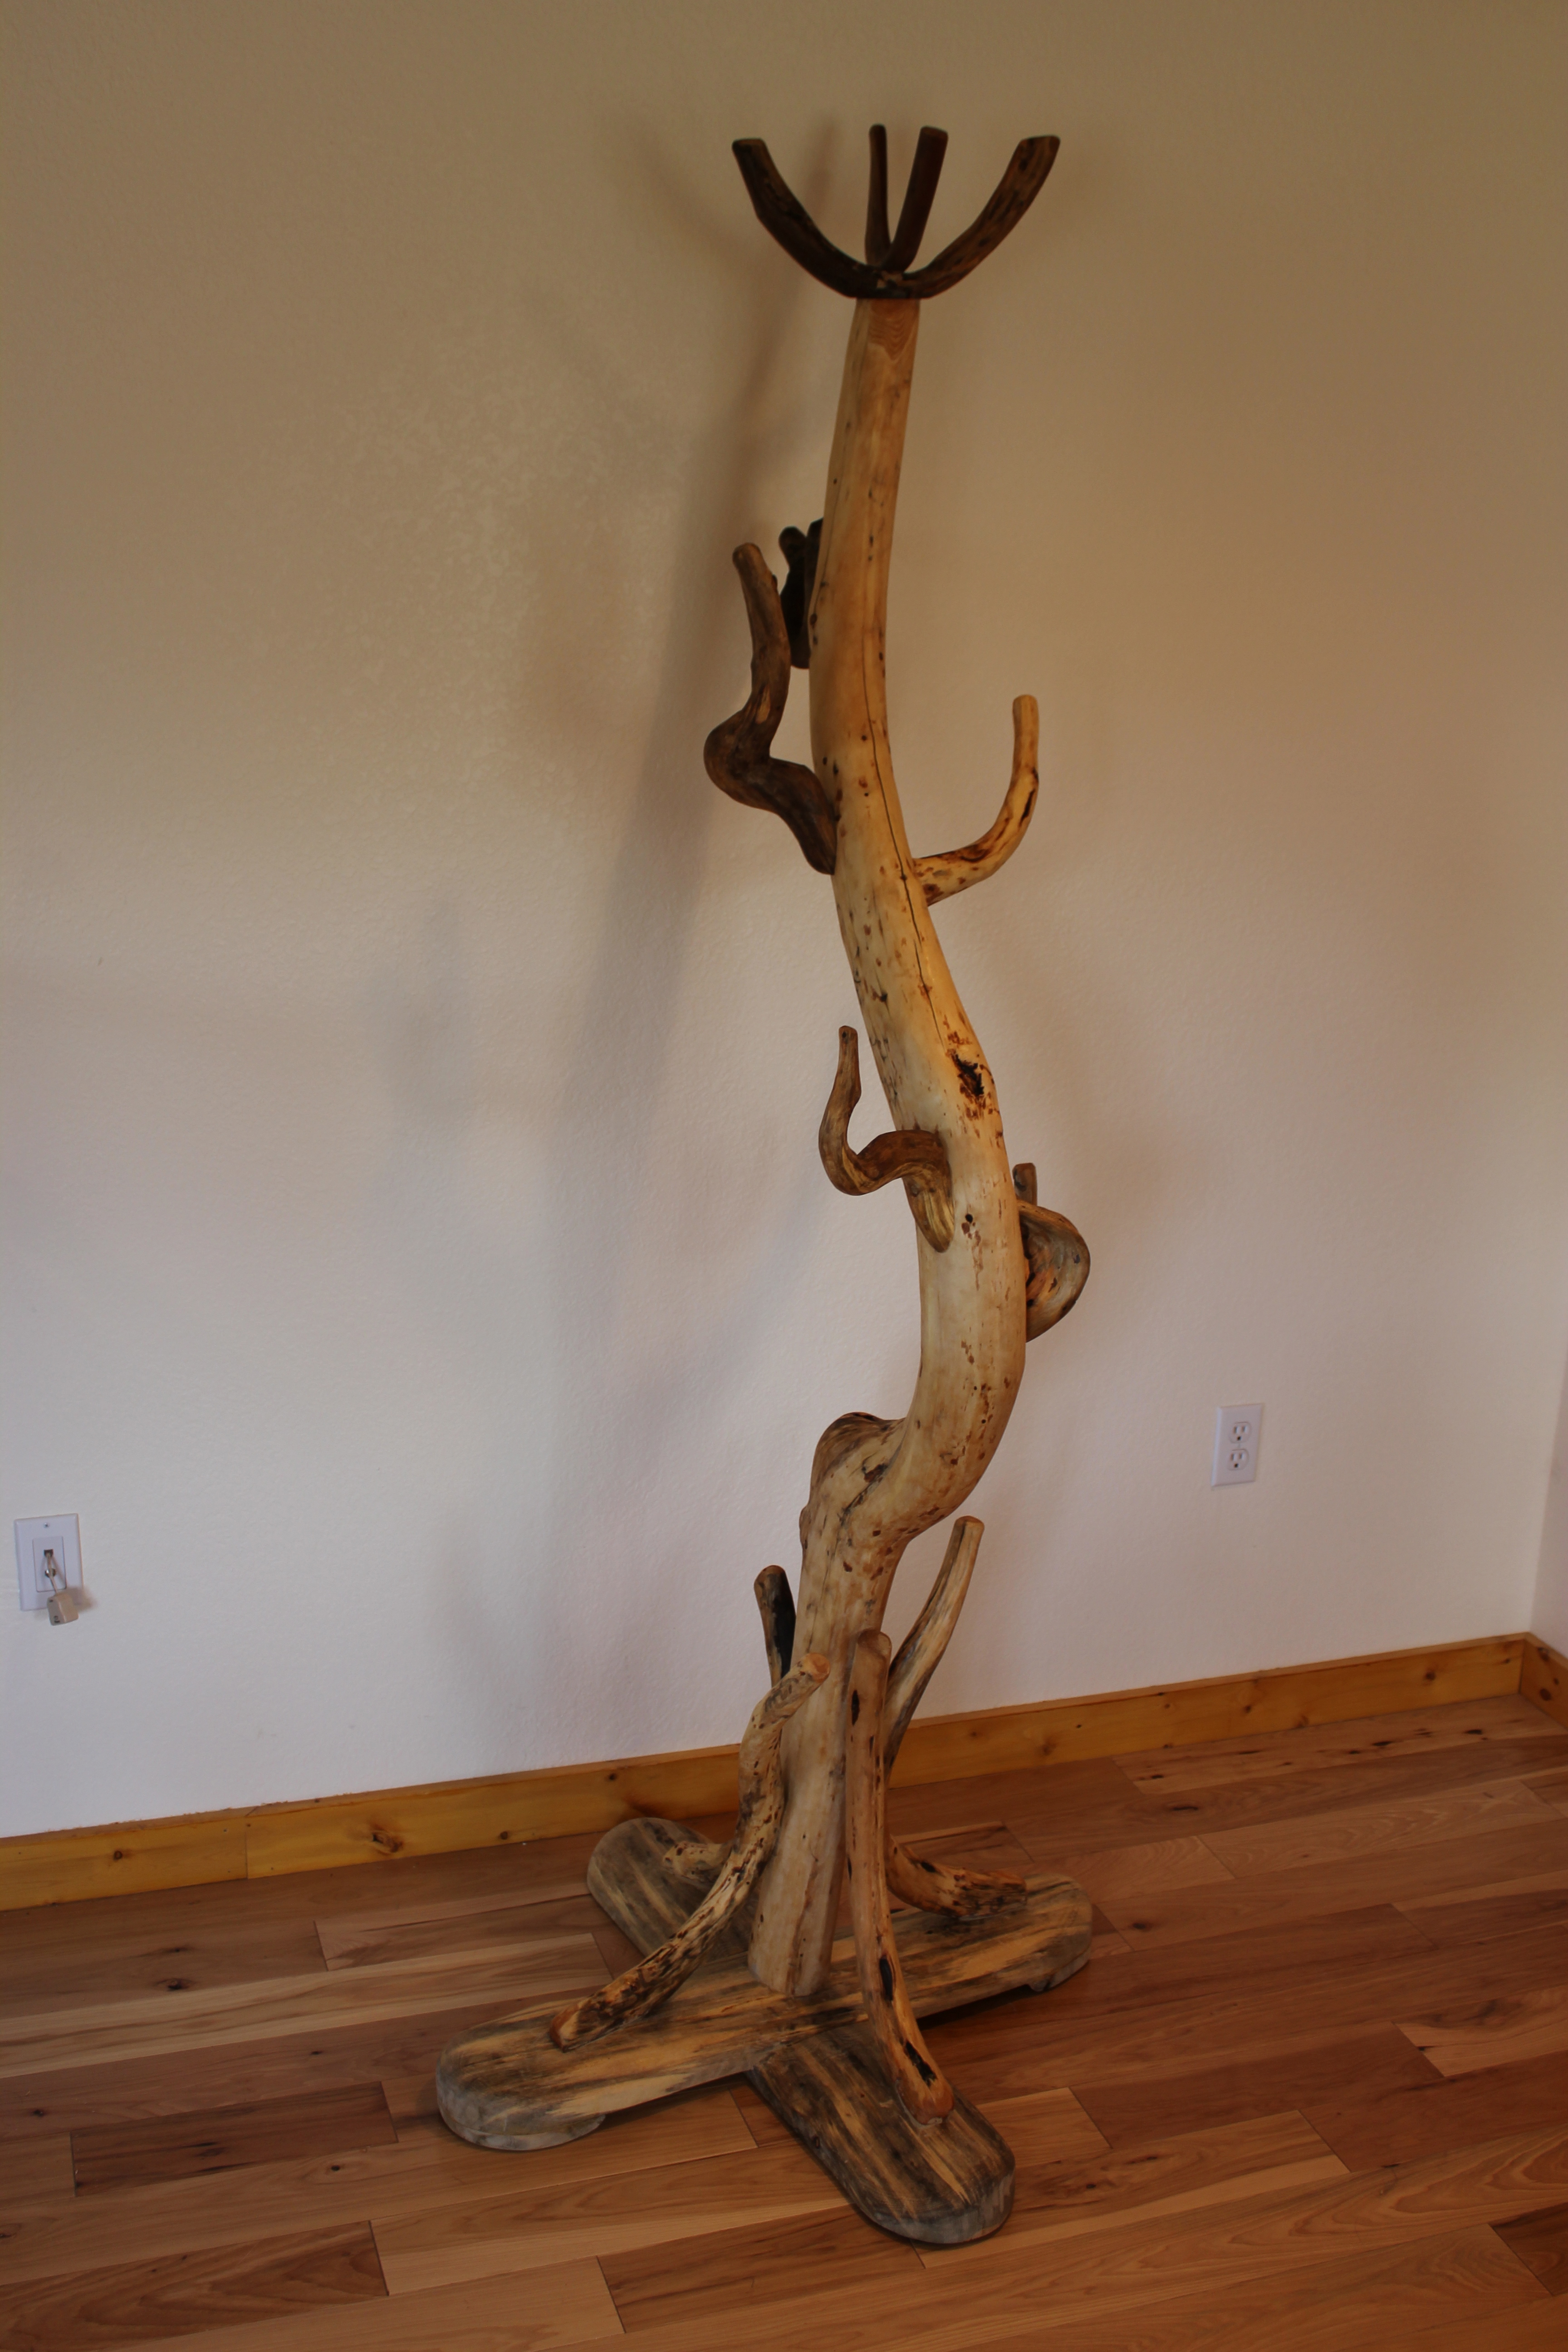
Thirty-two. Another project: coat–hat–boot rack
While the bench project continues, I finished a coat–hat–boot rack for our own family use.
The height is over six feet. Except for the two slab pieces of the base, the rack combines twelve lodgepole pine tree trunks (and limbs?). The large central tree is a “swan’s neck,” my favorite contorted lodgepole pine motif. All of the hooks were “mate-cut” to fit flatly and tightly to the central tree, and joined with trim head Torx screws. I’ve included two close-ups of the joinery, that also show insect activity and other “character traits.”
No stains were used. The different colors result from aging, weathering, and insect activity. The finish is natural Watco Danish Oil.
It is rare that we get to keep any of my tree art, and especially pleasing to me because I like this piece a lot, both for its appearance and its usefulness to our family.


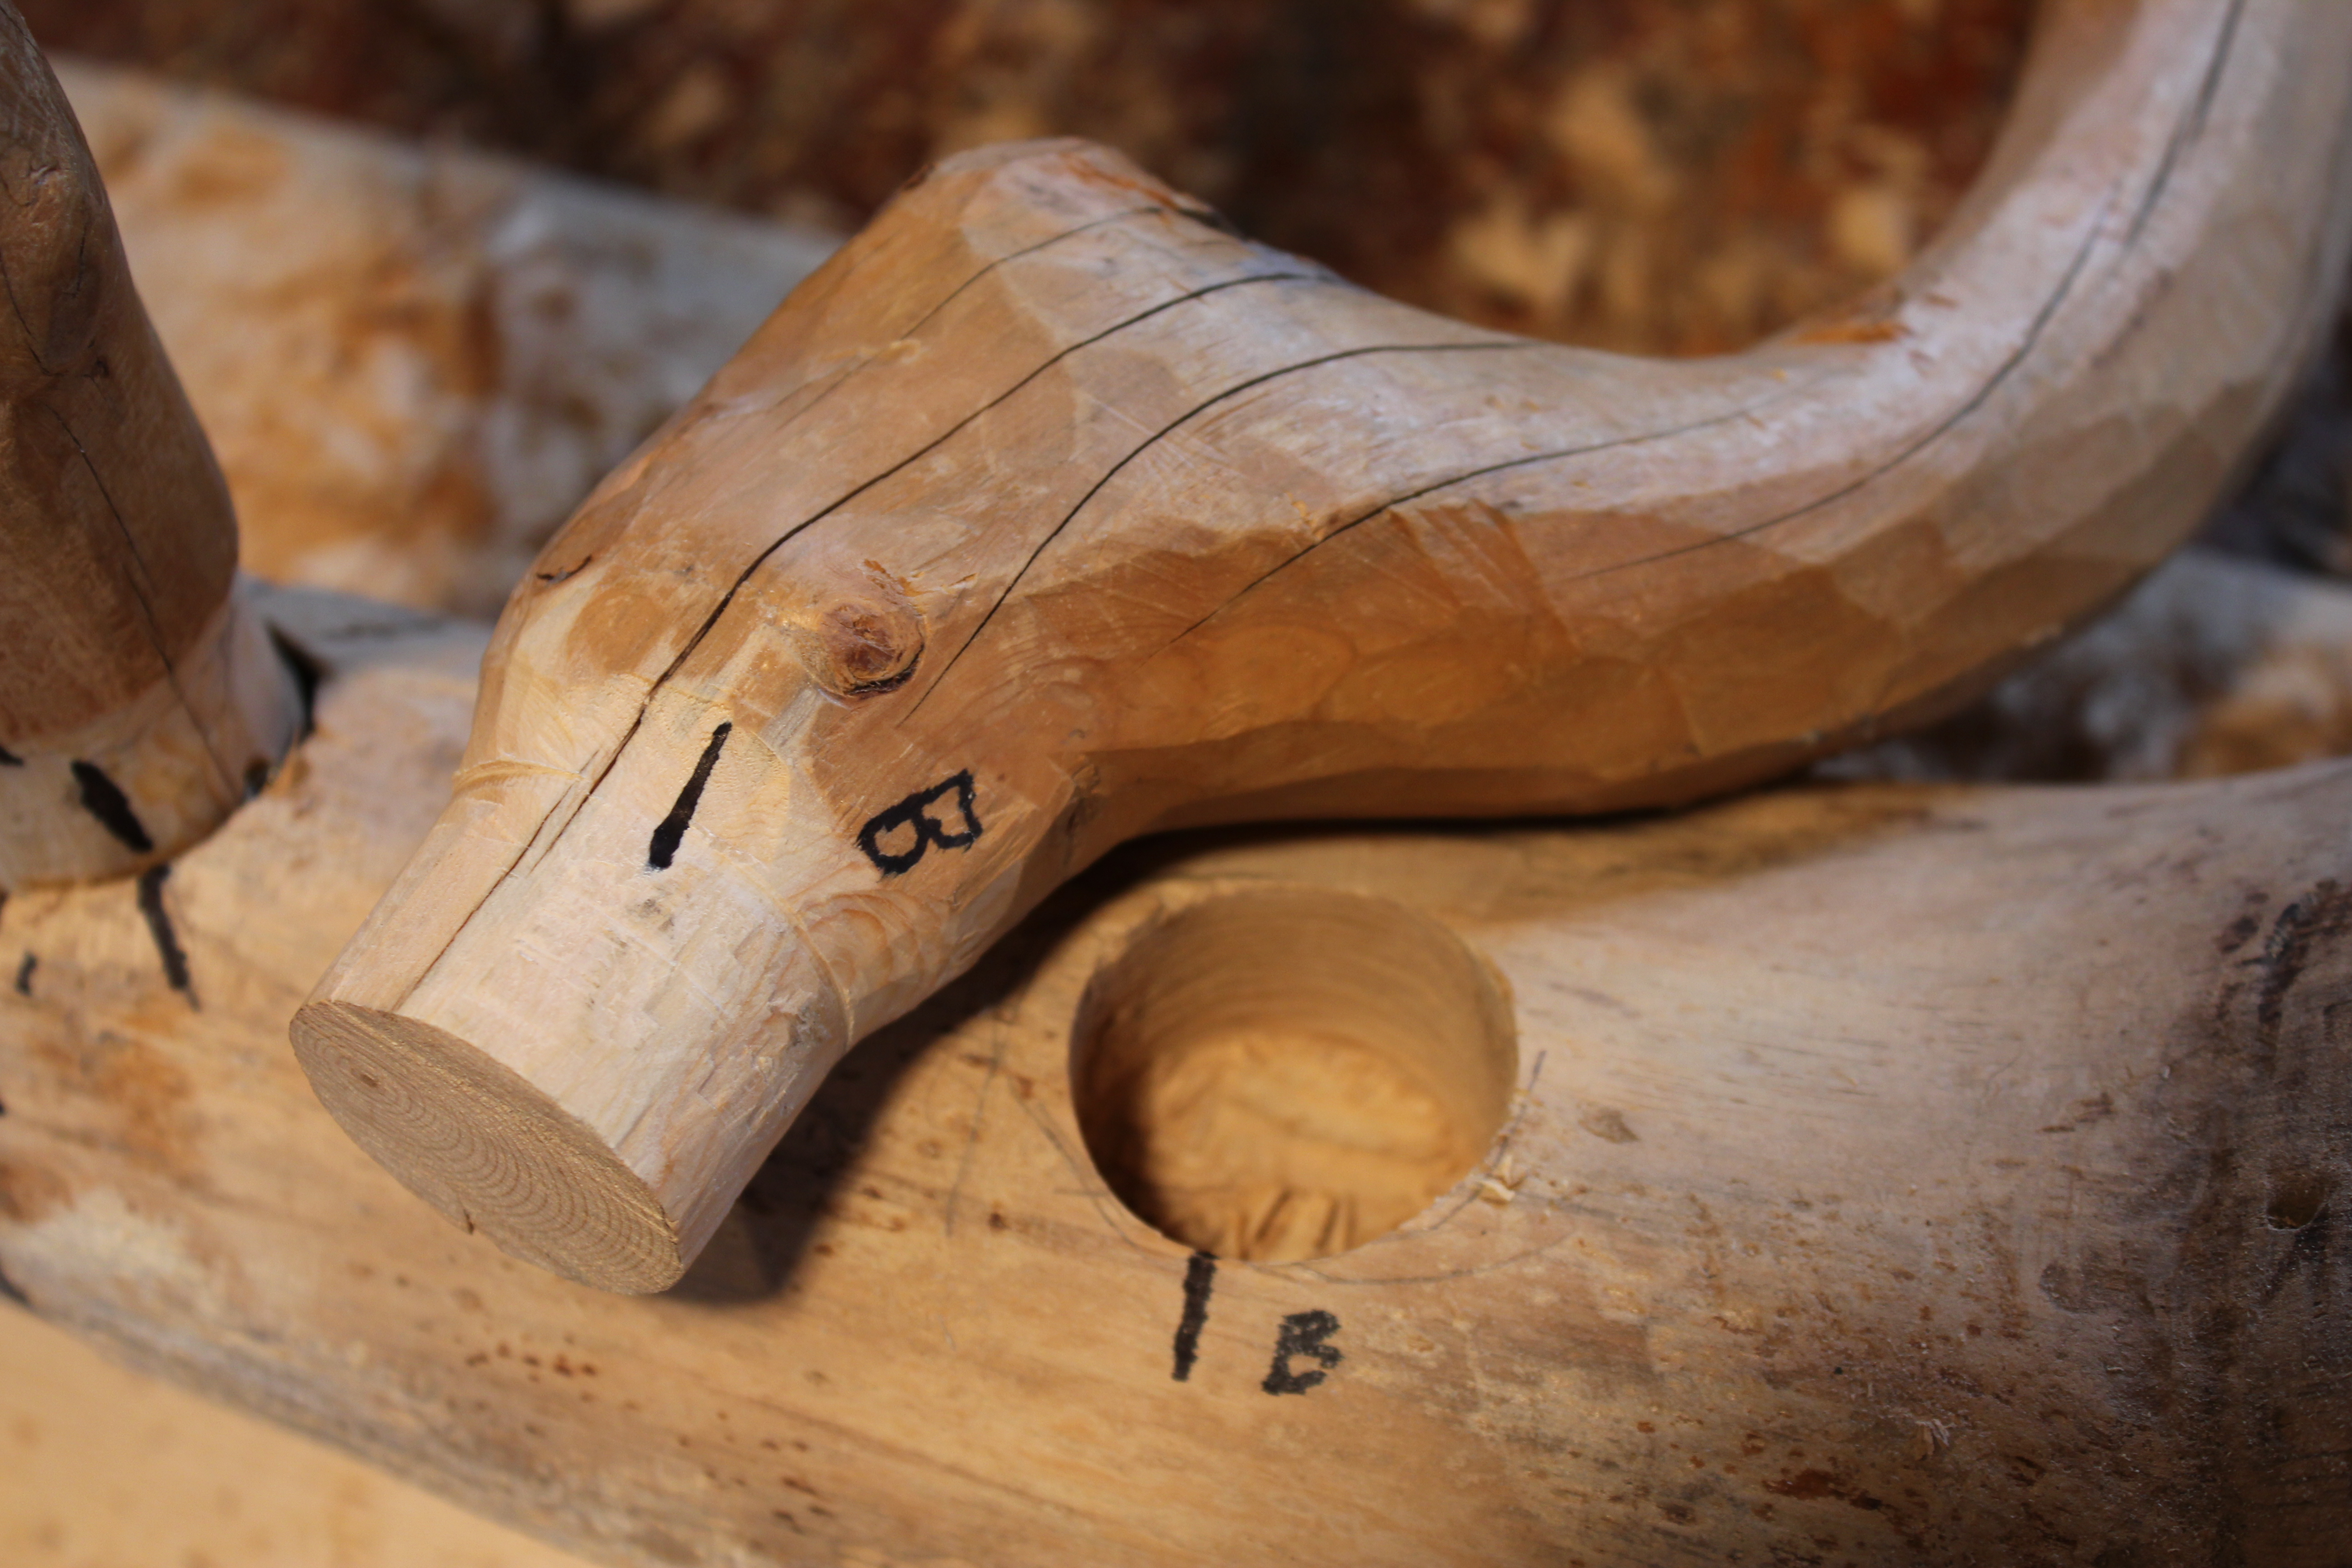
Thirty-one. Joining the front legs with an “ox-bow” stretcher
Throughout the designing and making of this bench, I’ve used trees prepared for use, but not used, in other furniture projects. The “ox-bow” is a tree art motif I identified many years ago, and the ones in these photos were drawknifed and sanded long ago. I brought a selection of them up from the workshop. I’ll use two as stretchers, one between the two front legs and one between the two back legs.

The one I selected for the front stretcher is laid in place for marking its length. The one on the bench seat will probably be used in the back. The front legs are temporarily screwed in place.
The stretcher is marked twice. One mark is for overall length and the other for the shoulder cut of the tenon. The”R” is to label the right end the stretcher.

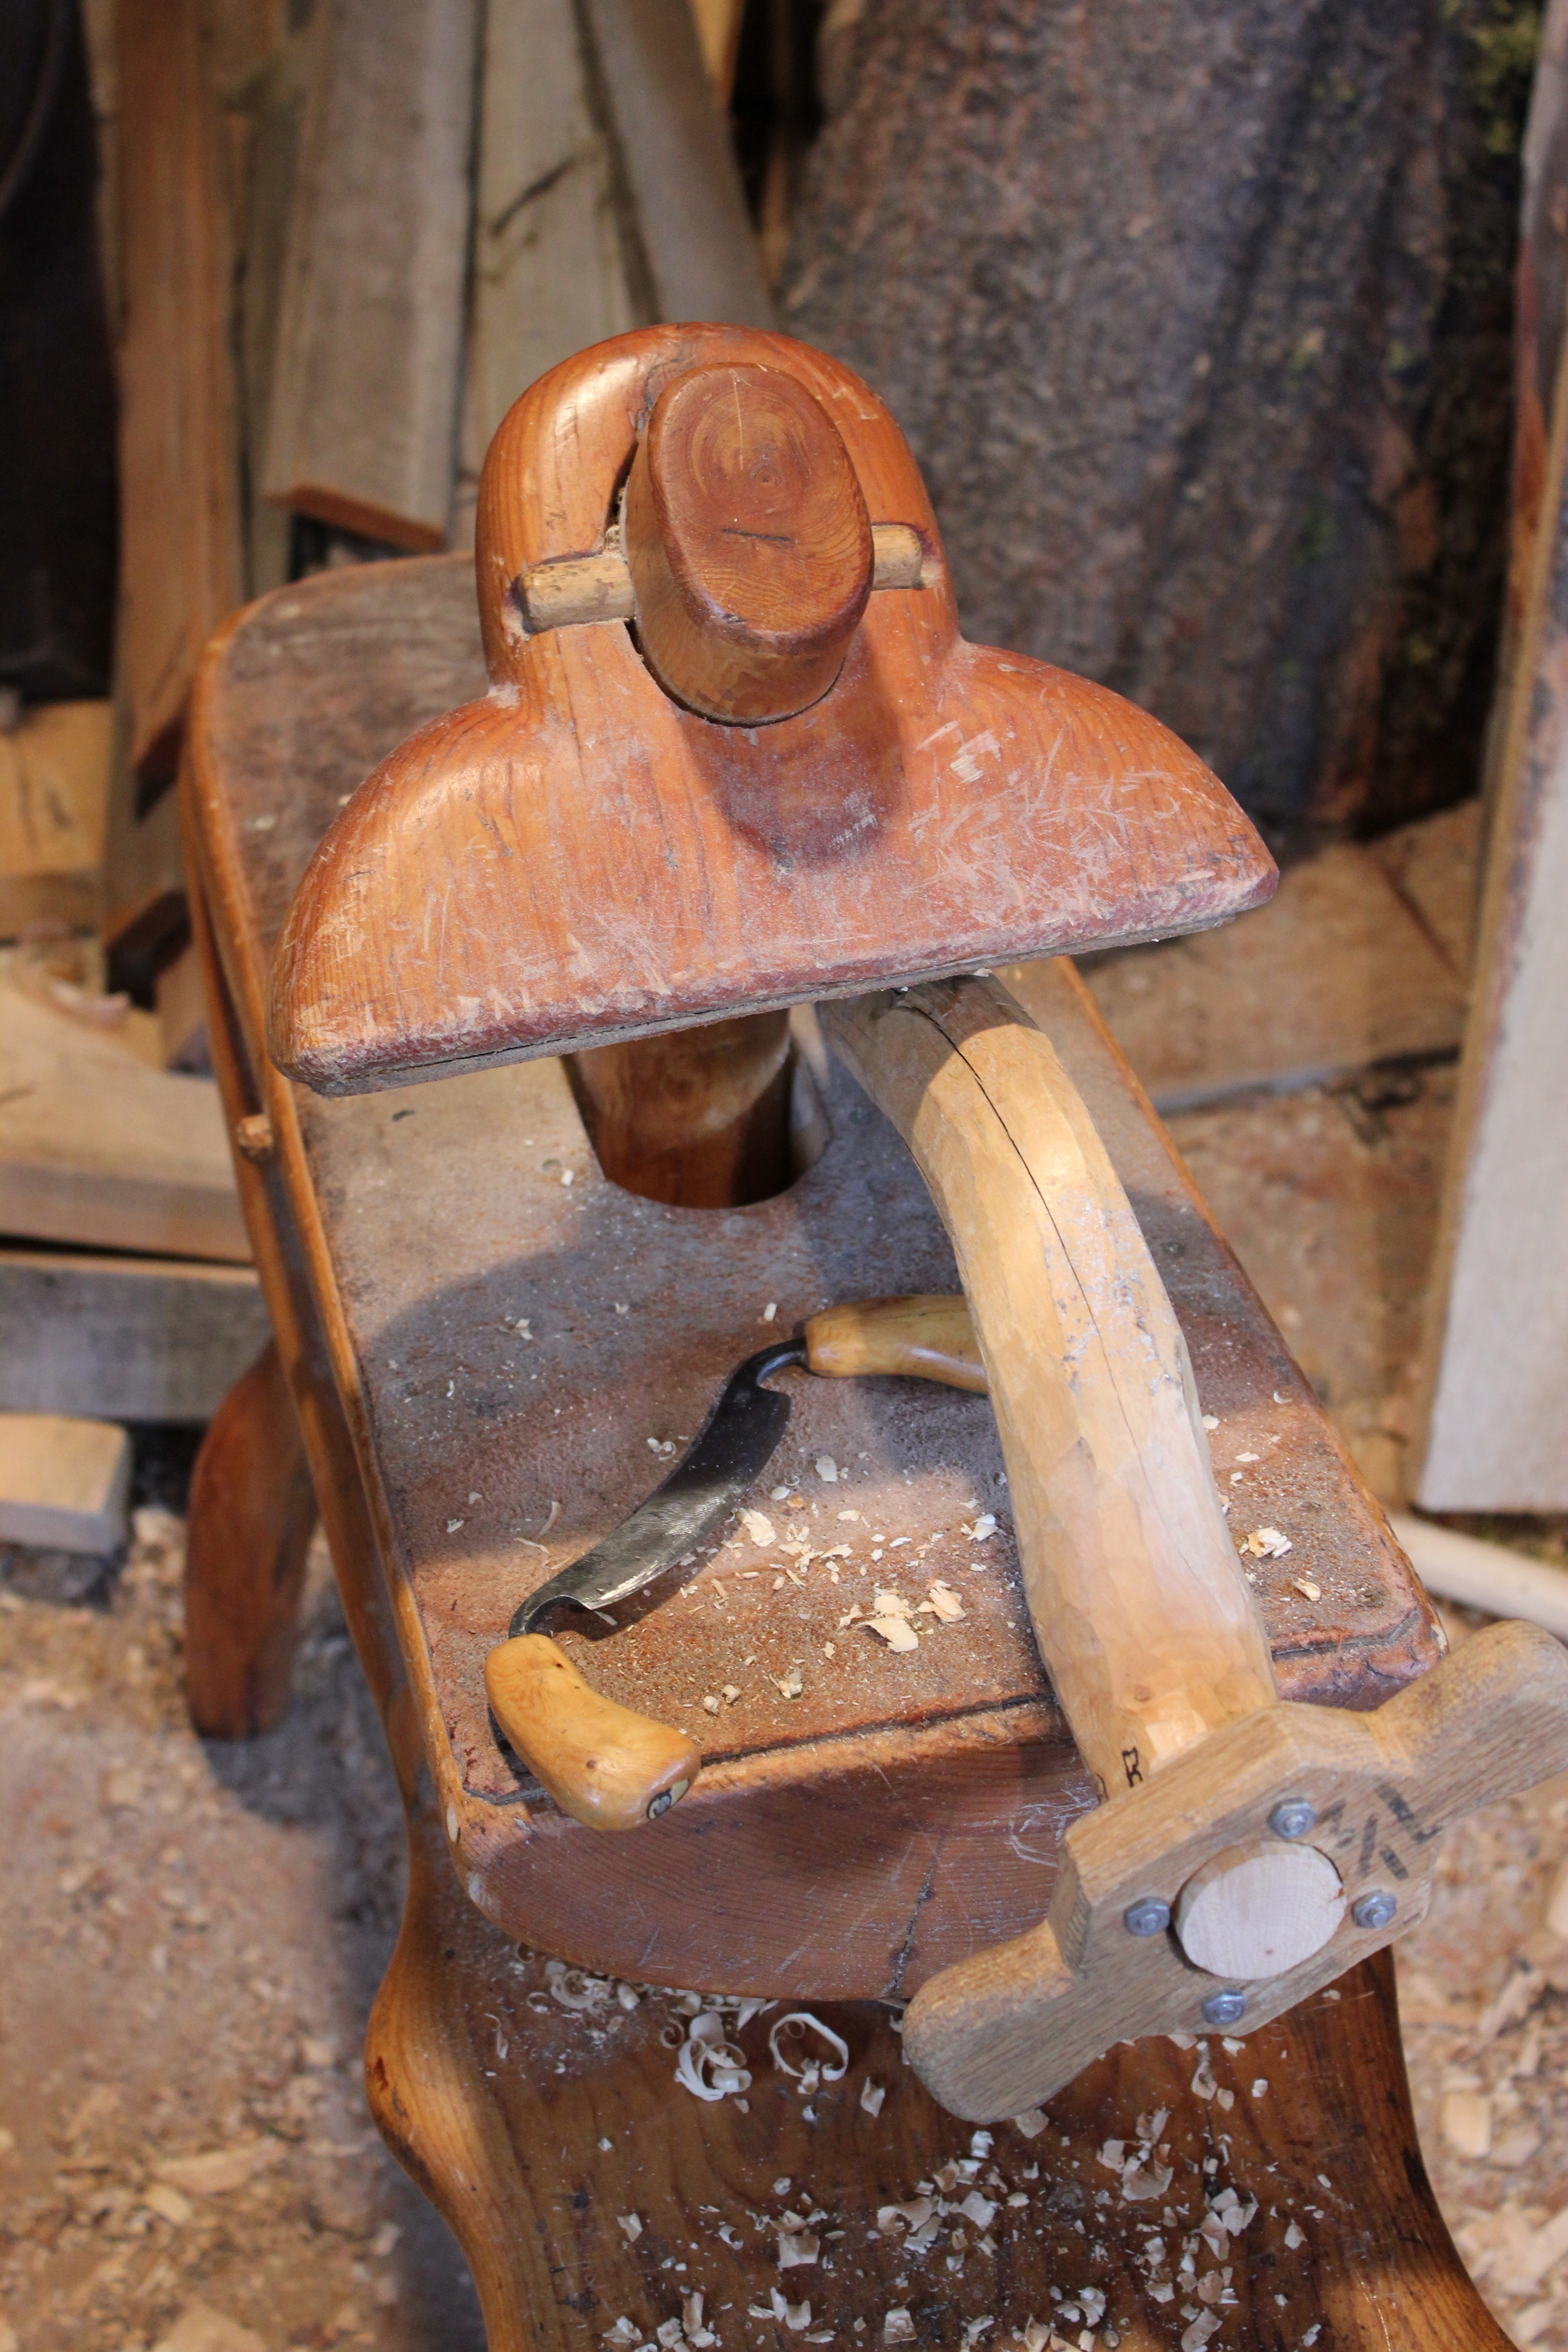
I’ve taken the stretcher down to the shop, placed it in the shaving horse, and marked both the diameter and length of the tenon.
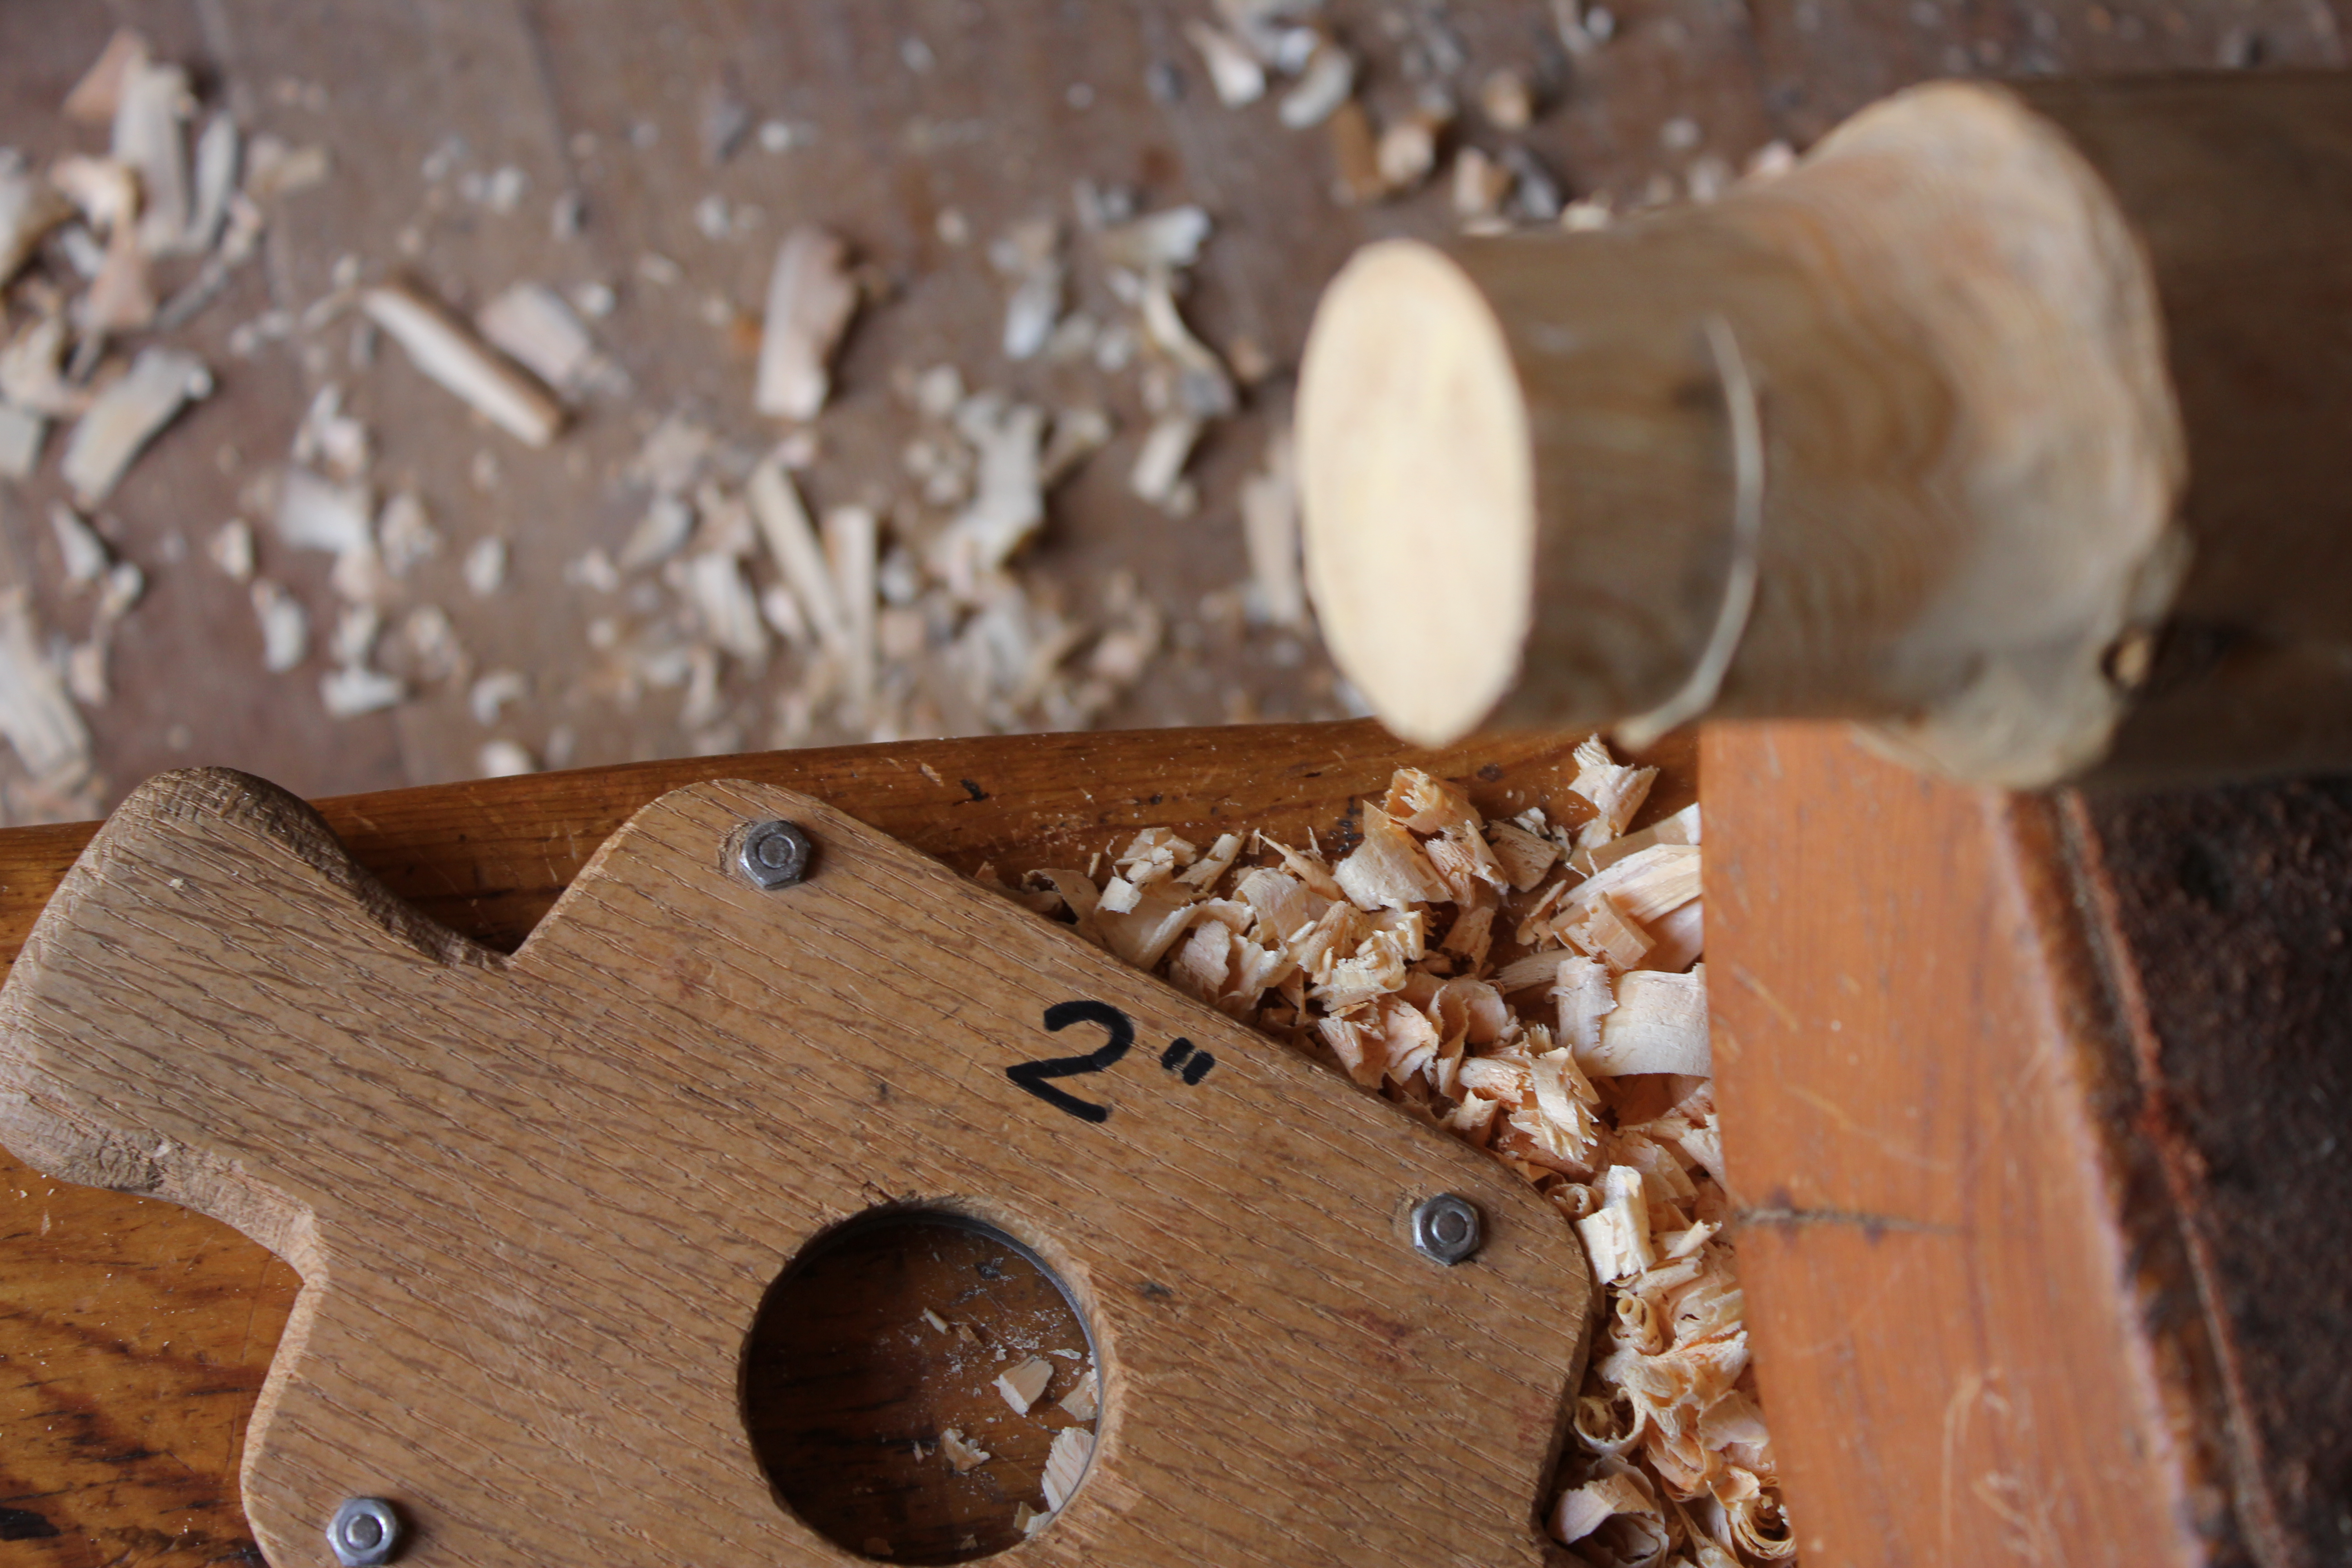
In 1992, I made a set of sizers of my own design, with different diameters, as an important part of hand-cutting tenons. Here I’m using a 2″ diameter sizer. I start the sizing by cutting the end down to the circle guideline with a drawknife. As the sizer starts to fit over the end and is rotated back and forth, its steel plate leaves a ridge on the tenon to show where more drawknifing is needed. The ridge shows in this photo. The goal is to make a truly round and cylindrical tenon all the way up to its shoulder. I have never used any kind of power tool, “production” tenon cutter.

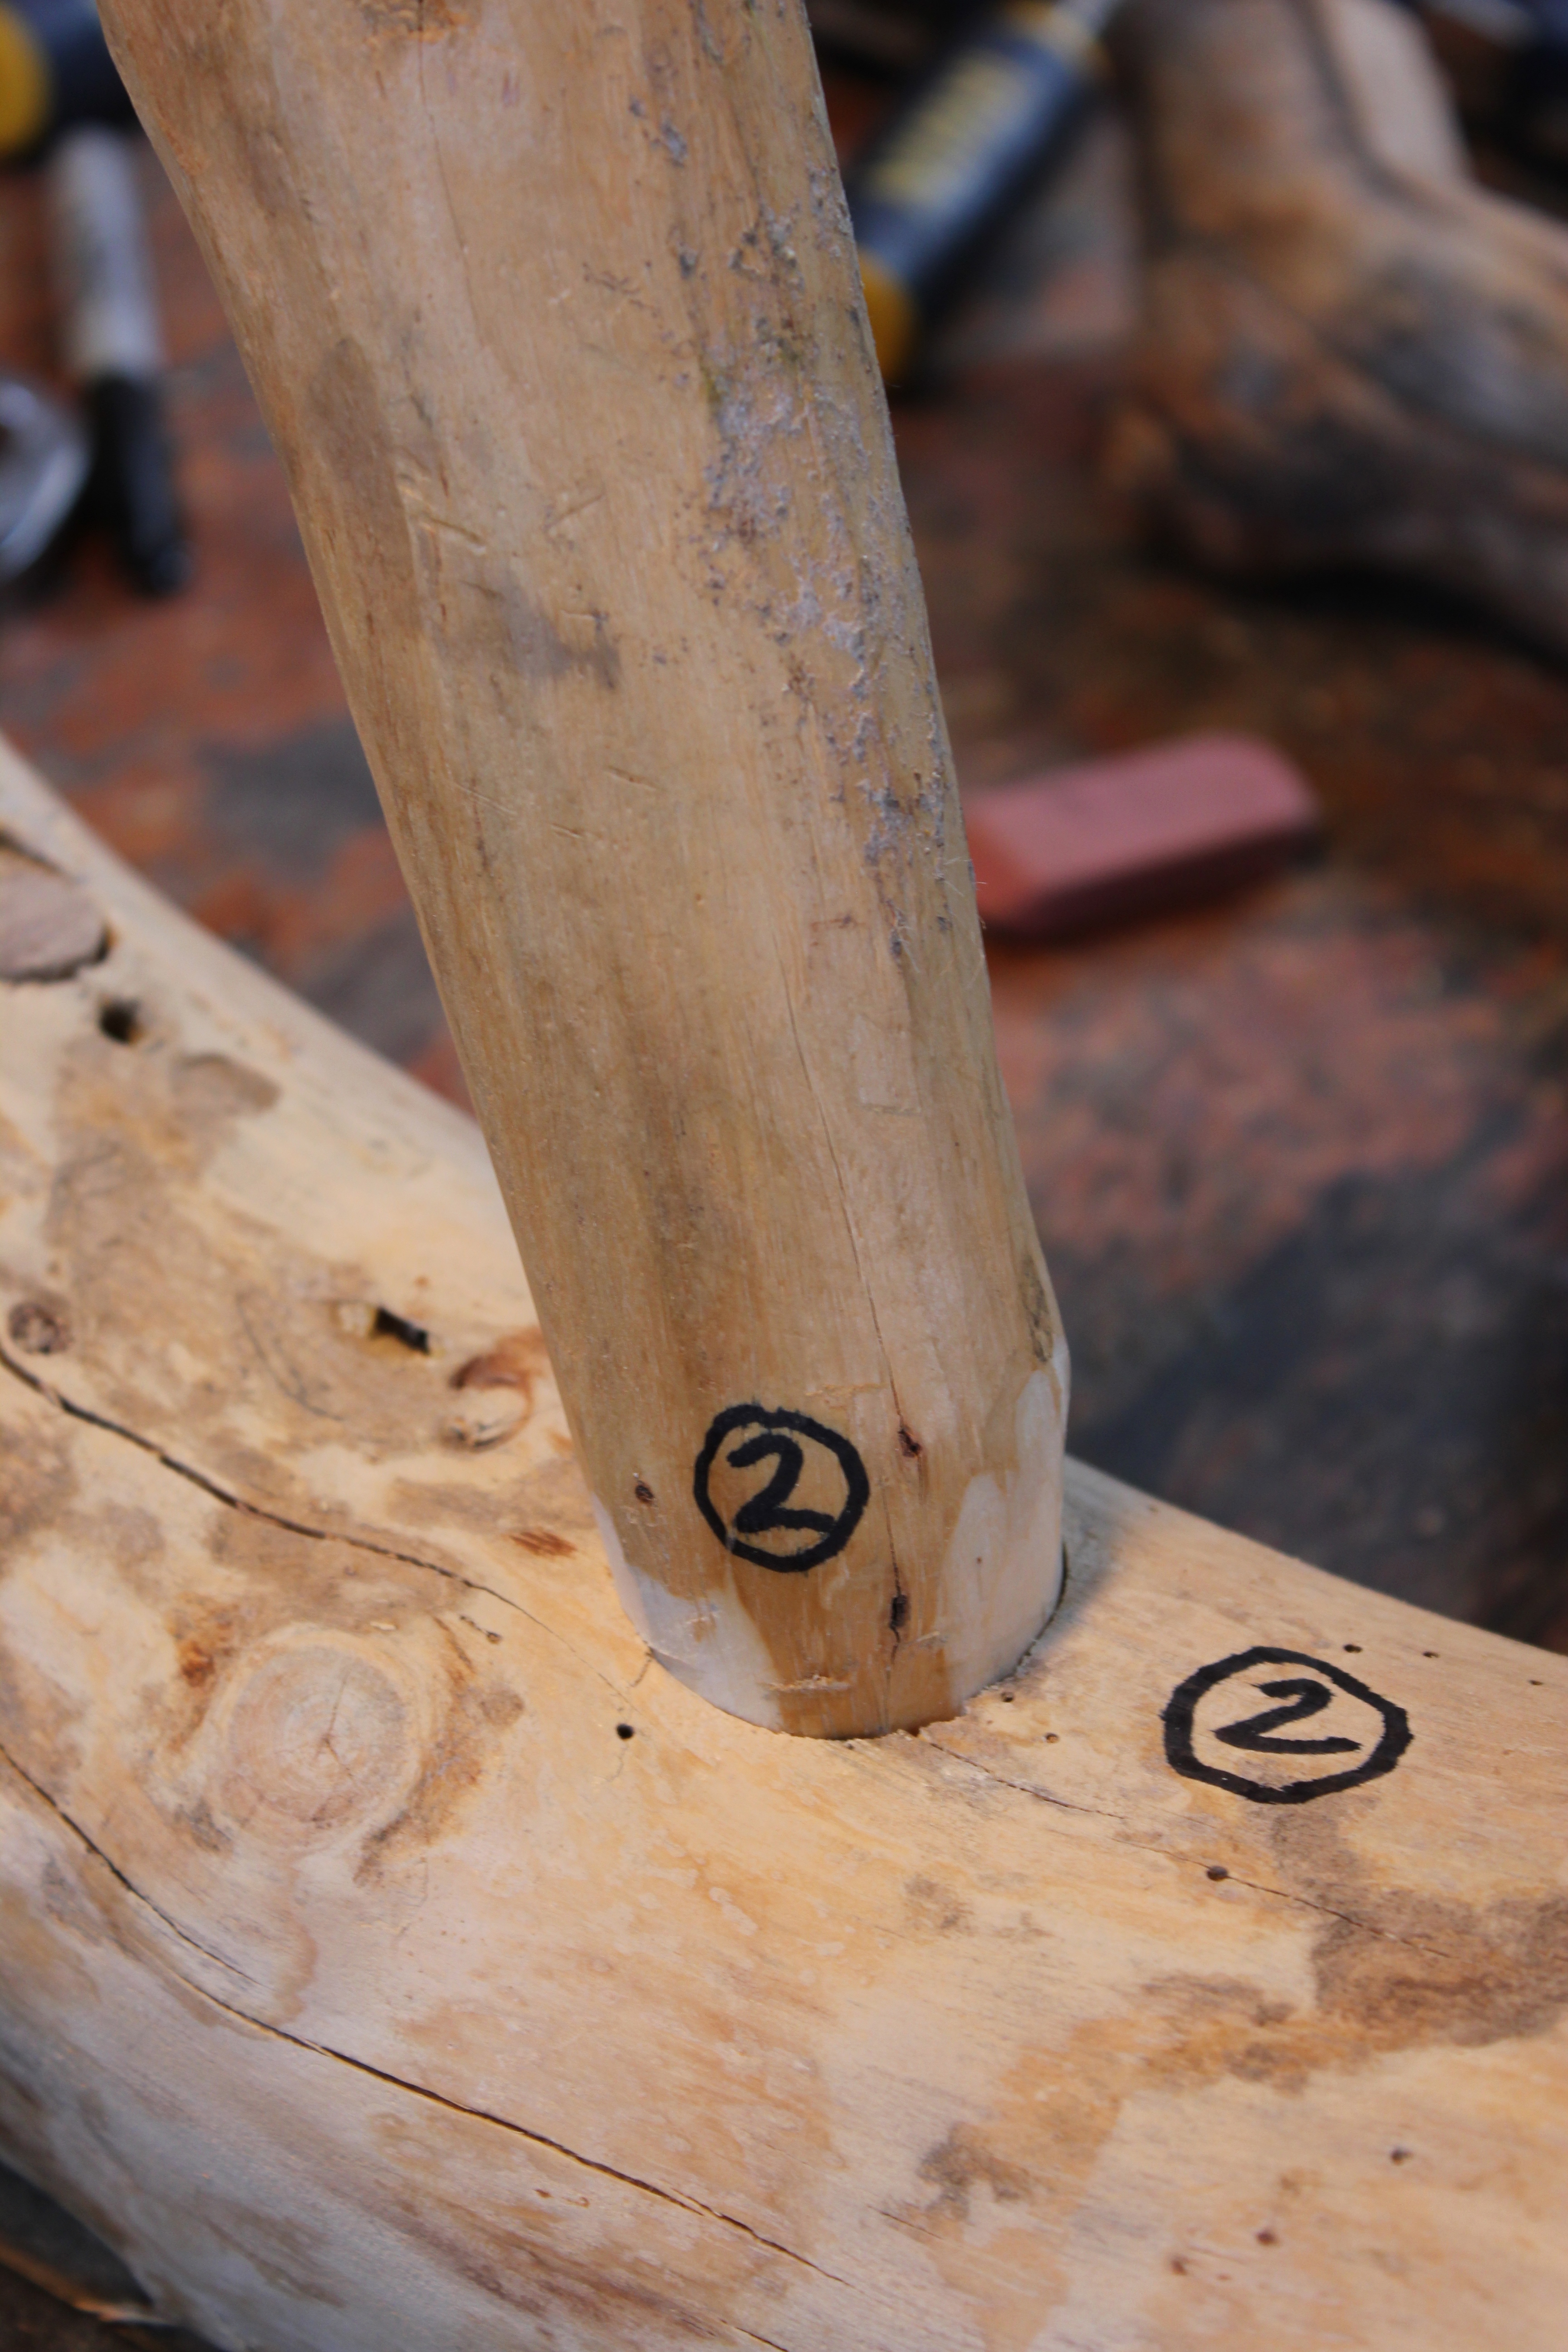
It’s tricky to get the right horizontal alignment on the drilling angle of the mortises. Because the ox-bow stretcher is not straight, the heights of the holes and the drilling angles have to matched to each end the ox-bow and to its overall shape. One mortise is 2′ in diameter; the other is 2 1/2″. I drilled them using a combination of a Forstner bit and a hole cutter.
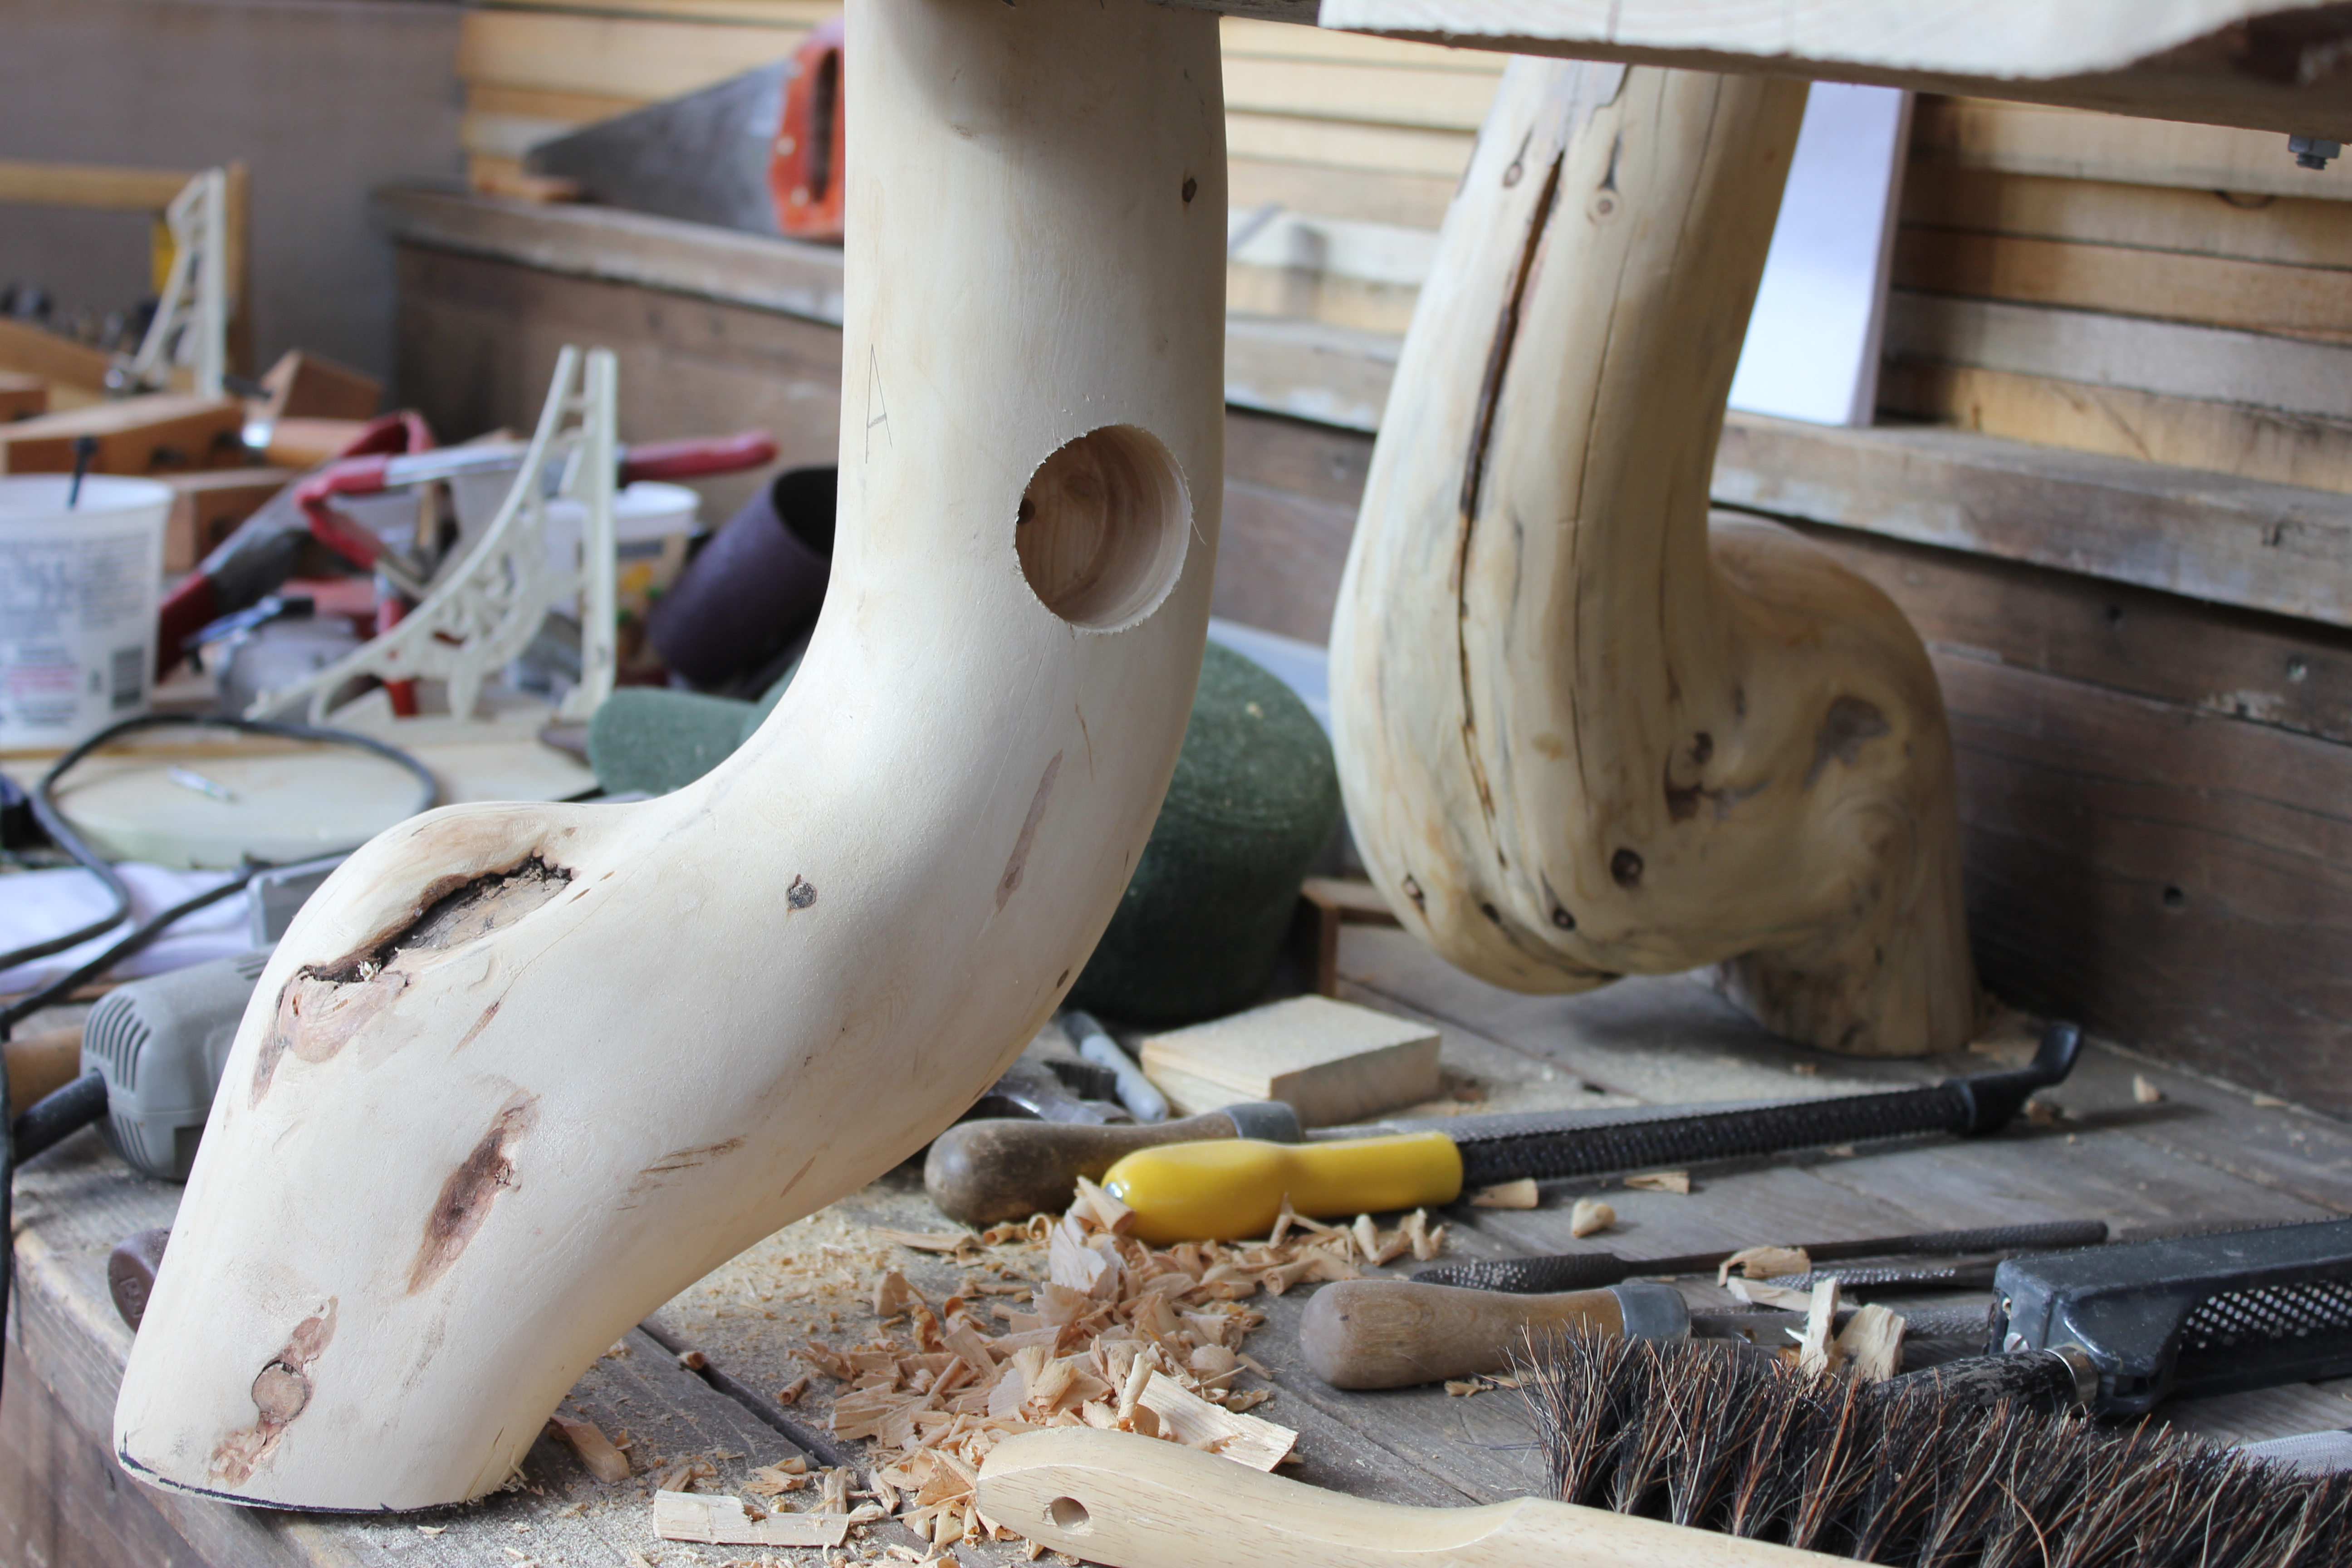
This is the left front leg. Its mortise is 1 3/4 inches higher than the right leg’s mortise, so that the stretcher will be, overall, level and parallel to the bench seat and the floor.

The right leg, with both the mortise and tenon finished, is ready for gluing, clamping, and assembly.

I visually test the shoulder fit and depth of the tenons on each leg.

Because of the number–four–and size of the joints, I appreciated Kristin’s assistance (including taking photos.) I first apply a sizing coat of glue, and then a generous follow-up coat, that actually serves as a lubricant during assembly.

The first step in gluing is to have wet rags ready for clean up. I use my fingers a lot, along with a dowel and glue brush. There’s stress in this phase, so the more preparation (and anticipation of what can go wrong) the better.

It was challenging to use a correct sequence of assembly, and to use the web clamps in a way that pulled the joints in tightly and yet maintained the desired vertical alignment and visual flare of the legs. Kristin prevented a huge problem by pointing out the the ox-bow was not vertical and needed to be twisted upright.
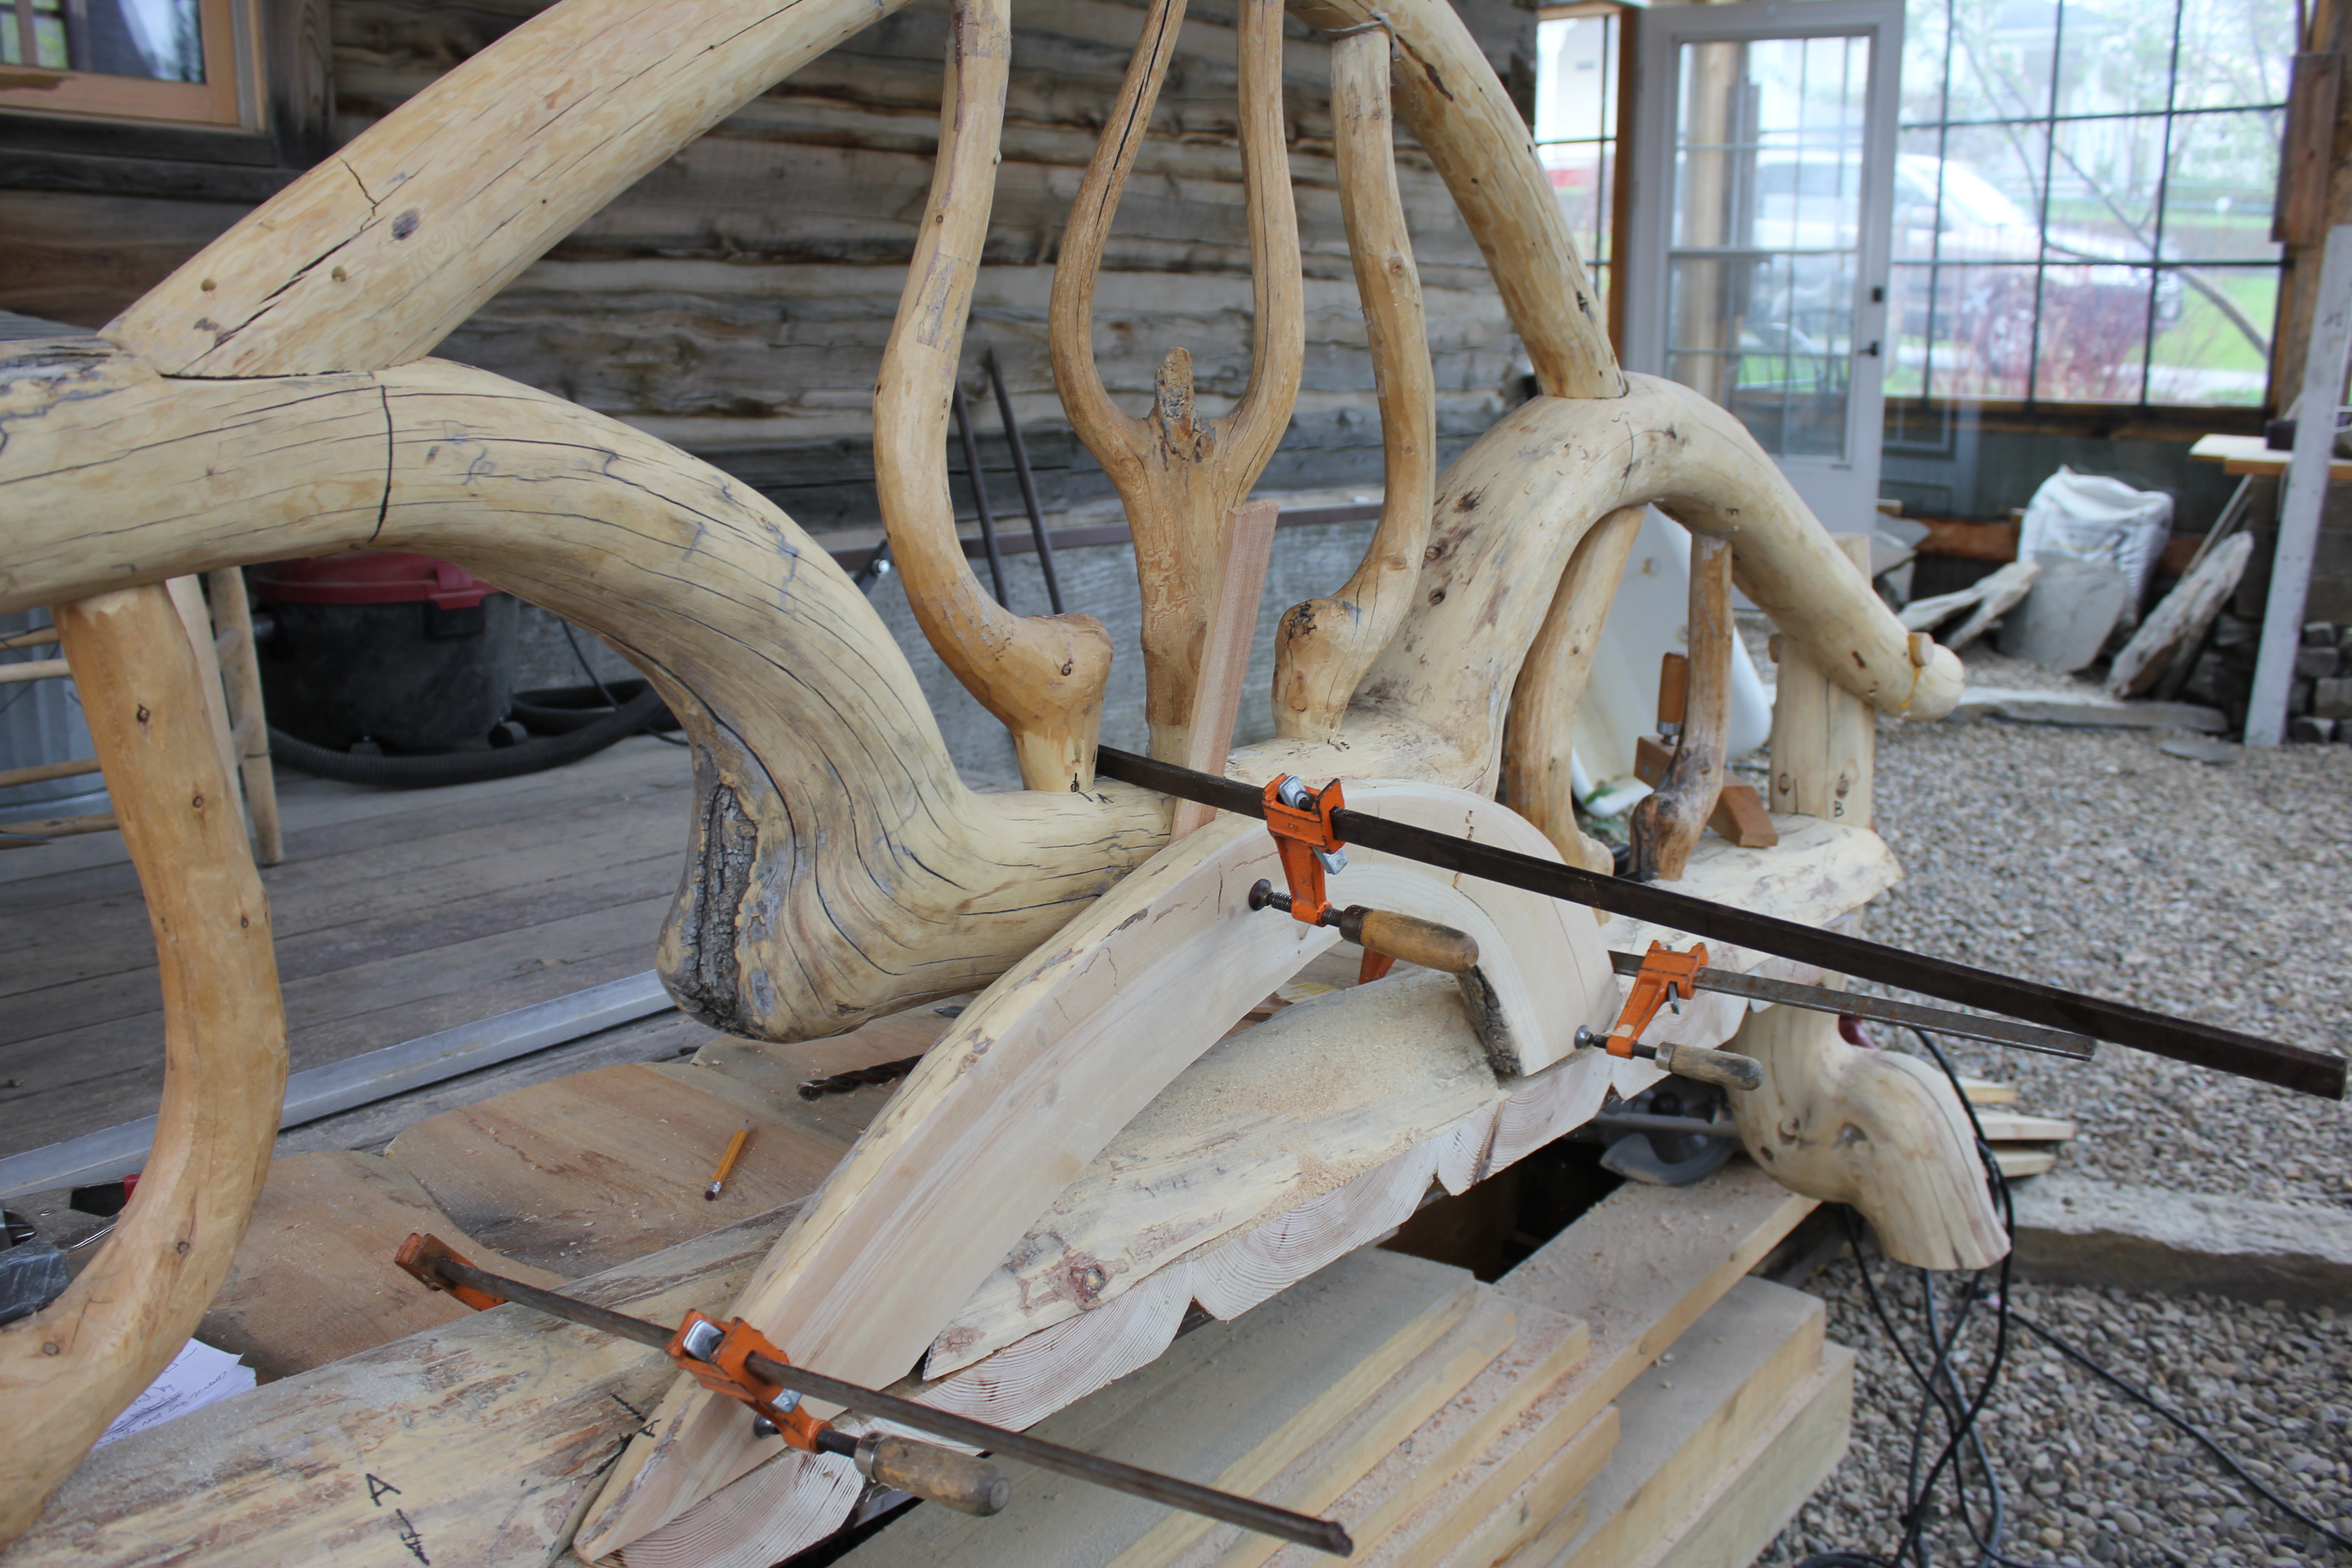
Thirty. Joining the front legs to the bench seat
The design of this bench is experimental and evolving step-by-step. I have a basic idea of adding wide slab armrests to the top of the front posts, which are much longer at this stage than they will be when I start working on the arm rests. For now, the challenge is tightly fitting each leg into a cut-out in the bench seat.

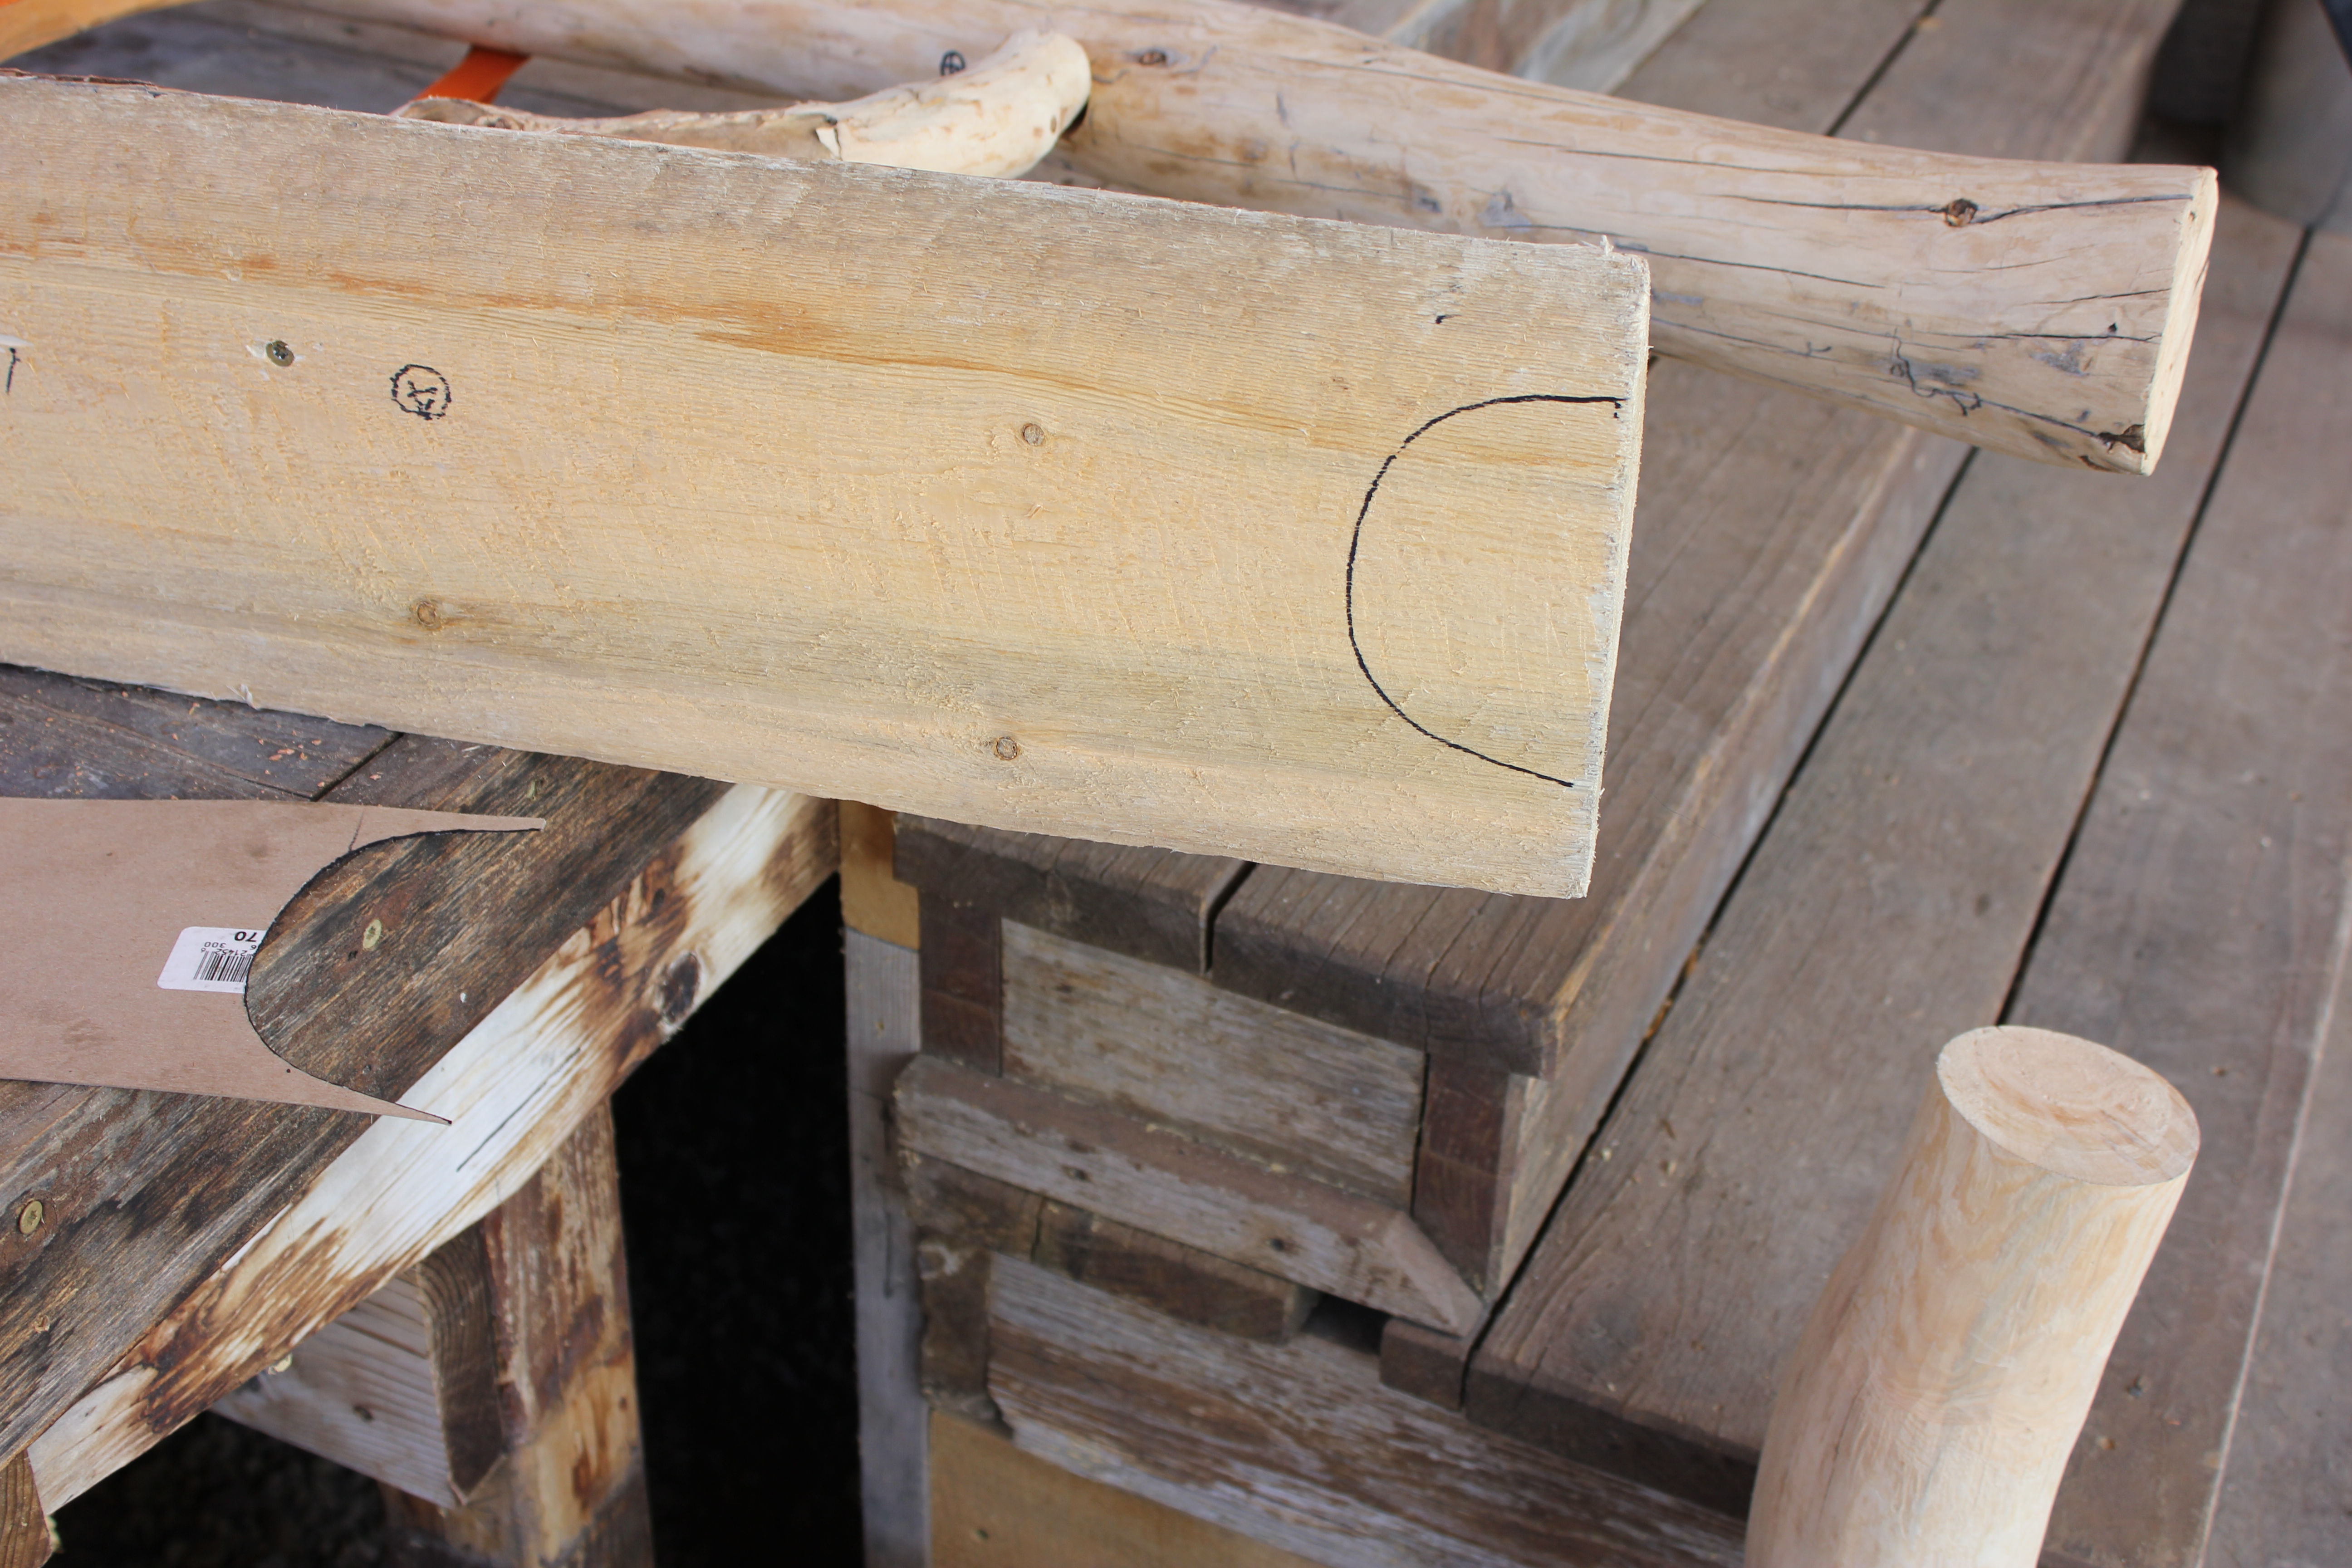
I first marked and cut out a poster board pattern. The leg is marked for realignment.

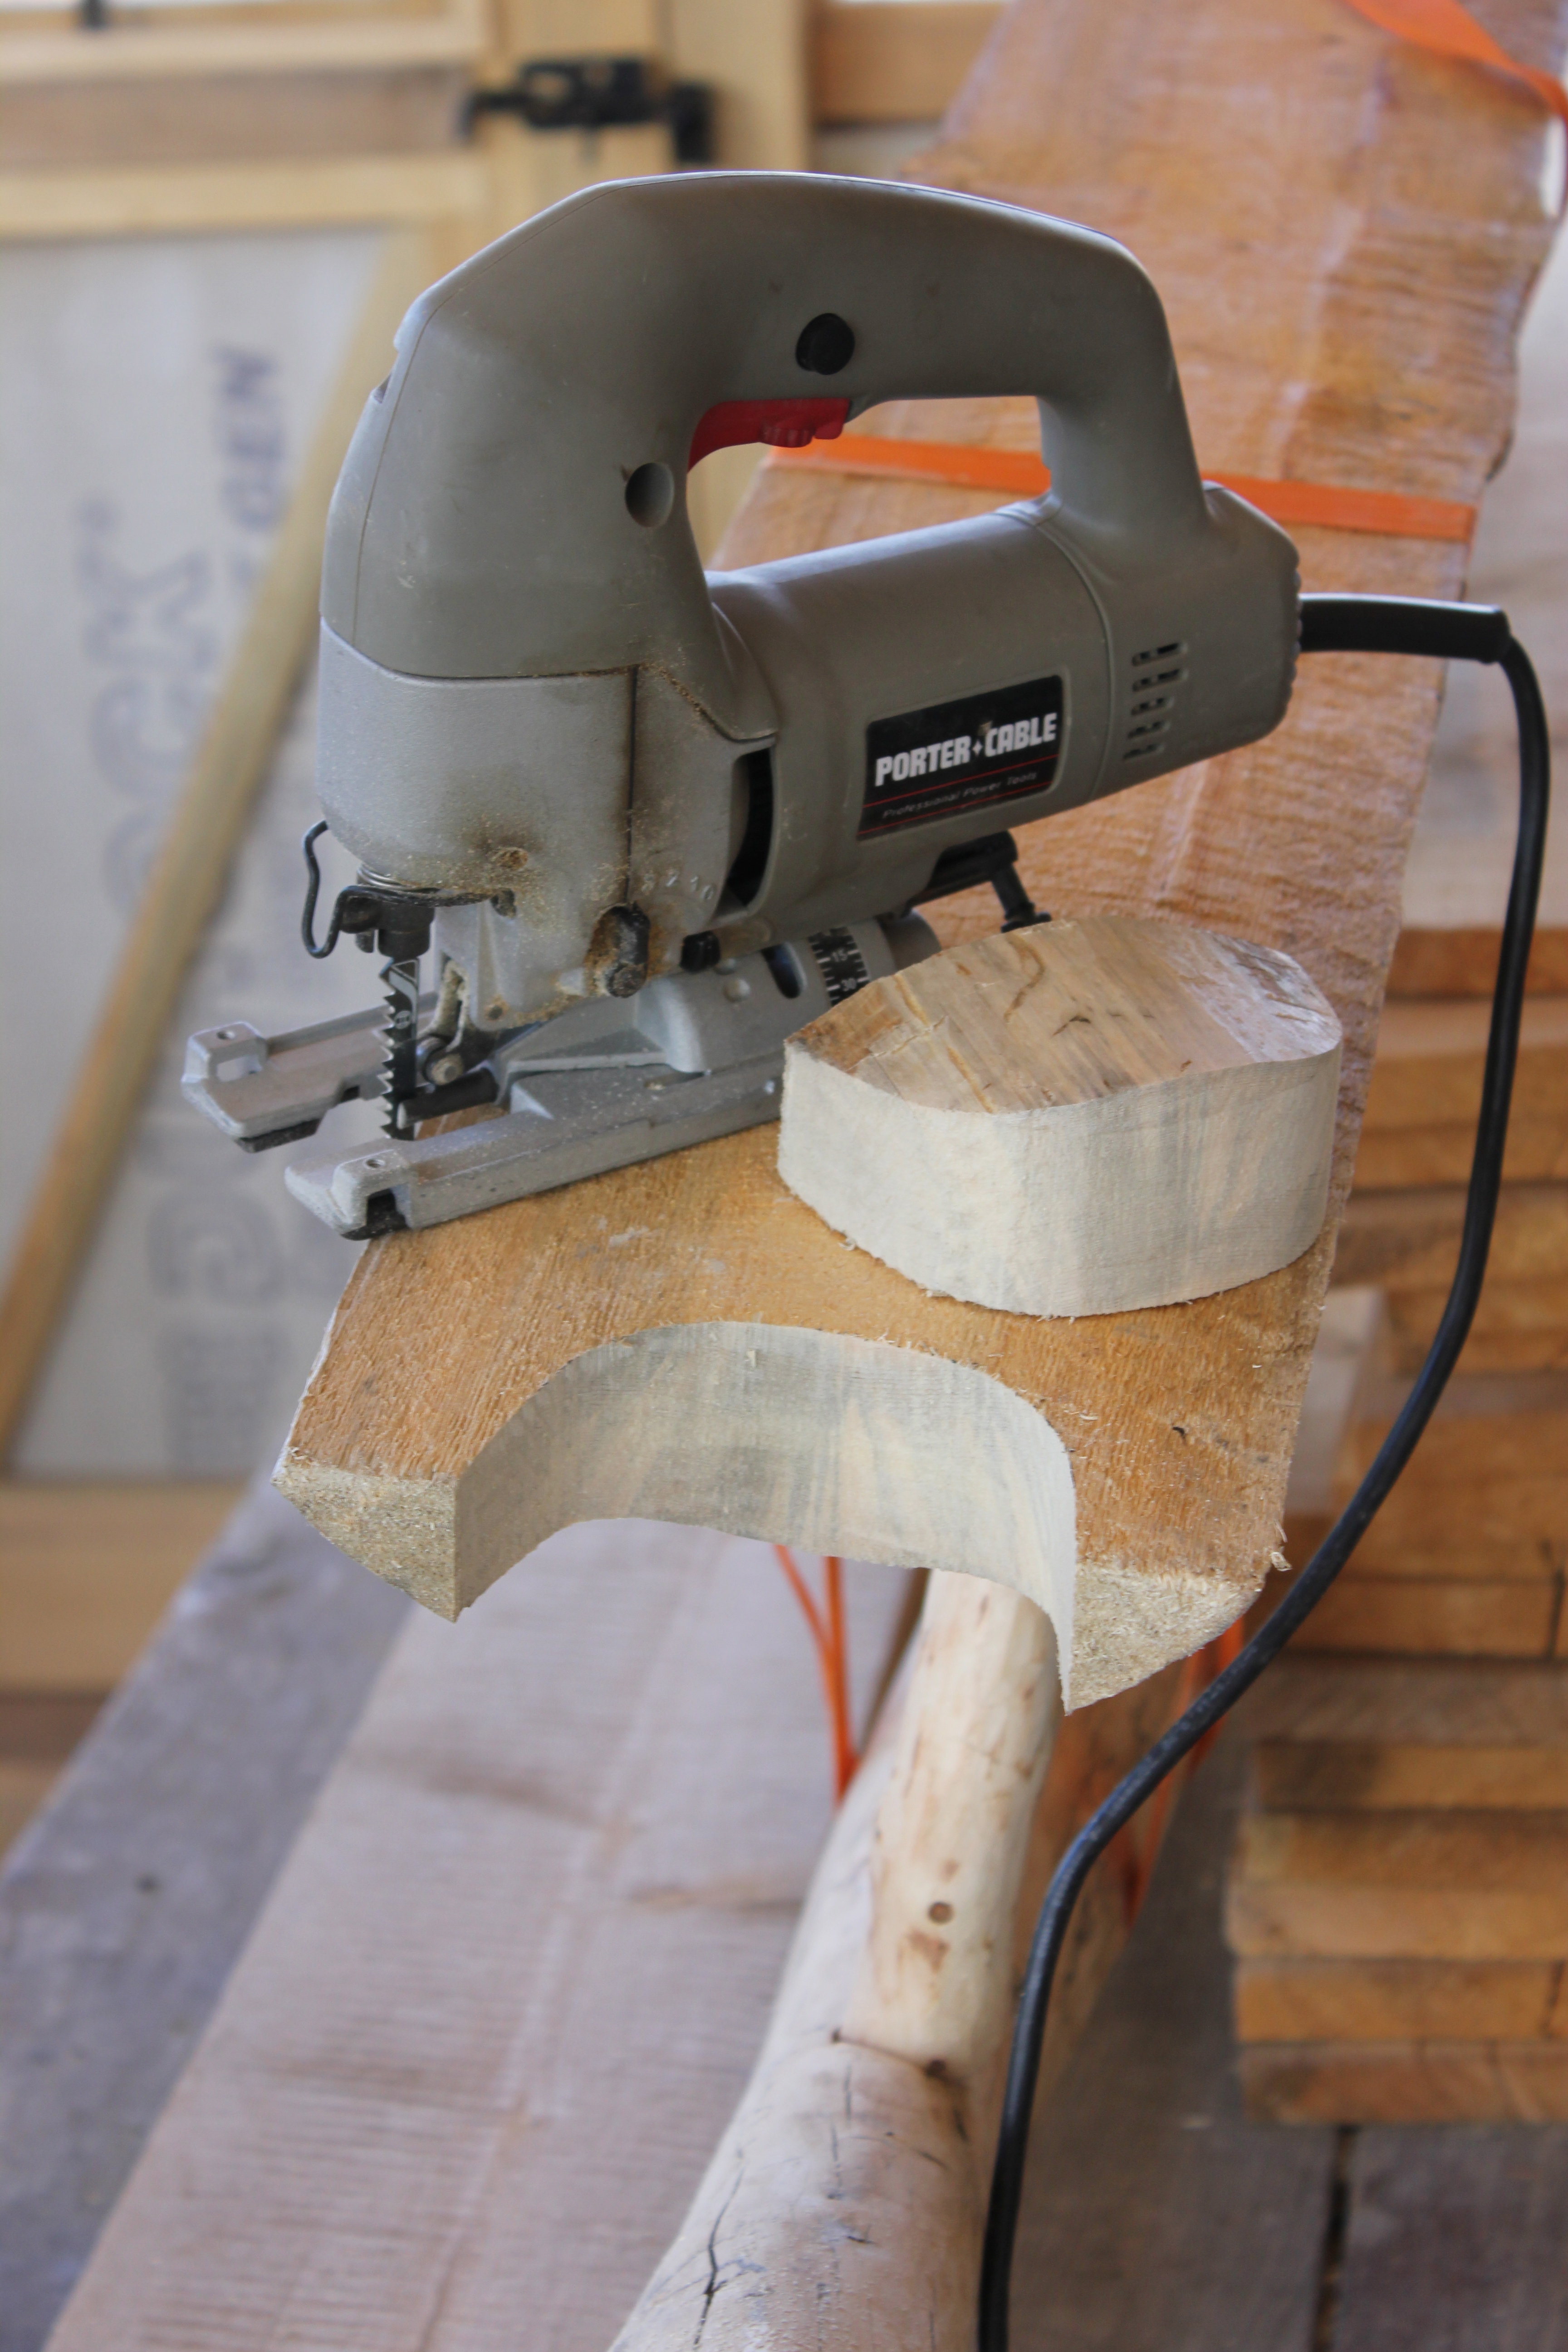
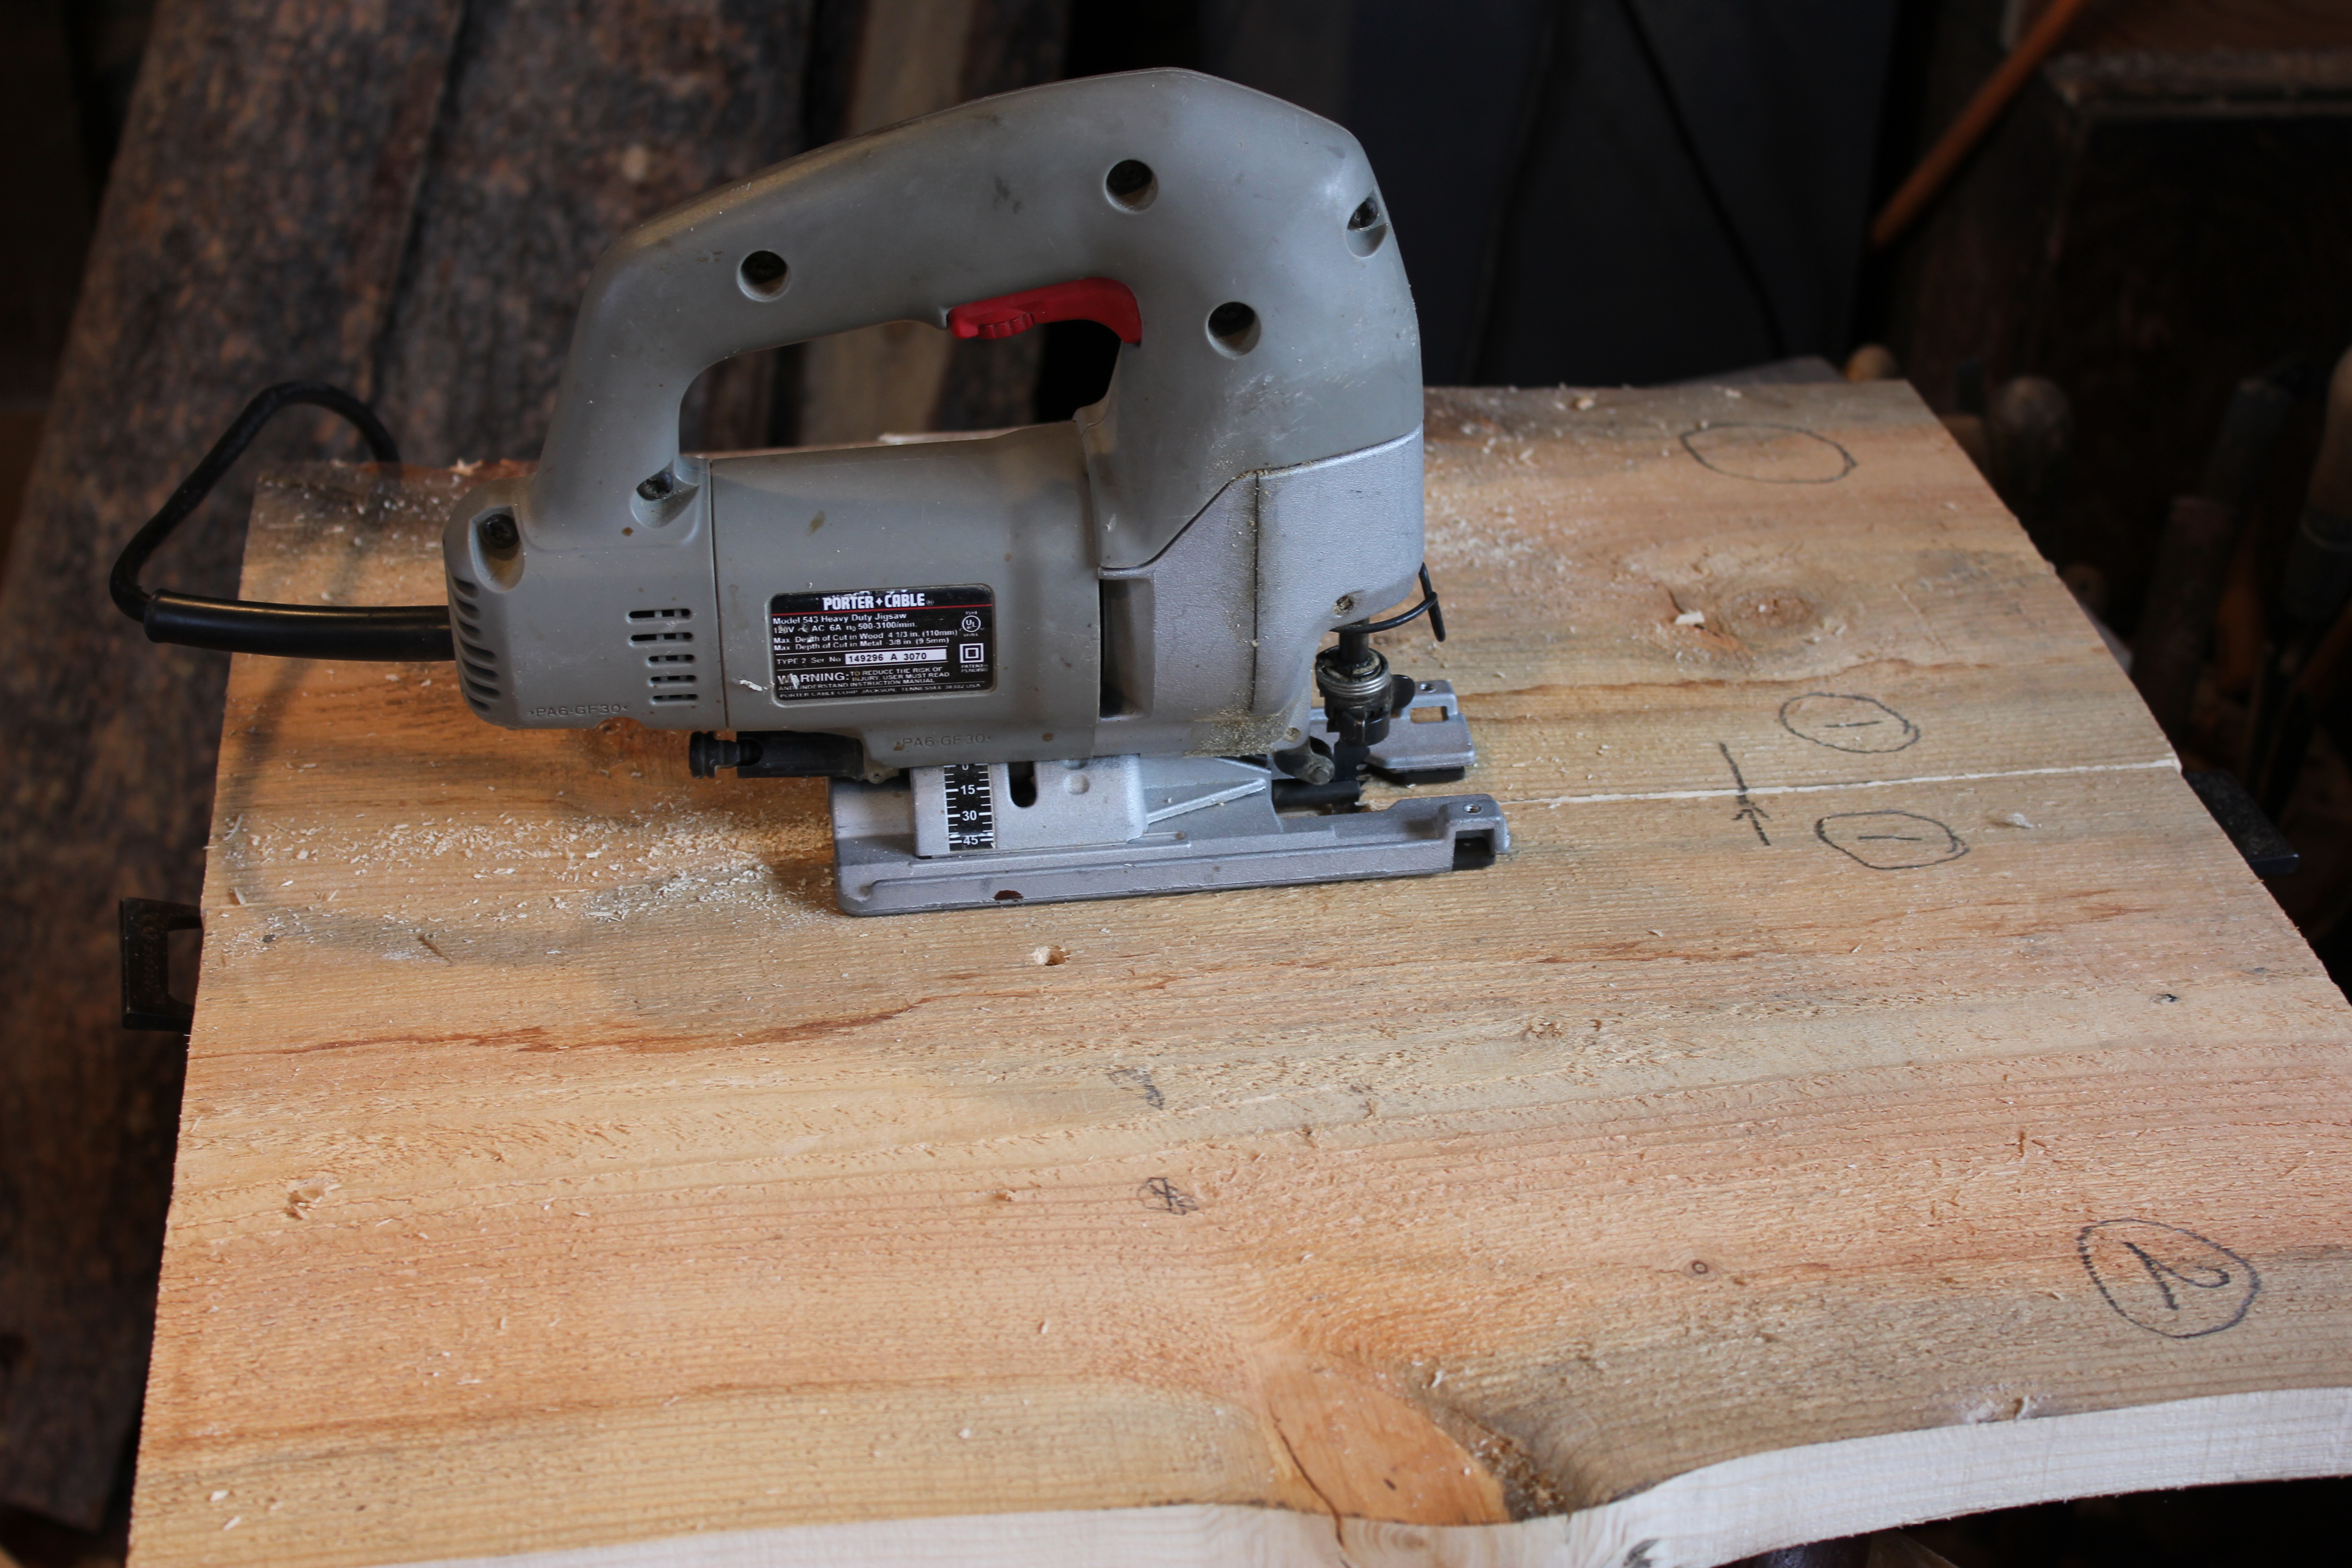
With the leg removed, the pattern was moved deeper into the bench seat. The straight pencil line was drawn at the edge of the pattern, before there leg was removed, as a guide when the pattern was moved on the bench seat. The cut-out is marked and ready for cutting with a jigsaw.

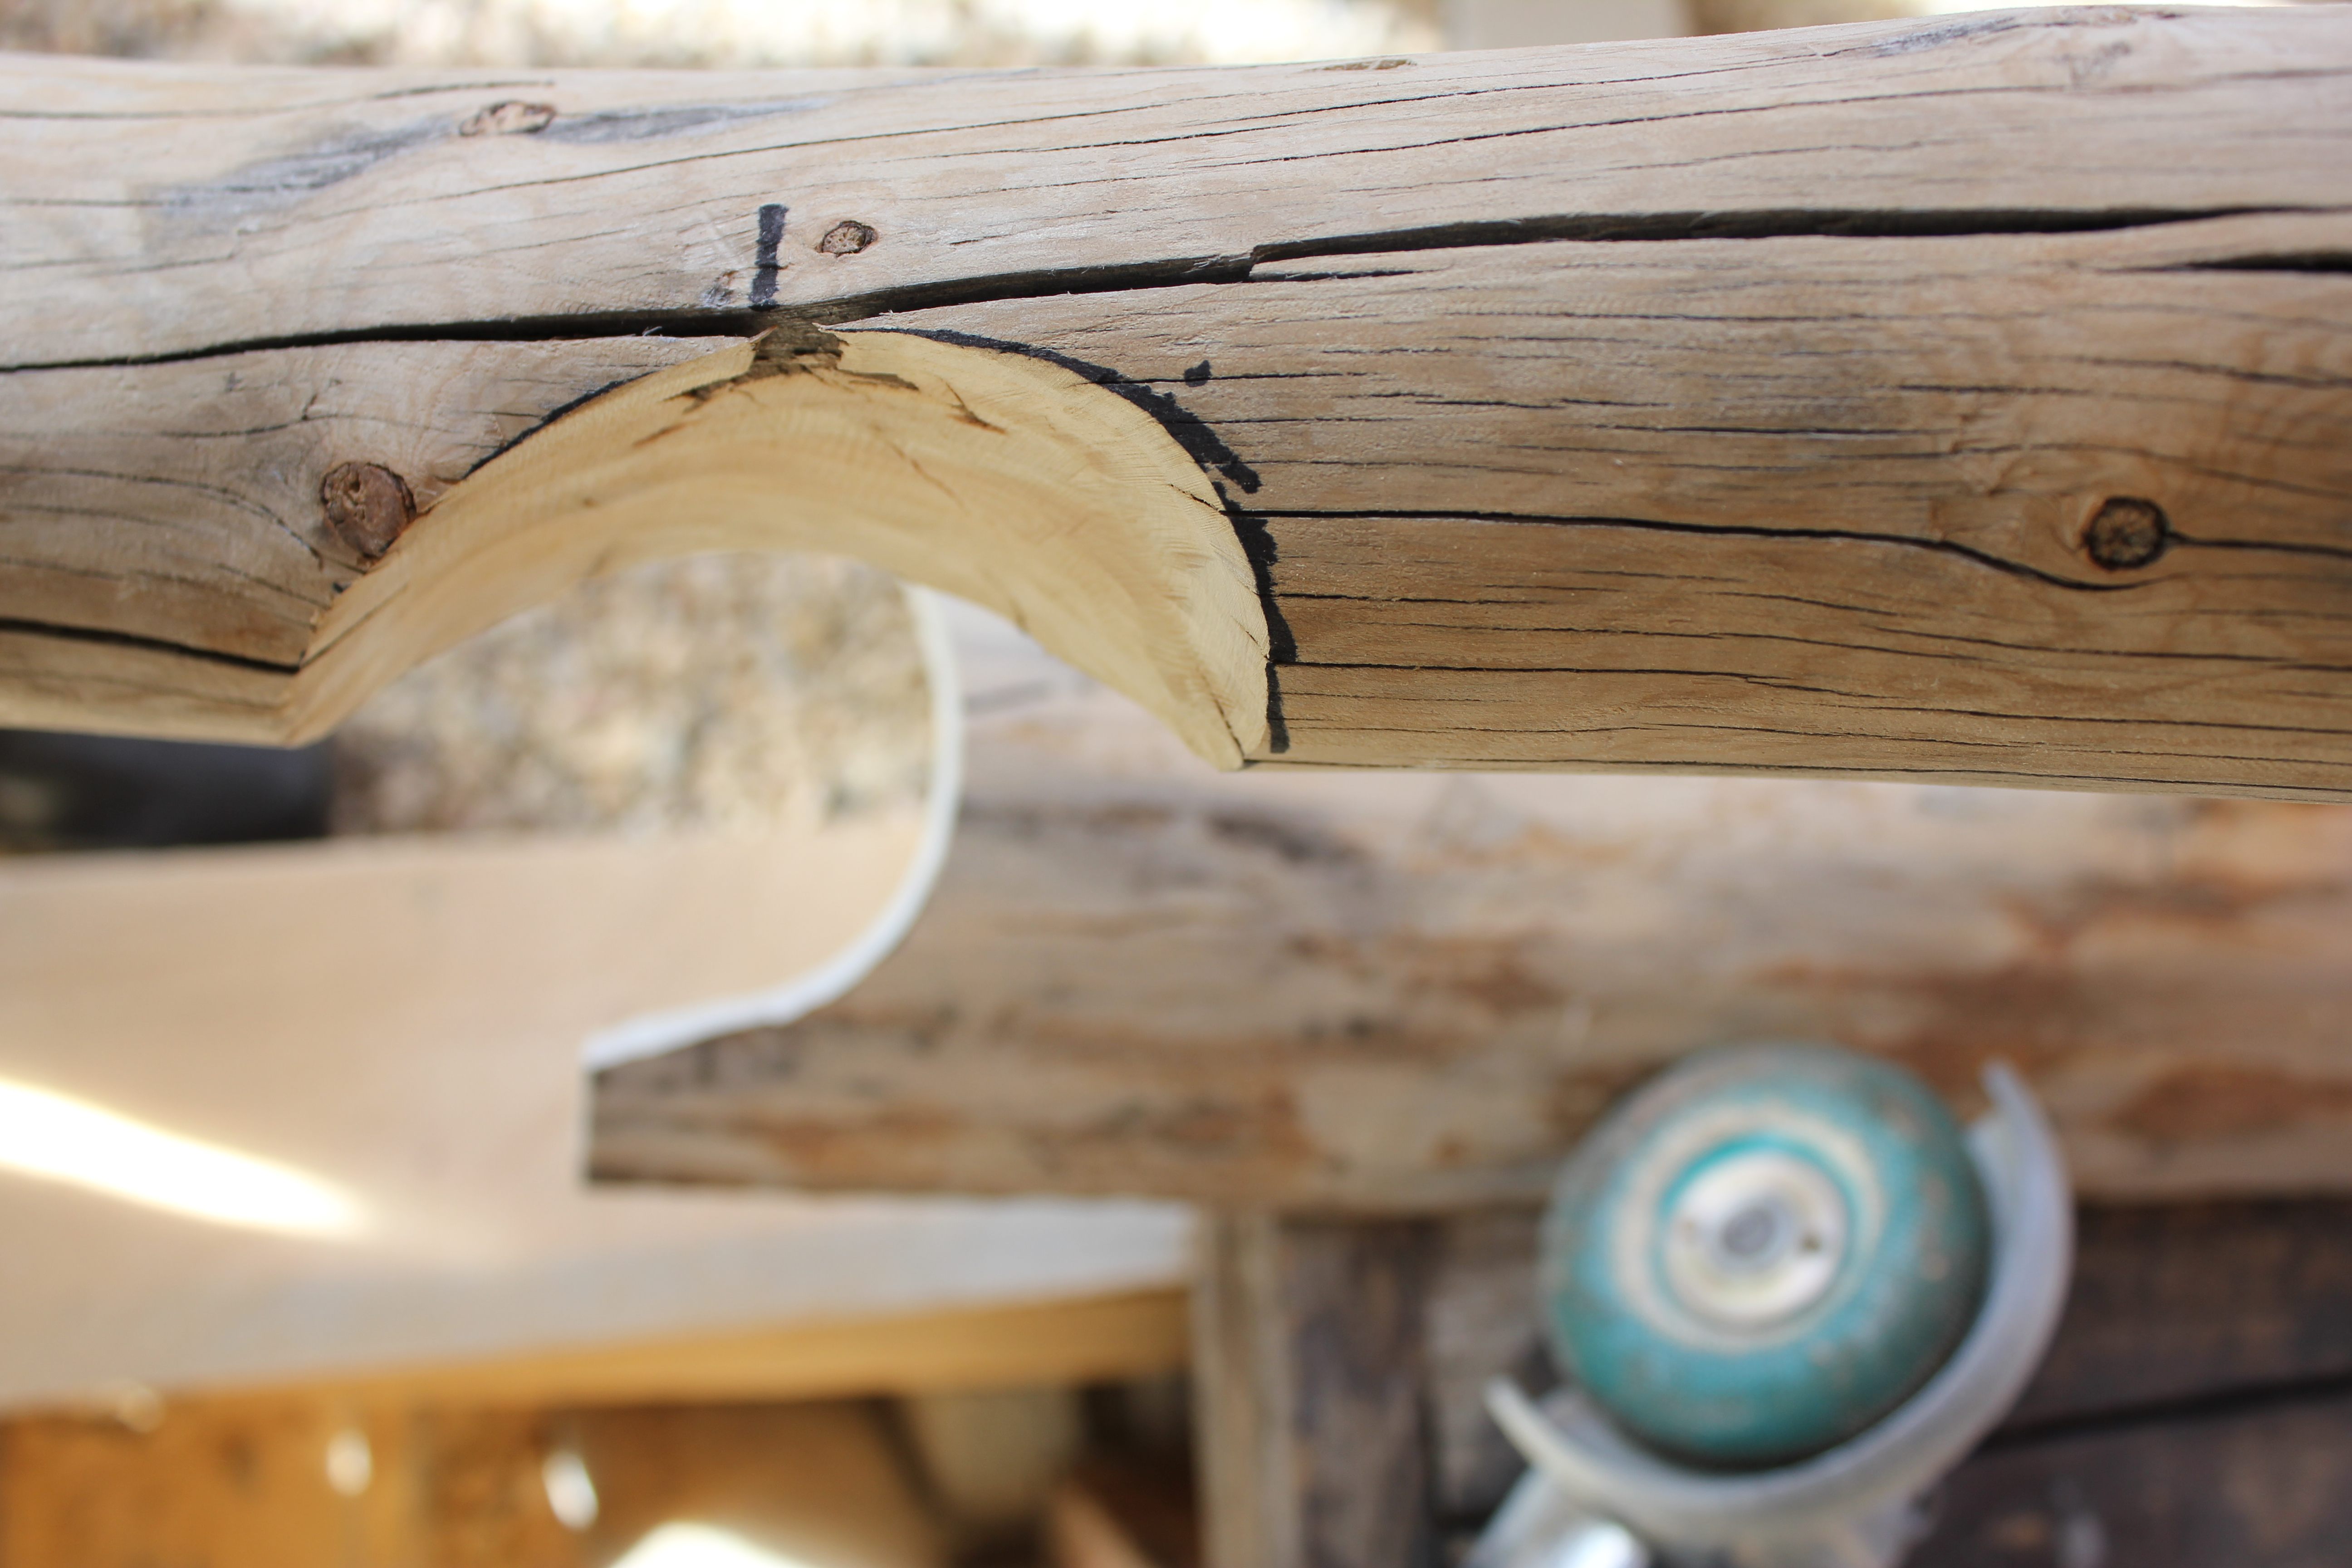
The cut-out is made and ready for a test fit of the leg.
This rarely happens–the leg fit tightly and with the right alignment on the first try.

Twenty-nine. Bench backrest attachments & front legs
This post is about (1) attaching an arched support to stiffen the backrest, (2) connecting the backrest to the bench seat in a way that allows the backrest and seat to be disassembled, and (3) the start of attaching the front legs. (My captions for the photos are not as detailed and informative as they could be.)
I have two more posts in draft status that I’ll publish asap (the date today is May 26, 2013).
The arch is a naturally grown shape, a small lodgepole tree trunk. I flattened it with a hand adze after cutting a series of saw kerfs. The rounded side had to be inset in three places, each of which were clamped as shown here.

This photo shows the mate-cutting in progress, with the top of the arch clamped in place. The saw is cutting both pieces at once. The kerf is prevented from closing, and pinching the saw blade, by the shim shingle.

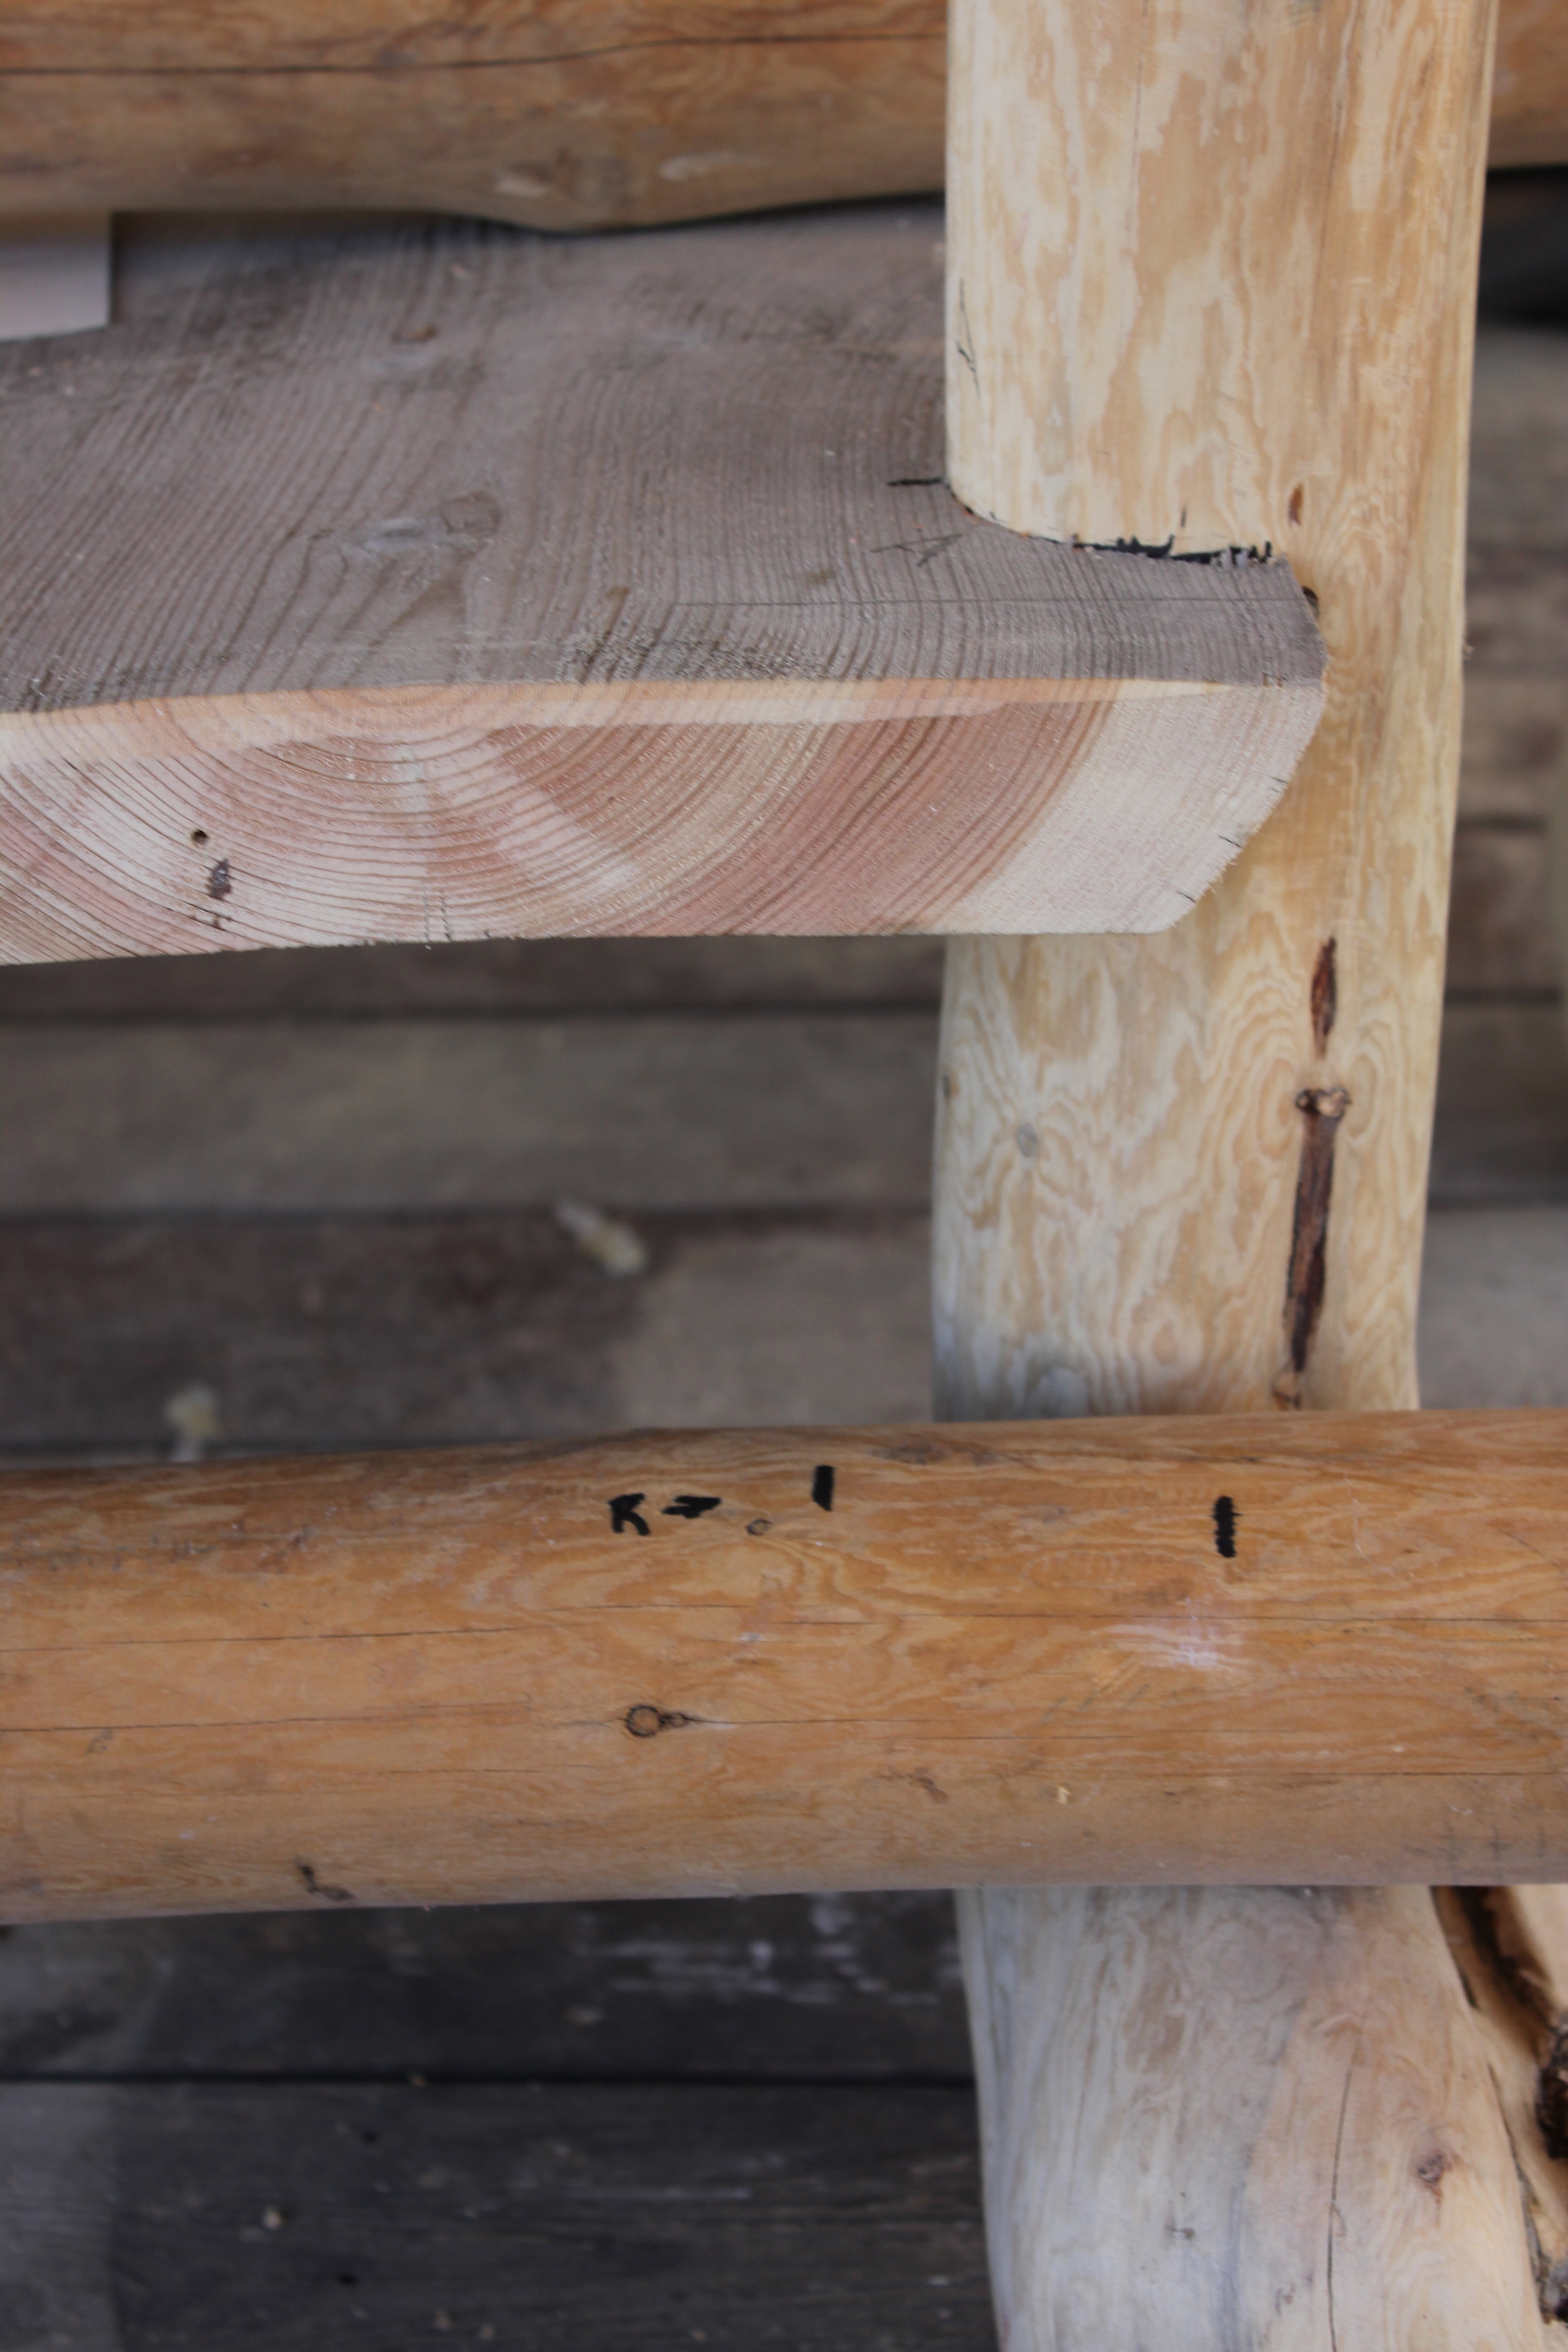
With the backrest laid flat and the seat clamped to it, I had access to the underside of the seat. I wanted to attach the seat to the backrest in a way that allowed for disassembly because of the increasing weight of the bench. I also wanted the attachment to allow for expansion and contraction of the slabs in the seat.

Here’s the underside with slotted holes, one in each of the slab pieces.
A close up of a slotted hole, this one and one at the other end of the row, are for hanger bolts to make assembly and reassembly easier. The remaining holes are for lag screws. (The drilling tear-out will be removed later with sanding.)

The hanger bolts and lag screws, with two flat washers each, are tightened securely but loose enough to allow the wood to expand and contract.

To establish a front seat height that approximately matches the back, I added a temporary board to each end of the bench. A spacer board was placed on the bench seat, and the front leg was leaned against the seat for its vertical alignment. This photo was taken after I had marked and cut the bottom of the leg for a flush fit to the deck surface.

This is the second front leg with the marking block and pen. The sequence is important. The cut is approximate, but once made the leg is dropped and that changes the fitting of the joint in the seat above.

Here’s the finished cut, with the leg vertically aligned, with a slight flare from from to back and side to side.

Both front legs are now ready to be attached, which will require cutouts in the bench seat at each end. That will be the subject of my next post.
Twenty-eight. Joining legs to the bench back rest.
April 17, 2013
For personal and family reasons and priorities, I haven’t worked much on the bench for the past month. I had originally planned (!) to have it finished by the end of April, but since that was a self-imposed time frame, I’ve relaxed my schedule. And, besides, the making of tree art is only one of my creative practices ….
I’m also continuing with my relaxed standards for the quality of these posts, especially in literary terms.
Because of the size of the bench, and the crowded condition of my workshop, I decided to bring the bench up to our attached greenhouse. As long as it’s sunny, the unfinished greenhouse is a comfortable, roomy, and well-lighted workspace. And the deck serves as a good workbench.
Here are photos of my latest efforts to combine the back rest with the seat, and to add two legs:

I’ve selected four swan neck pieces for the bench legs. In this photo, I’ve placed one of them to explore options for joinery that connects the leg to both the top and the bottom of the back rest.
Using a piece of light cardboard, I’m starting to make a pattern for the coped cut out on the bottom of the back rest, the first of the two to receive the leg.
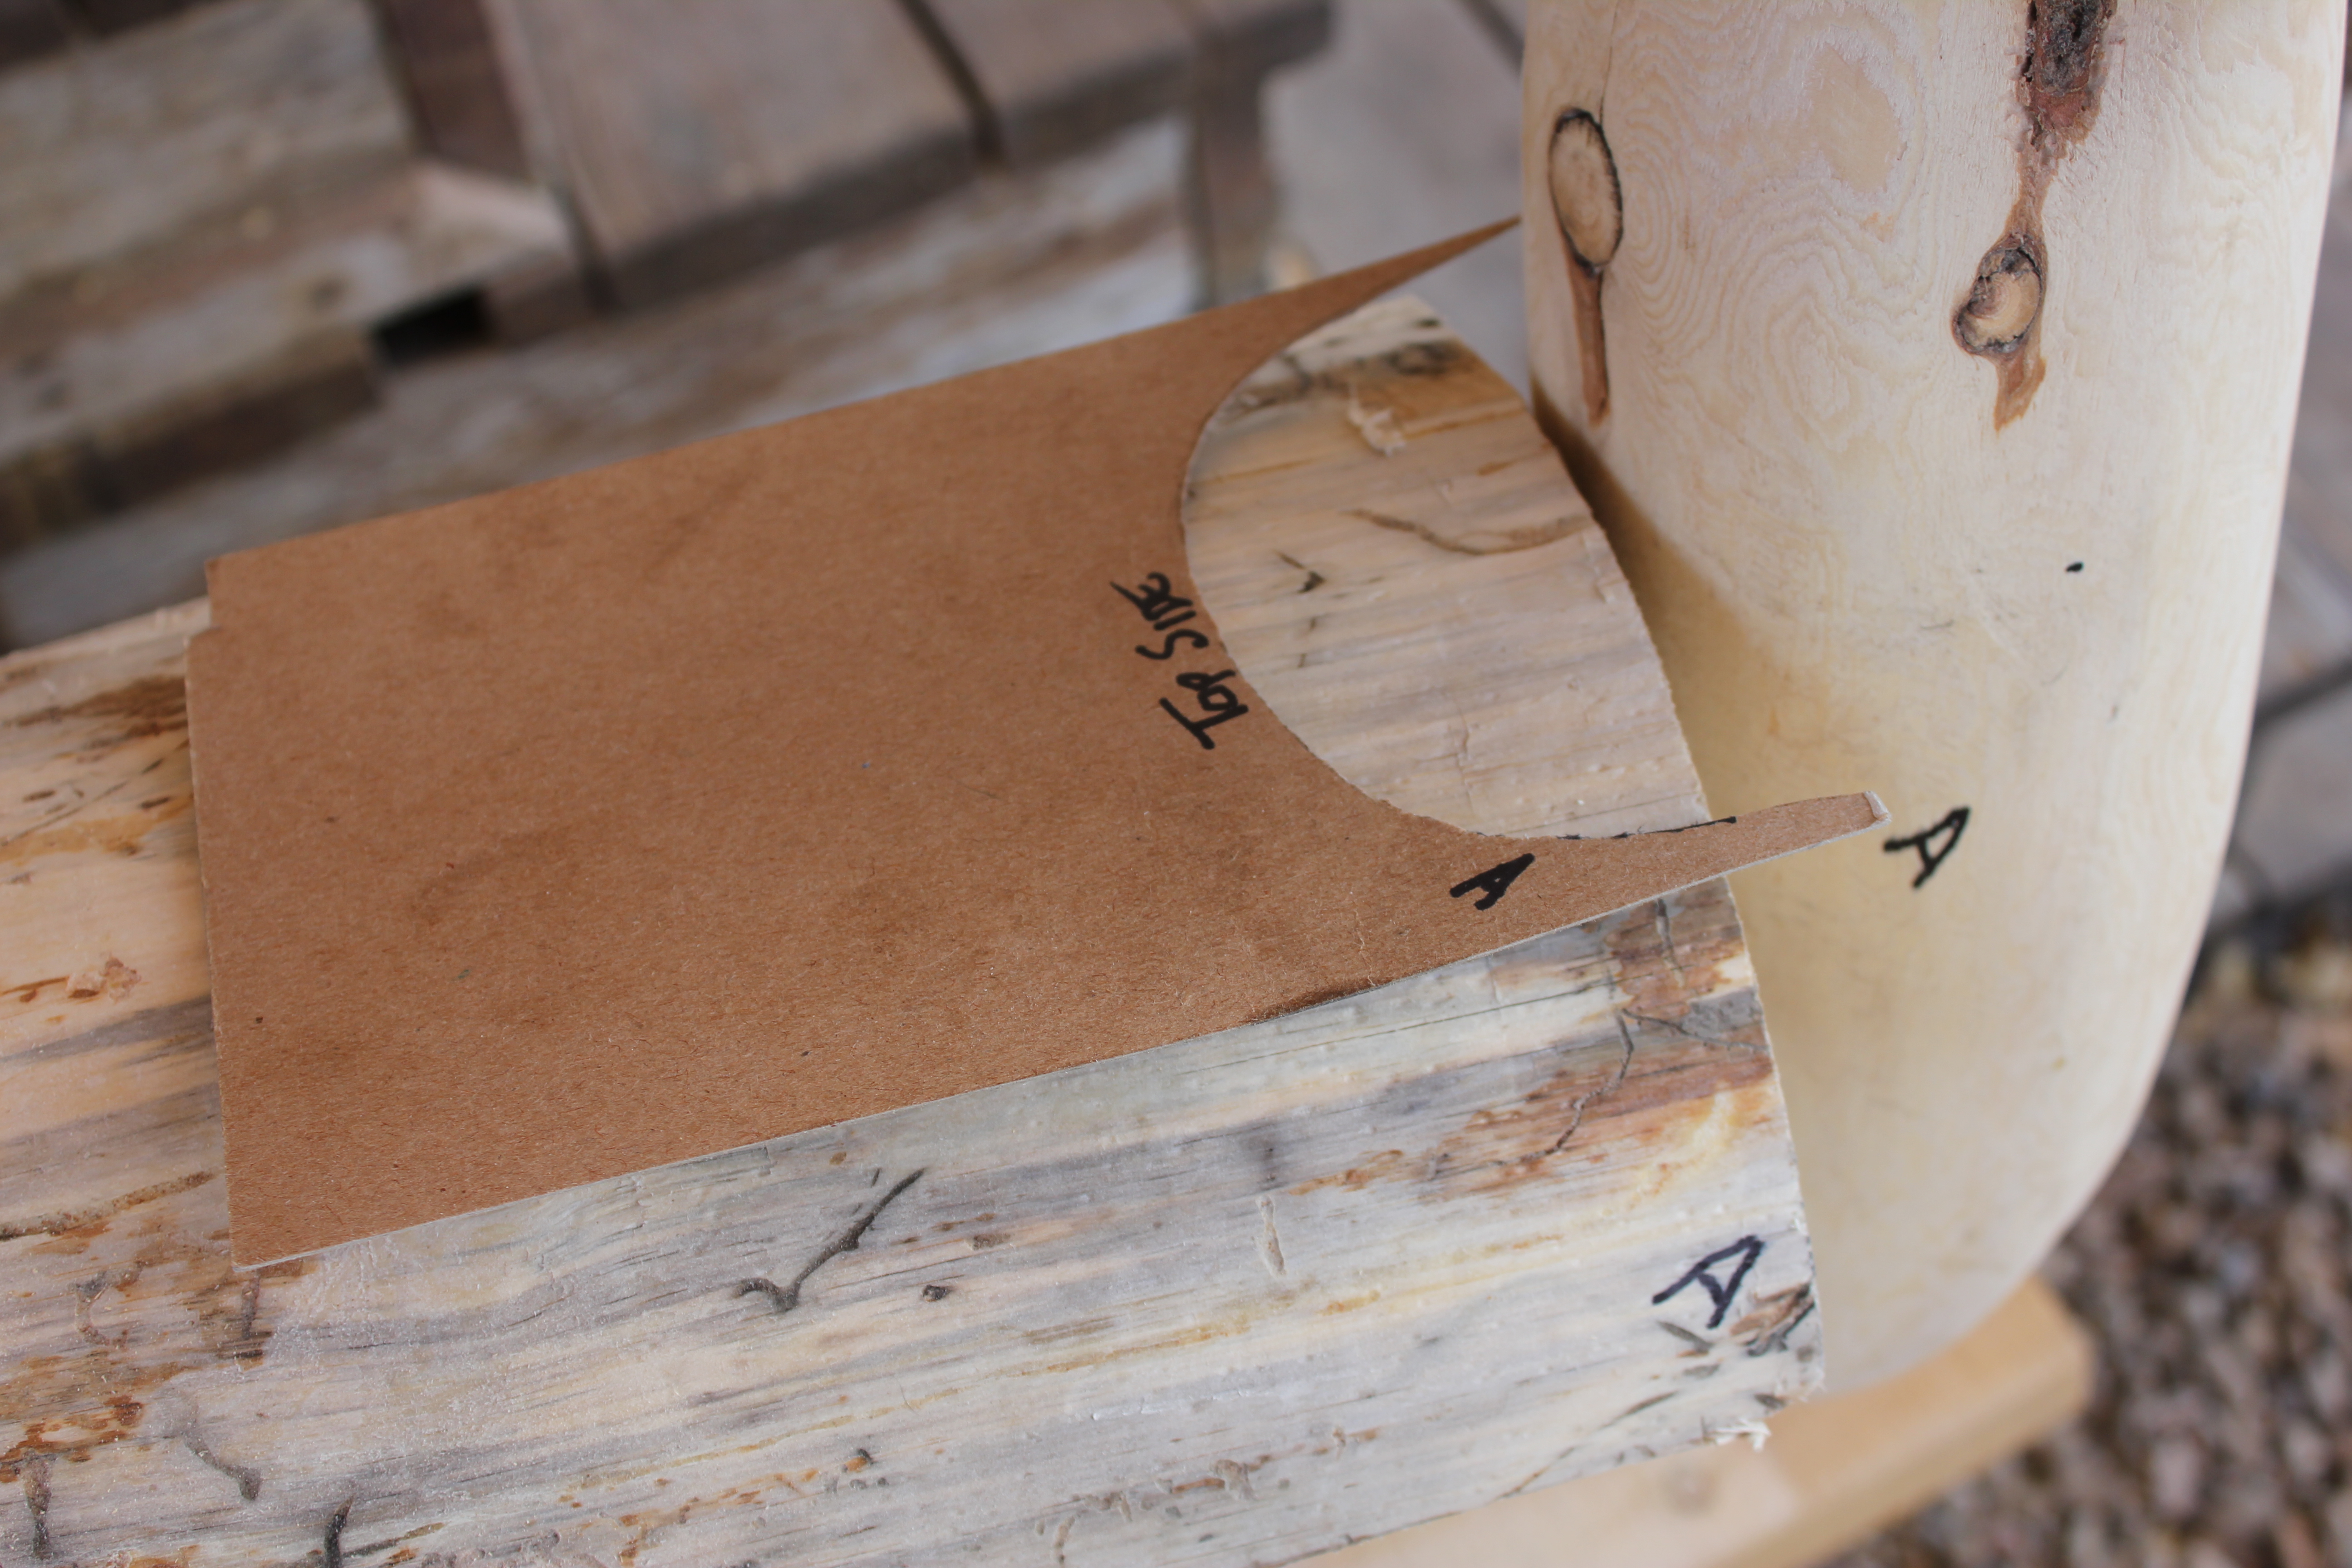
After the pattern fits around the leg, it will be placed on the underside to mark for the actual cutting. I have added the matching letters “A” to keep the correct alignment when the pattern is transferred to the underside.
So here’s the guideline for the cut out on the back rest base, to receive the leg.
The cut out is completed, and the back rest will be turned over for a test fit.
This photo is the first in a series showing the cut outs in both the top and bottom of the back rest to receive the leg. It’s a top view, looking down after the cut out has been made in the top rail of the backrest. Notice the black line that has a matching line on the leg for correct realignment of the joints. Also in the photo is the grinder and special cutting wheel that works very well, with and against the grain, in “sculpting” these cut outs for the coped joinery.
Another view of the cut outs. I decided to leave the leg “as is” and fit it fully into the two cut outs. It’s complicated to make just one of these kinds of joints because of the curves and slants of the cut out, and of getting the correct horizontal alignments of the legs so the bench sits firmly on the ground.

This is another view of the leg fitted into the two cut outs, with the top joint showing the alignment marks I mentioned above.
Viewed from the other side, the leg is securely fitted into the cut outs. At this point, I’m not sure how I will fasten the joints–whether I’ll dowel and glue them or use concealed wood screws to allow for disassembly because the bench is getting heavy and will be awkward to move.
Twenty-seven. Making the bench seat
The making of the bench seat with 8 pieces of 2″ thick planks.
Perhaps, since tree art is a collaboration with Nature, I tend to abhor straight lines (and square corners, etc.). In the making of edge to edge butt joints, I like the mate cut, waney edge joints as a design detail.
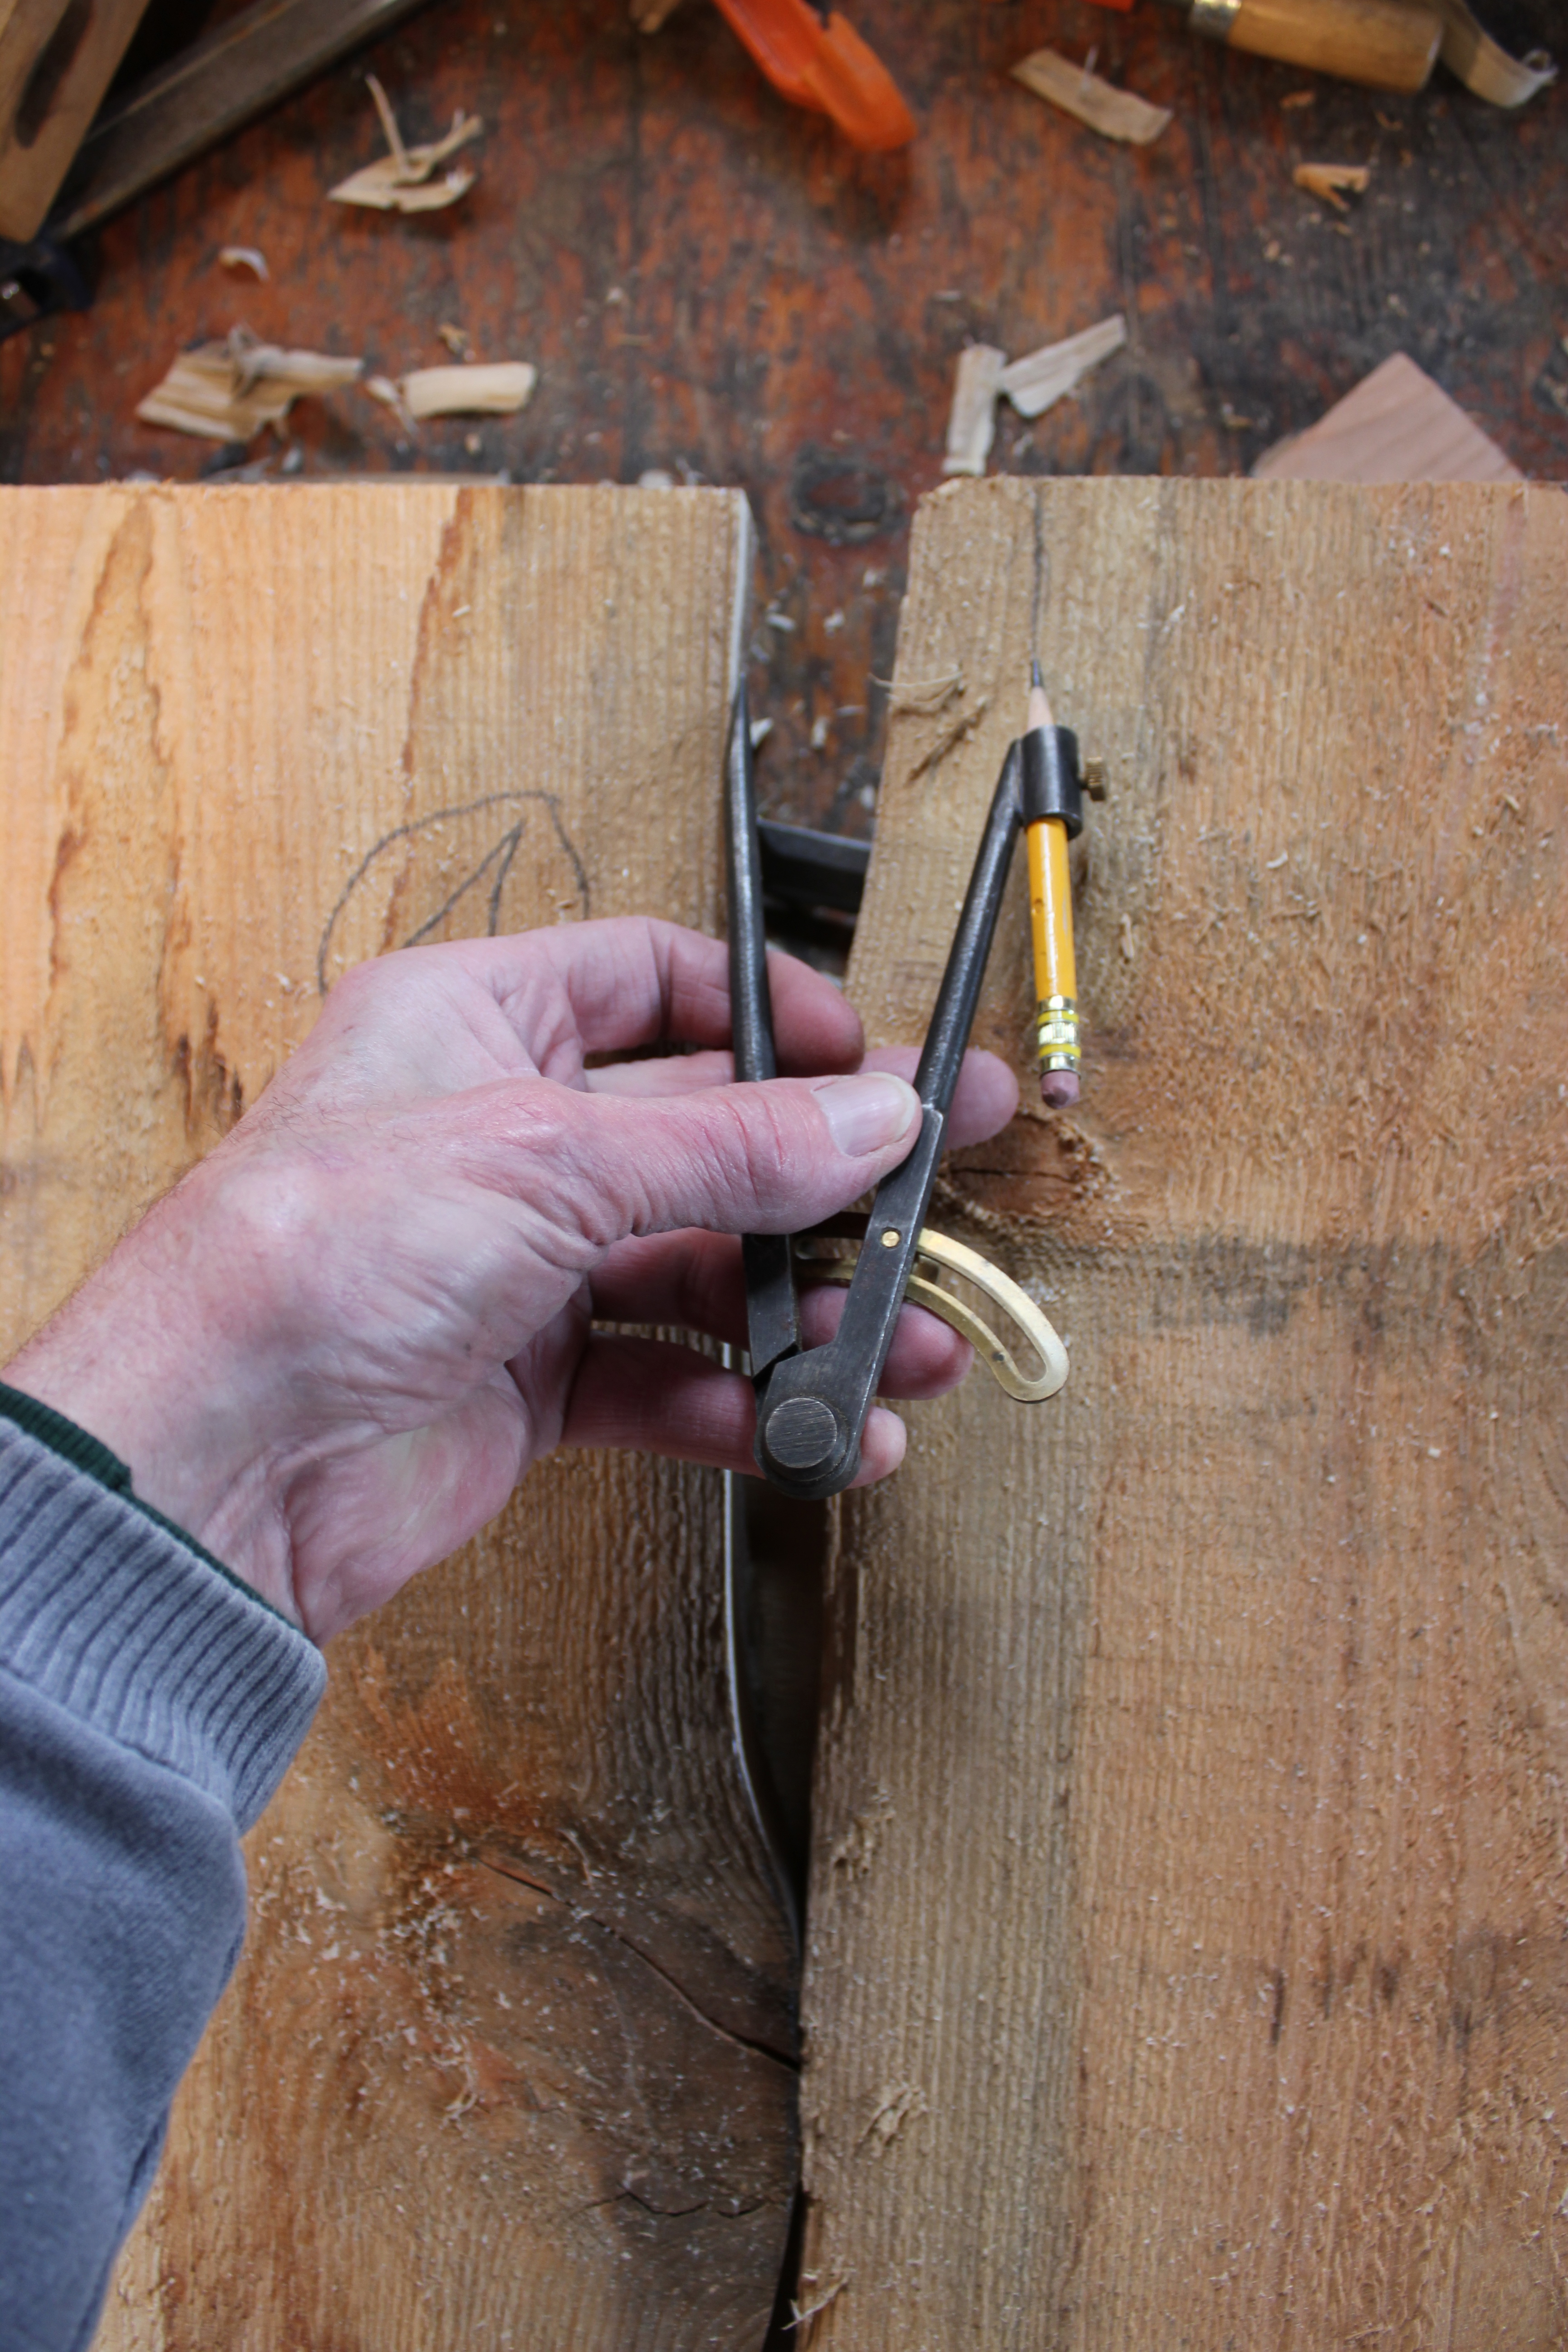
After one side of a piece has been cut on the bandsaw, the compass serves to scribe the adjoining piece, for a paired and mate cut joint. It’s important to keep the point and the pencil directly opposite to each other, closely perpendicular to the direction of the joint.

Piece number 4 will now go to the bandsaw for a cut of the second half of the paired pieces, for an approximate fit. It is important to number the paired pieces for replacement.

The edges of these pieces have all been cut on the bandsaw. Now, one joint at a time, after each end of the paired pieces has a log dog driven in, the jigsaw will mate cut the final butt joint.
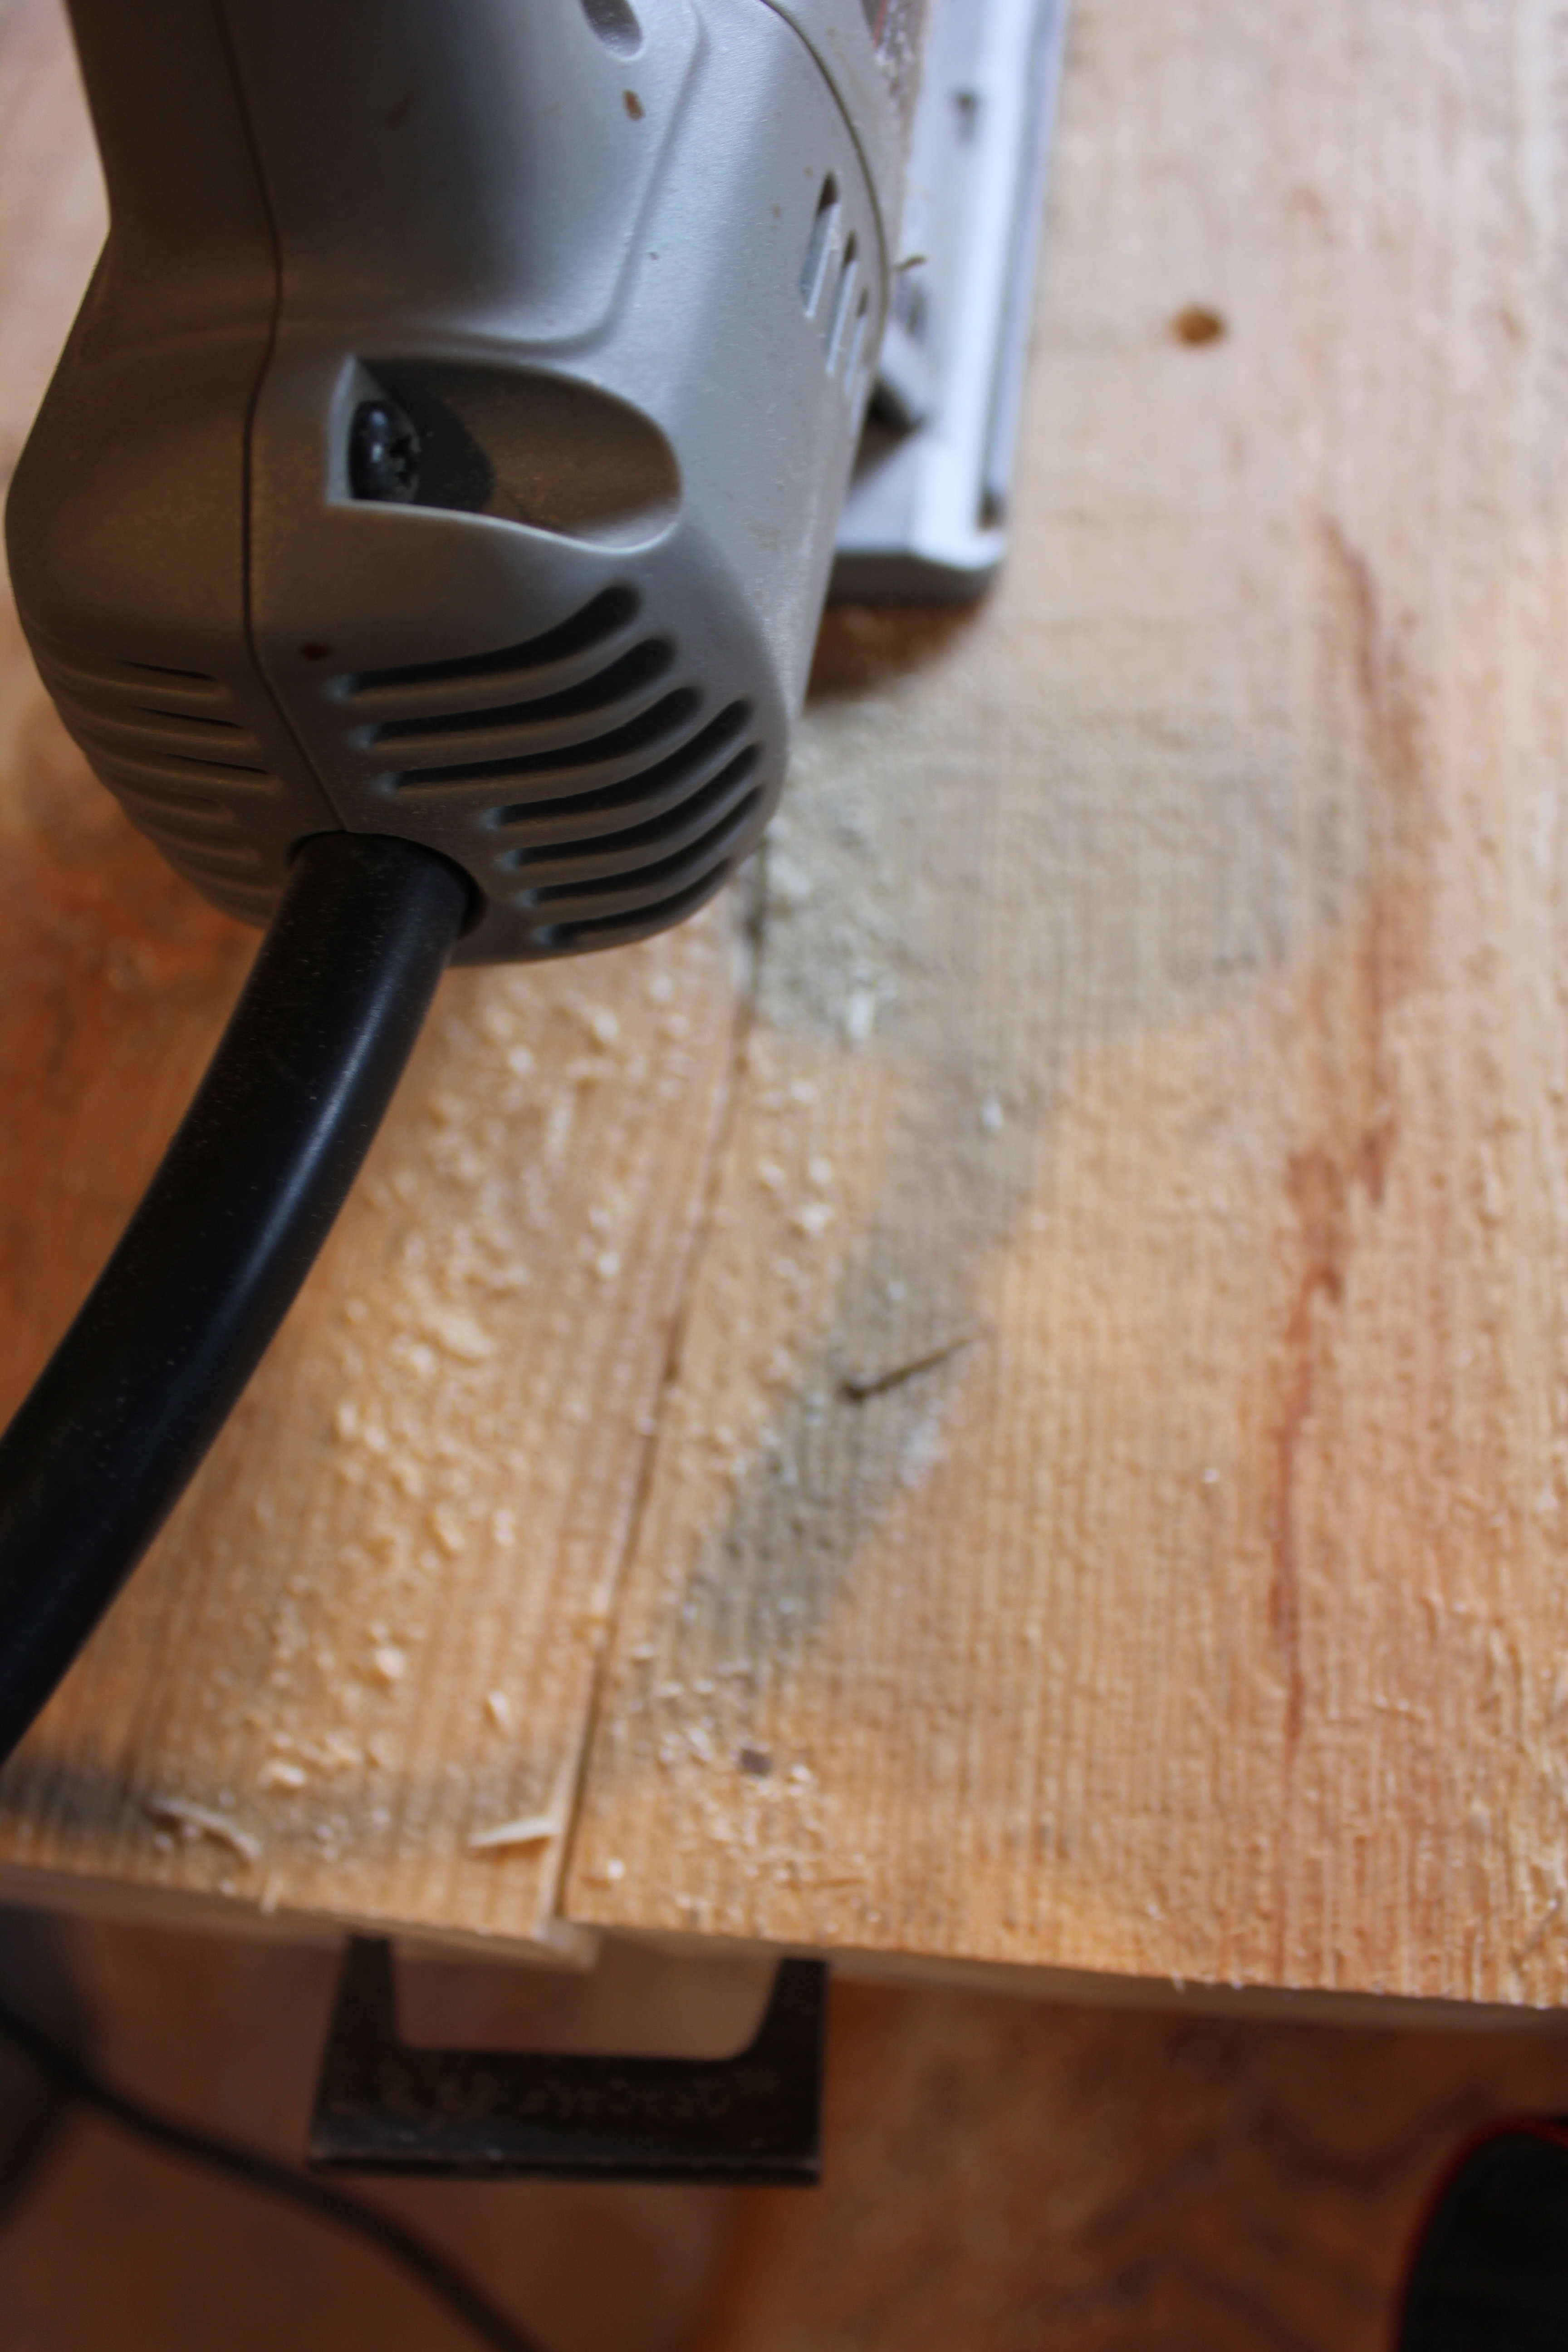
Here’s a close up of the mate cut in progress. Tightly fitting the joint sometimes takes several passes, releasing the log dogs each time, depending on how tightly the bandsaw’s approximate cuts fit. The two points of each log dog are pointed and wedge shaped so they draw the joint together as they are driven into the end grain.
The jigsaw is cutting a uniform kerf the length of the pieces, so when the log dogs are removed the waney edges fit tightly, i.e., are mated to each other.

These 8 pieces are ready for gluing and clamping to make the seating surface for the bench, about 80′ long and 20″ deep–deep enough for the backrest to be placed on top.
Twenty-six. (B) Making the bench backrest (cont’d)
Post Twenty-six was getting too lengthy, probably too many photos and not enough text. I’ve been saving two posts as drafts rather than publishing them. I’m thinking now that it doesn’t matter all that much if I go ahead and publish them. Just as tree art is not fine woodworking, my writing in these posts is not fine literature.
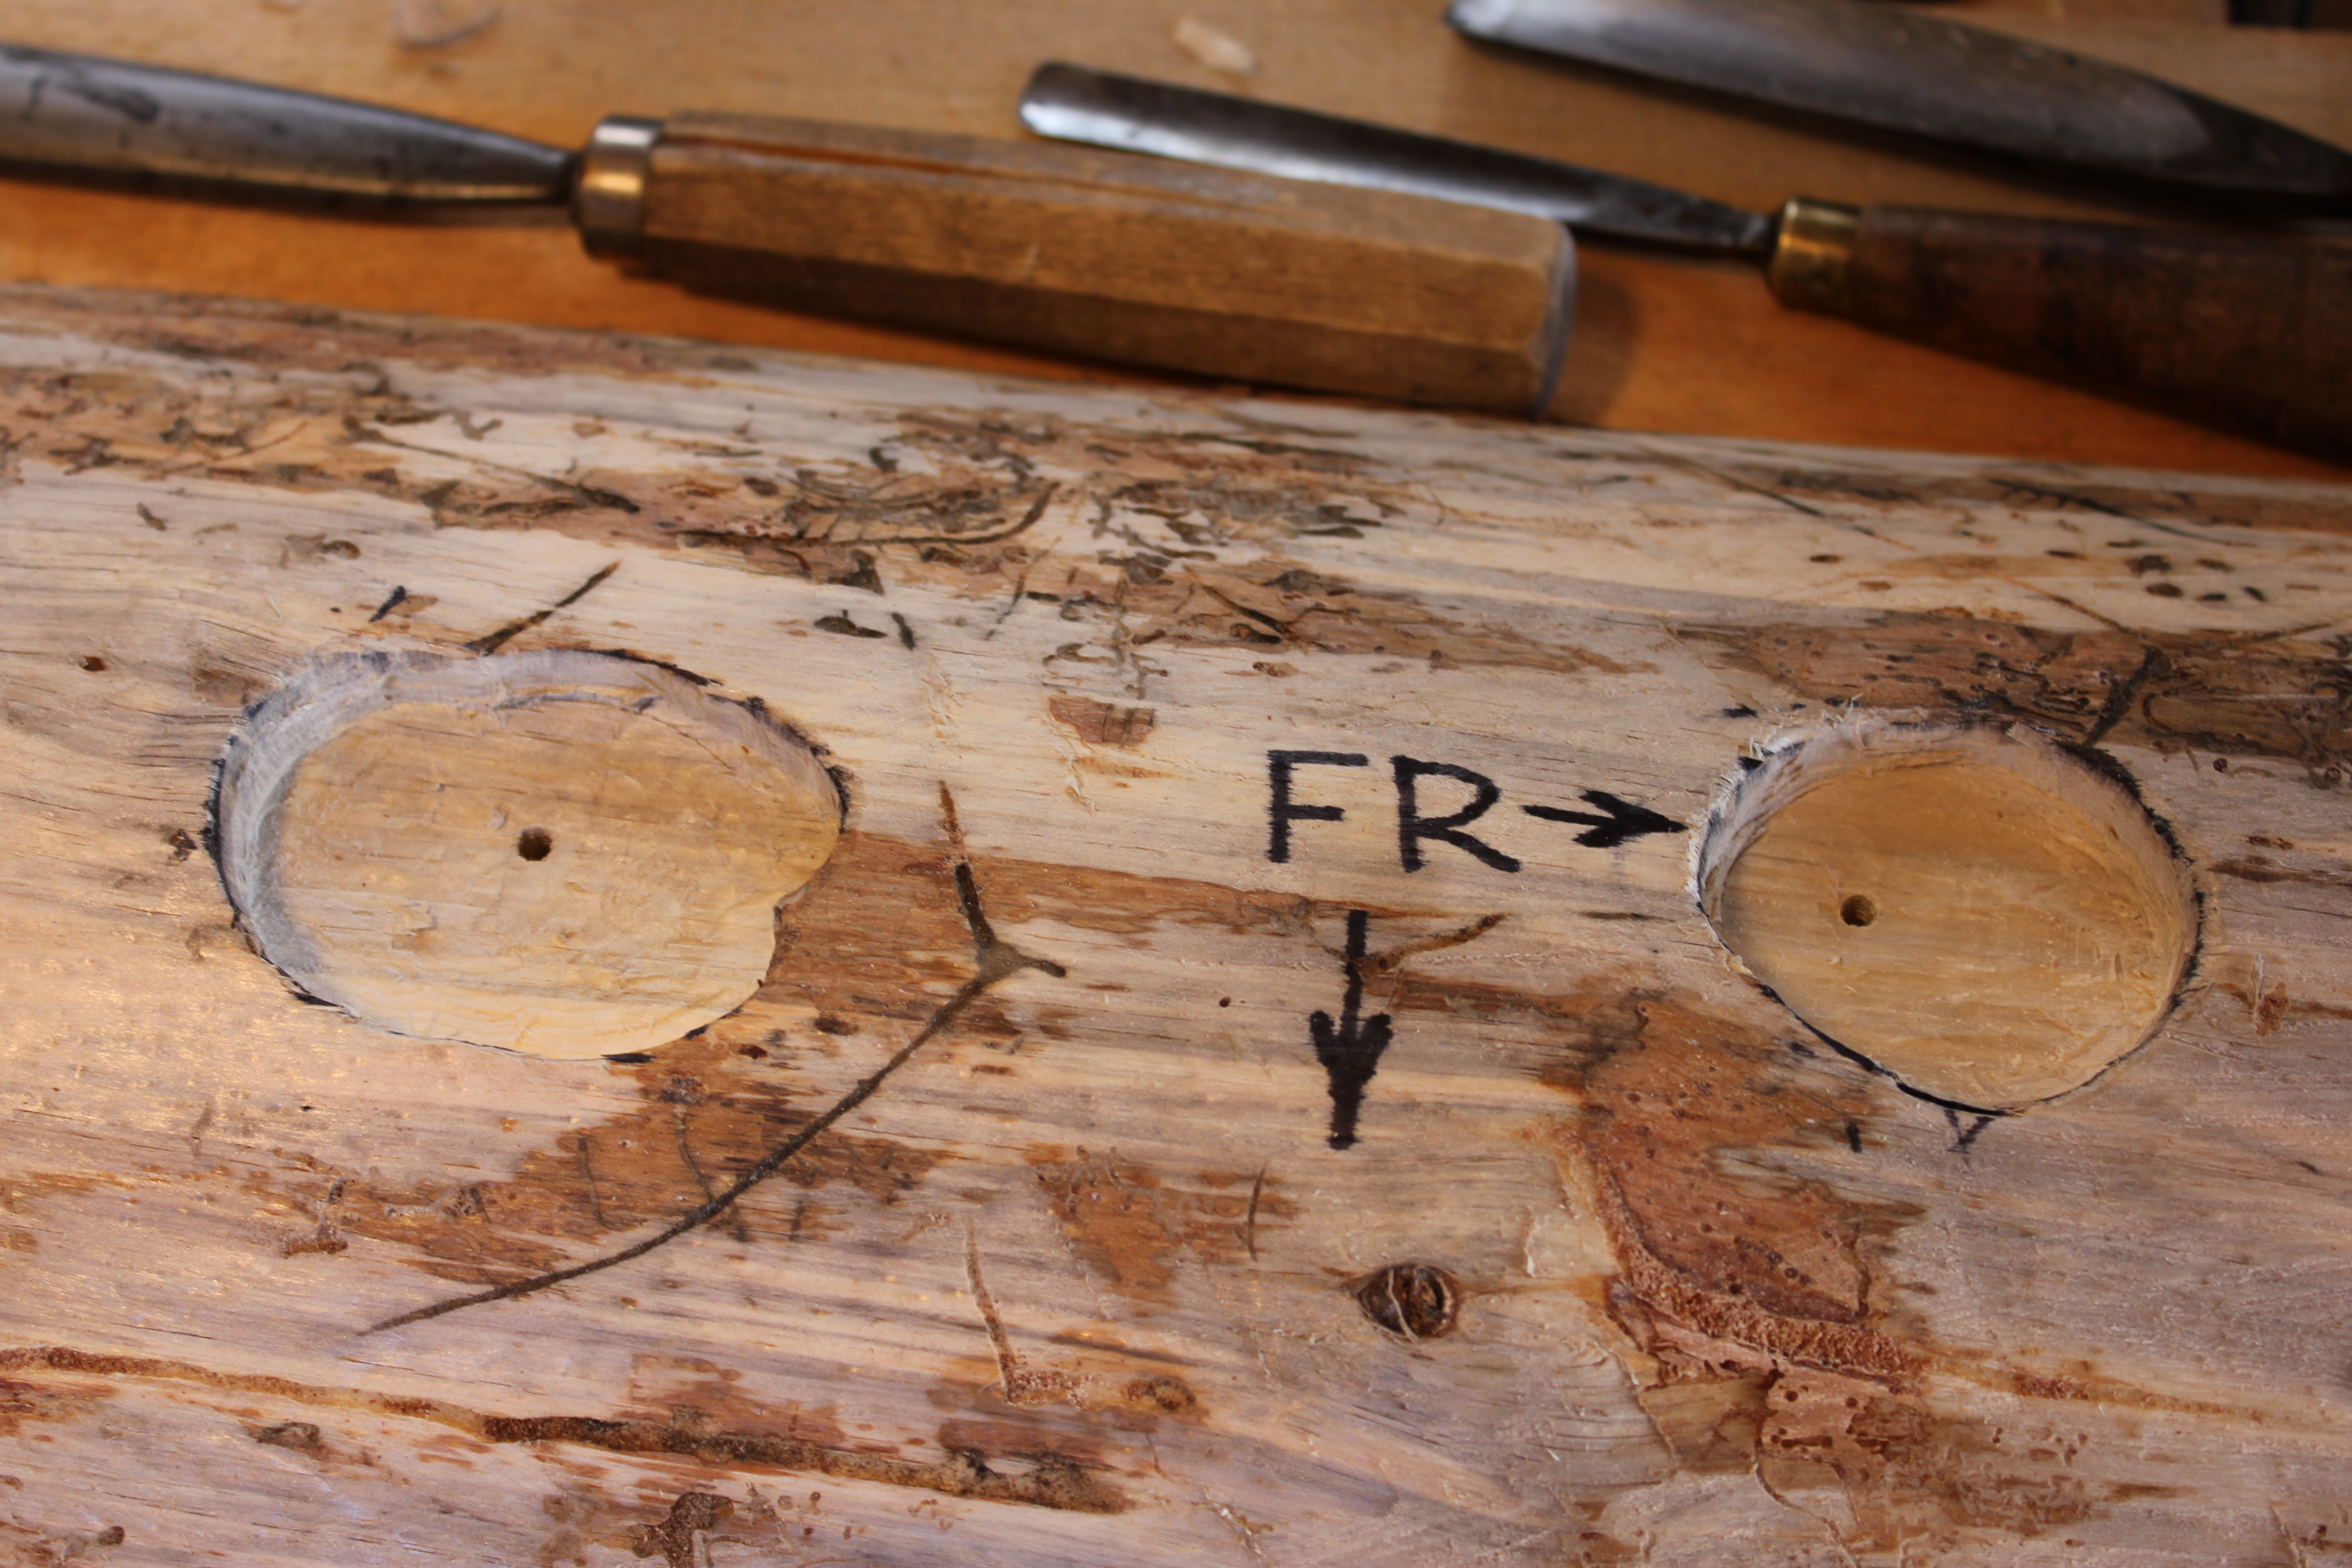
After the bark was drawknife off the slab, I scribed around the end of each swan neck for a matching mortise to secure each of them as a tenon. The FR with arrows remind me which edge of the slab is to the front and which end is to the right.

The four swan necks will connect this 80″ long slab with both the backrest and the bench seat. Eventually, the two back legs of the bench will also be joined to this slab.

Each swan neck tenon is now secured in its mortise by a long wood screw inserted and tightened through a pilot hole predrilled through the slab from its flat underside.

With the backrest mounted to the slab, I’m now ready to think about the bench seat, which I hadn’t designed yet or selected its materials. This project has become more of a design-in-progress than I feel comfortable with ….
Twenty-six. (A) Making the bench backrest … Feb 28, 2013
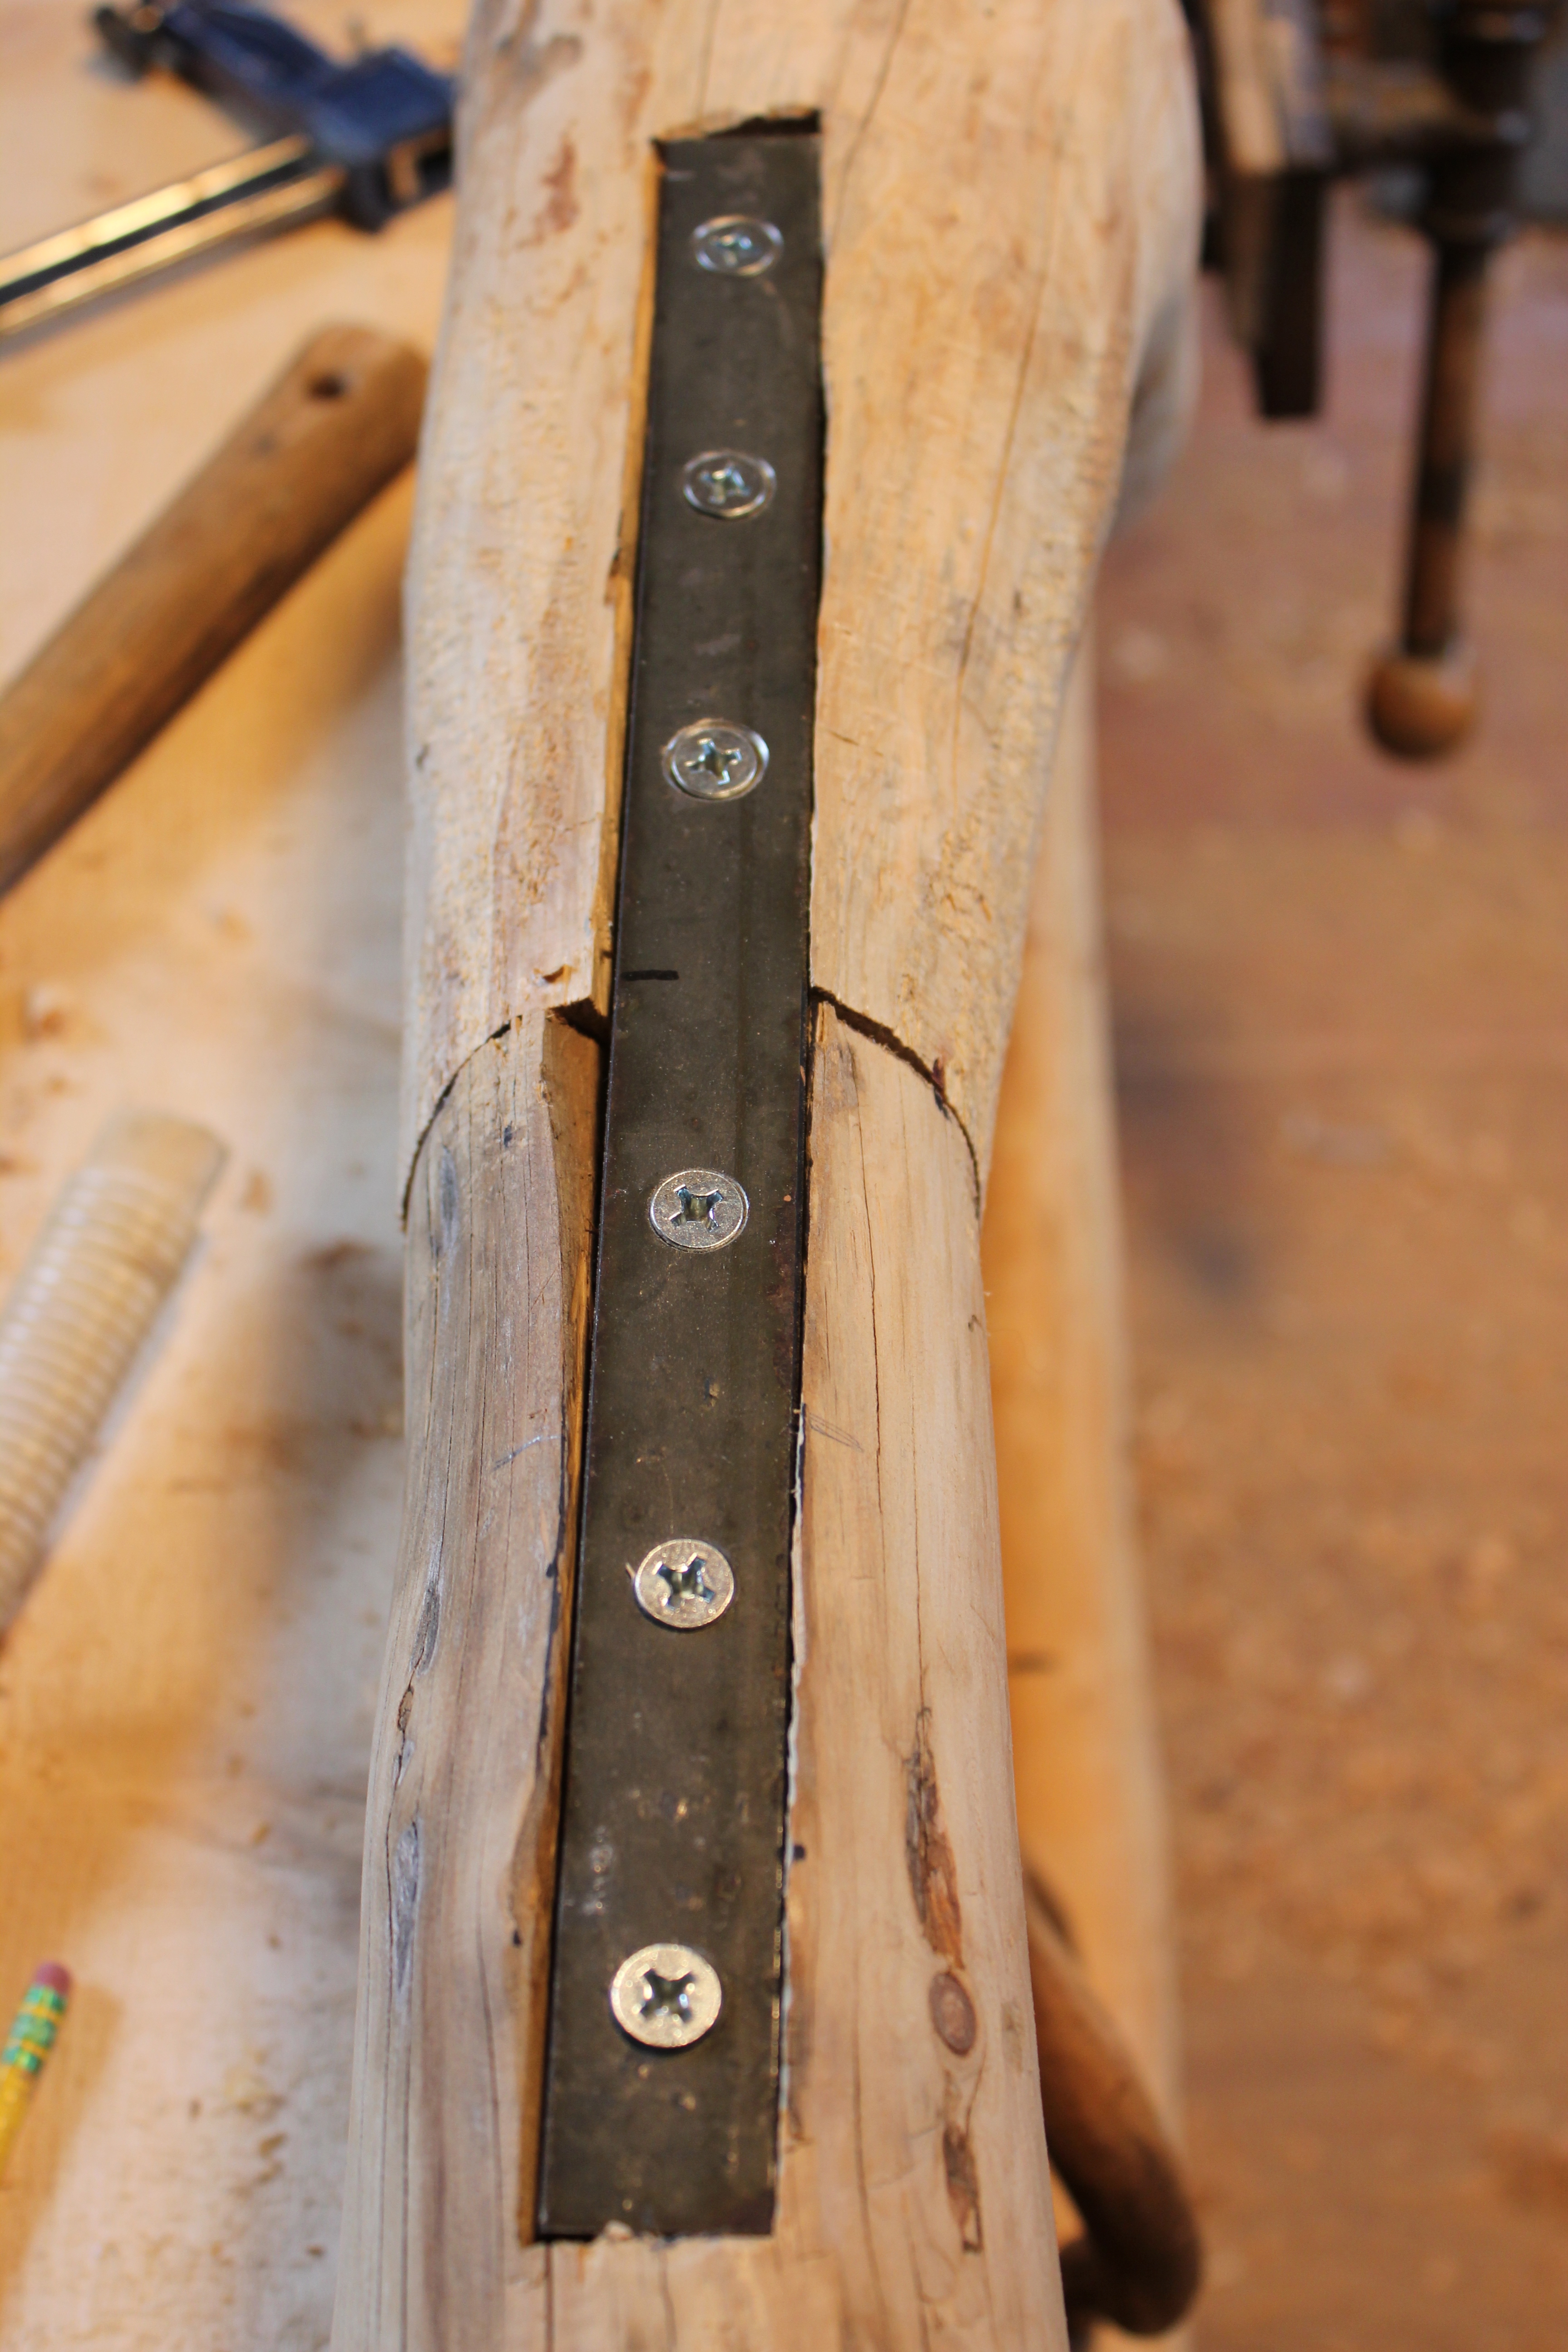
The flat iron bar is inlaid into the underside, to be concealed, and secured with long, countersunk wood screws. The end to end butt joint of the swan necks is also reinforced by a one inch diameter hardwood dowel, centered and penetrating more than 3″ into the end grain of each piece.
These round tenons are made by hand with a draw knife and sizing jig to fit a drilled mortise. In this piece I’ve also used free form tenon and mortise joints.
Here’s a piece clamped in the shaving horse, with the sizing jig and hand-forged drawknife in use.
The swan neck is clamped in place and both the placement of the mortise and the shoulder of the tenon are marked.

I’m using a long straight edge just to get an approximate location and length of the paired swan necks.

This round mortise is on the underside. Also visible is the dowel that goes up into the end of the arch on top. I always use numbers, letters, arrows, etc. for replacement after repeated fittings.
Here’s #2 mortise and tenon in place. The joint is drawn tight by a concealed wood screw entering from the other side.

The slab is placed here just to check the length of the four swan necks. It seems to work, so it’s time to put the slab in the shaving horse.
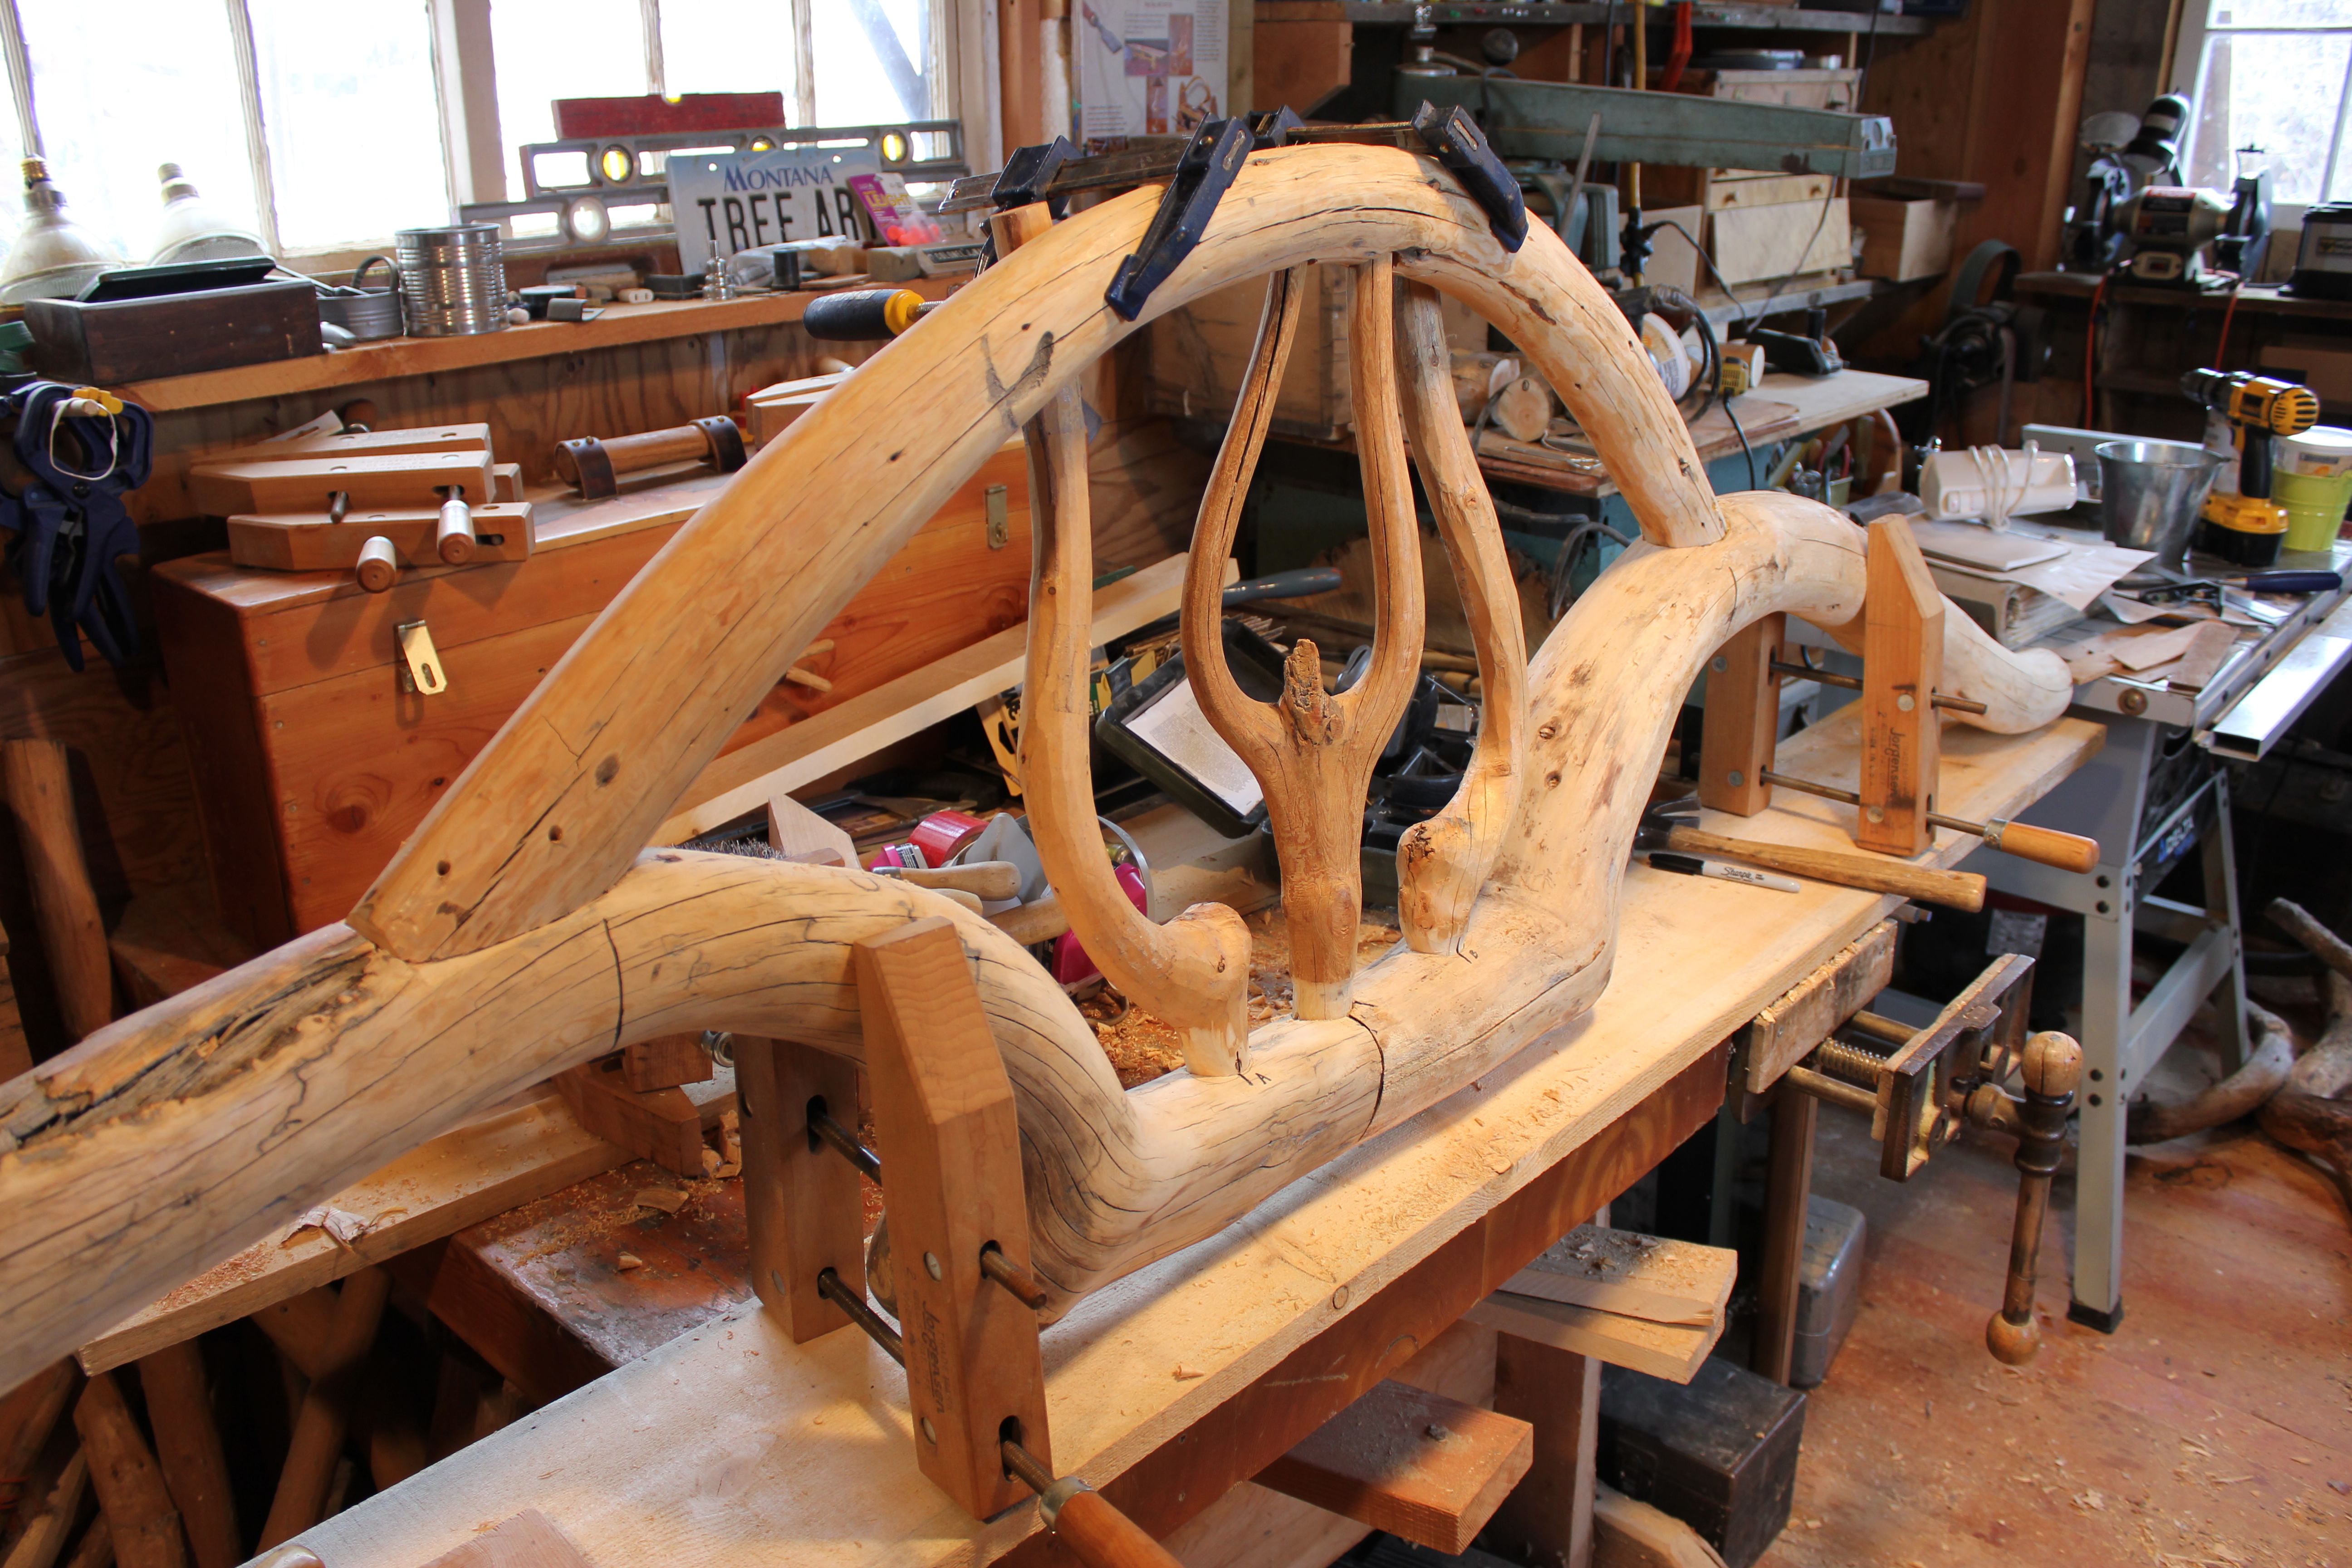
Twenty-five. The Making of a Tree Art Bench
January 1st, 2012. After exploring a lot of design options, both functional and sculptural, and with many choices and indecisions, the project is now underway. I finally decided to make a large seating bench that could serve in a public space, possibly in the lobby of an historic, and monumentally rustic, inn?
I began taking photographs in the workshop after selecting trees, some new ones for this project and others I had previously prepared then not used for other projects.
I’ve decided to publish this documentation as the project proceeds, as a”work-in-progress,” similar to what I did in documenting the making of the trestle table a year of so ago.

Getting started by selecting component pieces, each a lodgepole pine tree trunk–four “swan’s necks” and one “tuning fork”.

The drawknife and long arch held in the shaving horse. This is an example of the difficulties, the awkwardness of securing the irregular tree shapes, and of how helpful the shaving horse is.

These four tree trunks will become the bench legs that will also support, I think, slab wood armrests. They were originally prepared for use as dining table legs.

Here are sketches (not very artistic) and notes, some old ideas from my 3-ring design binder combined with new options as my thinking about the piece evolved.

Here I have positioned all the pieces into a design for the backrest of the bench. I’ve joined the two swan’s necks end to end, after drilling a 1 inch hole into each piece and inserting a hardwood dowel to maintain the alignment when I web clamped them together.

The bench will be about 8 feet long, so I had to add a board to my workbench top to support the swan’s necks. Using the wood clamps this way solved the problem of how to hold the two swan’s necks upright, so I could begin fitting the arch.

After clamping the joint, I marked the pieces with a connecting straight line, so that after I’ve disassembled the joint for gluing I’ll be able to realign it as it was marked. After gluing, I’ll size and shape the joint by hewing and rasping away the excess on the one piece. And I’ll inlay the flat iron piece on the underside.

This piece of flat iron is drilled, holes with with countersinks, for flathead wood screws. It will be concealed, inlaid on the underside of the two swan’s necks to span and reinforce the end to end joinery.

A next challenge was to place the arched tree trunk on top of the swan’s necks to make the joints. That’s a recurring challenge because hand holding and clamping the irregular shapes securely isn’t easy, but necessary to cutting and fitting the joints repeatedly.

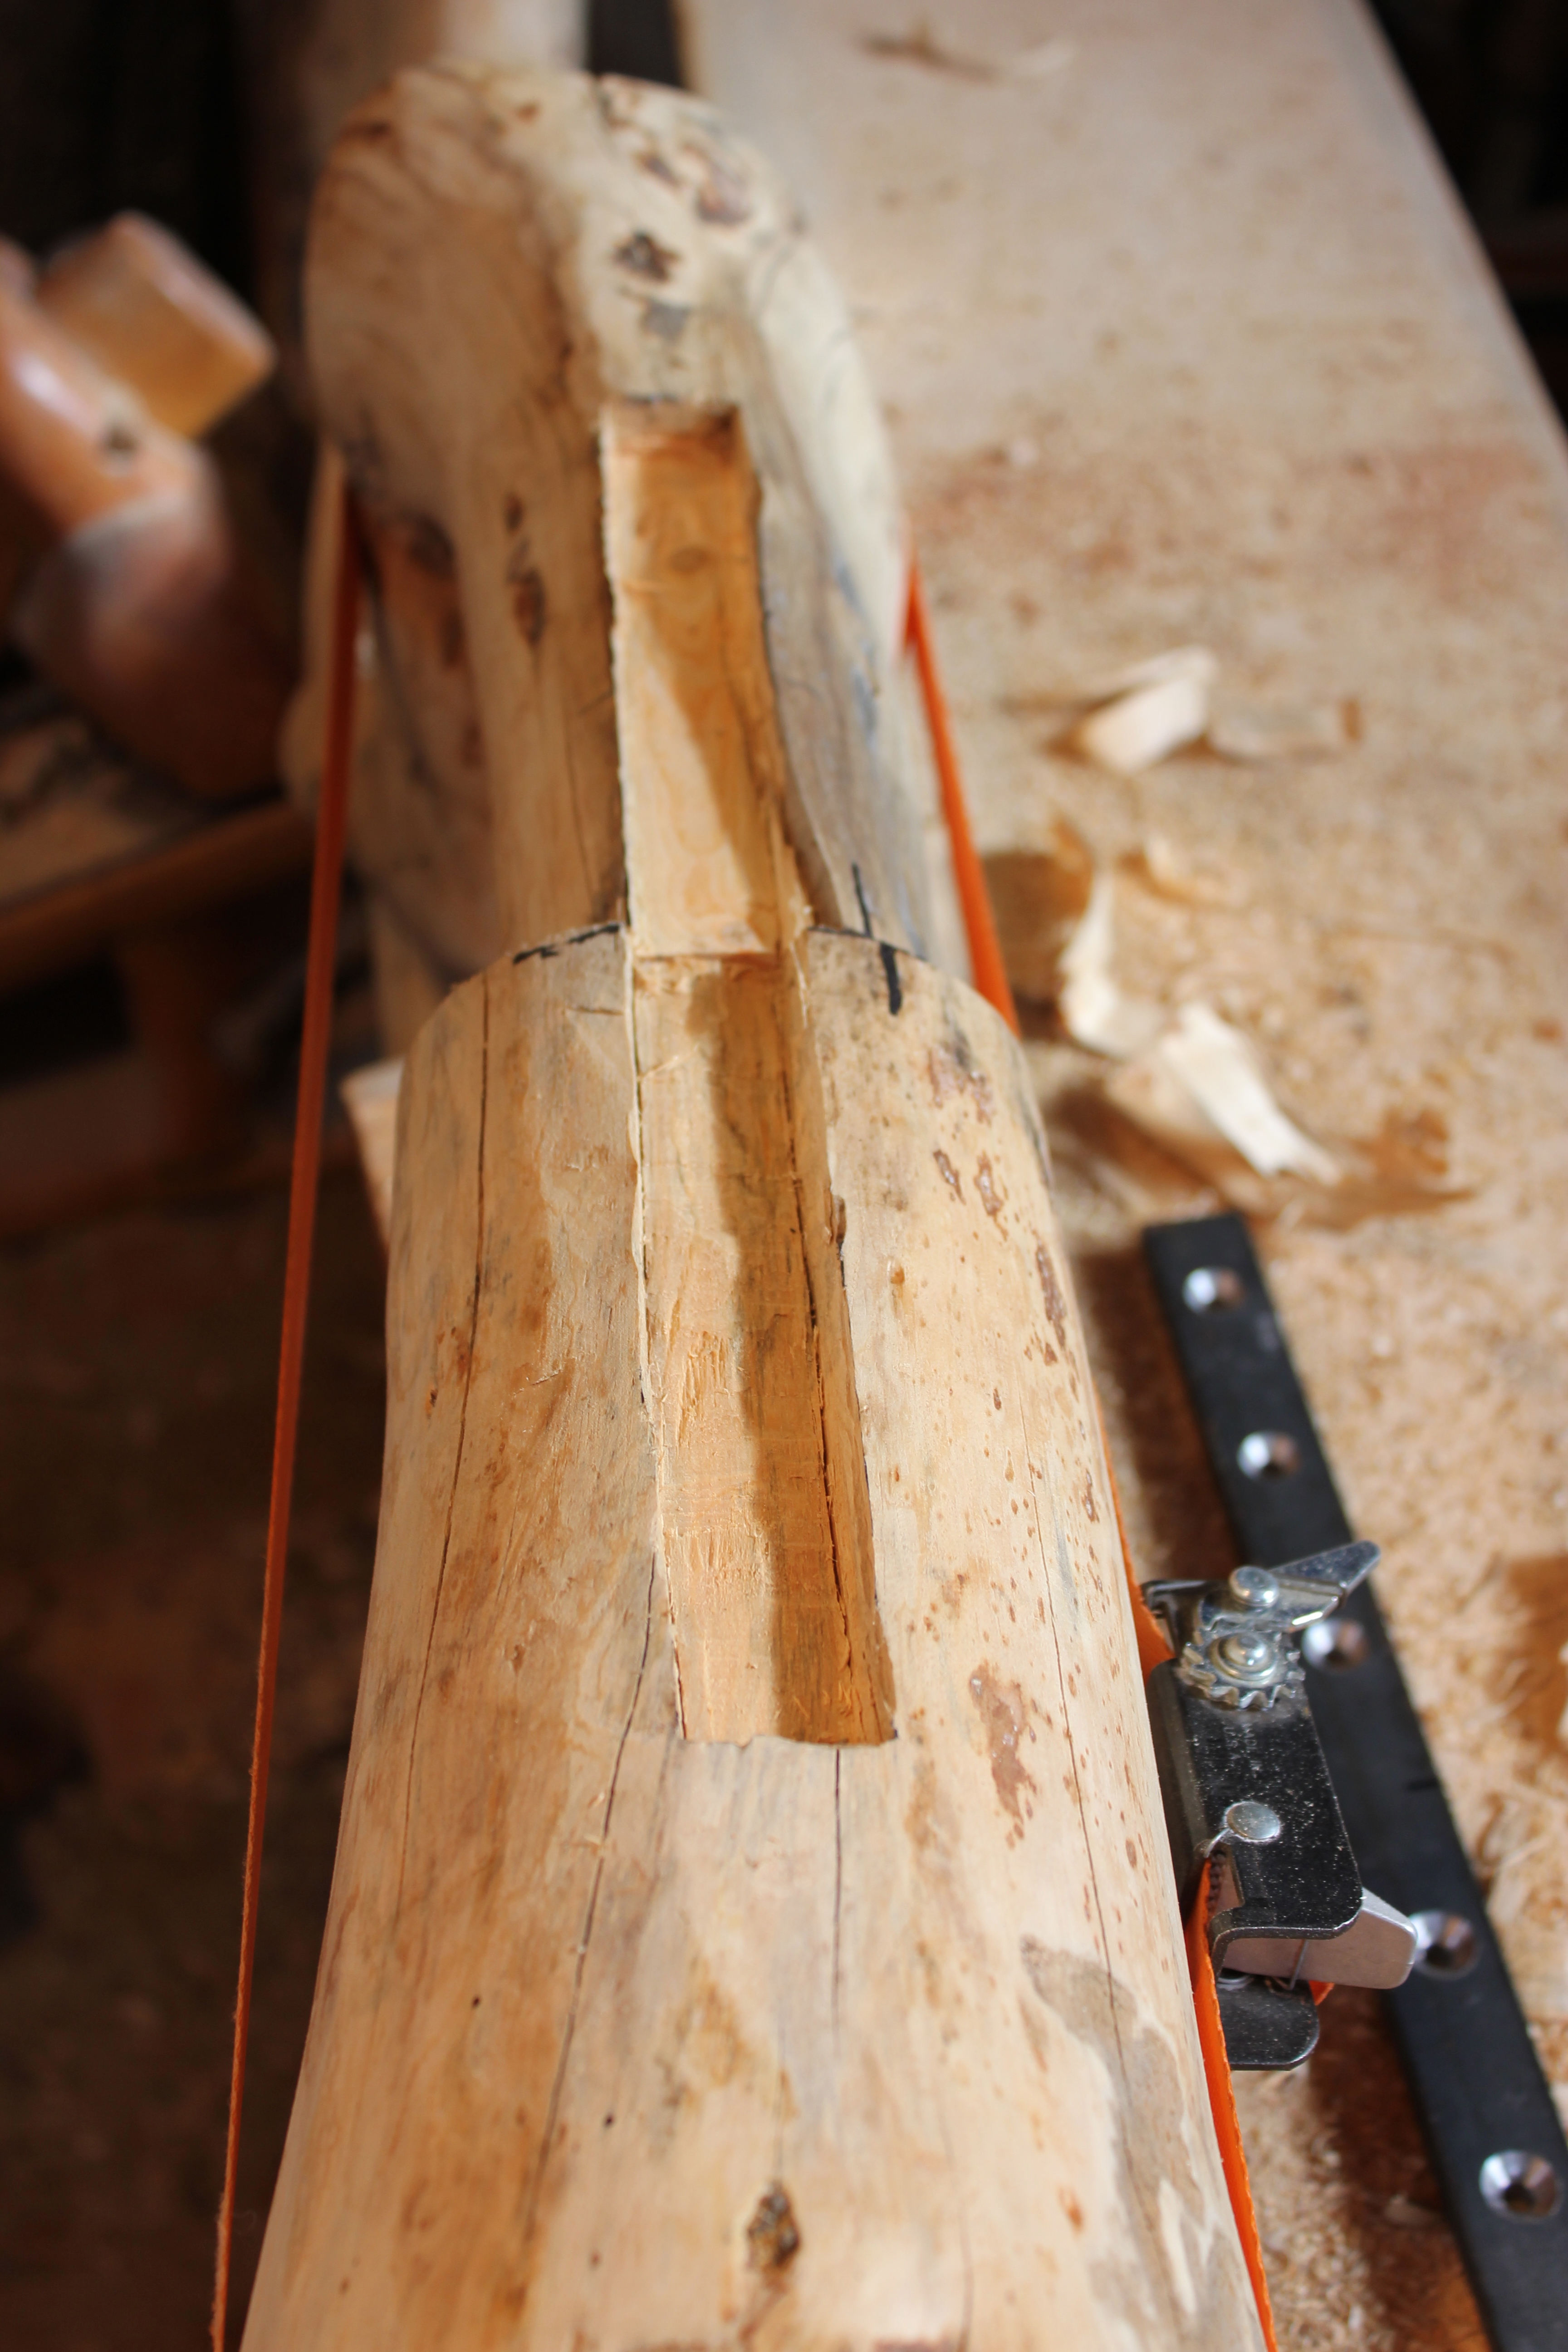
At this end of the arch, I decided to make a shallow mortise to secure the joint, again making an alignment mark.

Here I’m using a Japanese rip saw to make a “mated cut,” a coped joint in which the saw is cutting both the arch and the swan’s neck at the same time. This takes repeated passes, using a wedge to prevent the saw kerf from pinching the saw blade as the cut progresses.

After the mated cuts were done, I laid the clamped pieces flat on the bench and drilled a 7/8″ hole from the underside of each swan’s neck and up into the end of each arch to reinforce the joint. The dowels are extra long so I can twist them out for gluing. I’ll wait until the other pieces have been dry fitted and joined, so i can glue, clamp, and dowel them all at one time.

The web clamp secures the joint as the dowel is inserted without glue until the other components of the backrest are dry fitted and joined. The black line on the swan’s neck shows both the location of the drilling and the alignment for entry into the end of the arch.
Twenty-four. Tree Art Assemblage: A New Challenge
This post will be brief, as an announcement of a new, and very challenging, tree art project. I’m planning a series of posts to document its makings and, hopefully, its public placement as a tree art exhibit.
I’ve begun to design a tree art assemblage, essentially as a tribute to the contorted Rocky Mountain lodgepole pine–Pinus contorta v. latifolia.
I’m working with an urge to select a variety of contorted lodgepole pine tree trunk motifs (see below), and to assemble them into a sculptural forest, a “stand” of pines that is both physical and figurative. Within this stand, I imagine interconnected chairs and benches to serve as public seating.
For many years I’ve thought about this kind of project, and came up with the term “monumental tree art” to describe it. Part of its being monumental would be the architectural setting, which I’ve imagined as a rustic hotel lobby or an art museum foyer. (I have the perfect place in mind, the best setting I can imagine for my tree art, but it would be premature to disclose it.)
I admit that this challenge is great enough–in terms of design, workmanship, and finding a public placement–that I might not be able to make it happen.
As preliminaries, I’m looking in my storage to select component trees. I’ll take photos and make sketches to include in a later posts. Below is a graphics display, prepared for a Creighton Block Gallery exhibit and talk last year, of the recurring contorted lodgepole tree trunk motifs I’ve identified over the past twenty-plus years:

Twenry-three. Trees (in transit)
We sold our across town “Tree Art Studio” (and storage building) last April, 2011, and have been moving trees ever since. Those in these photos are awaiting, in the alley behind our home, their winter storage. They are a small fraction of our total tree inventory.
Here you can see how I’ve sorted the trees by “motifs” (the recurring, naturally grown shapes of the tree trunks)–fork, arch, swan’s neck, loop, spiral, and some one-of-a-kind, eccentric shapes.
Storage, and the handling that goes with it, have always been essential to the making tree art. I’ve moved some of these trees countless times over the past twenty years since I found them in the forest.
I still marvel at what each tree accomplished to overcome injury, gravity, crowded and shaded circumstances, and long winters. And I’m still working–physically and figuratively–on an illustrated book about these trees, with the title: The Contorted Lodgepole–A Poet’s Tribute.


Twenty-one. The ars poetica of tree art
There are many preliminaries and other indirect activities in the making of tree art. I imagine that any poet (maker) knows, regardless of the particular poem (thing made), that it resulted from the complicated processes of poetry (making). I like to think that the phrase ars poetica applies to both the making of my tree art, and to each individual piece I make.
For over twenty years, I’ve used pocket notebooks and clipboard tablets to record the process of making tree art–with descriptions, introspections, and philosophical reflections. These voluminous scribbles and word processings might someday become a published book.

- I started keeping design sketches and notes in this 3-ring binder in 1990. It has sections on: tree motifs and their possible uses; specific types of furniture–chairs, tables, beds,toteboxes, lamps, etc; workshop fixtures, templates, jigs, tools; and marketing ideas.


These are drawings of what I came to recognize as recurring "Lodgepole pine" (Pinus contorta var. latifolia) tree trunk shapes. They also became figuratively significant to me as runes--runic figures/characters in a forest calligraphy.
Twenty. The Creighton Block Gallery Collection
This is the first time I’ve had this many pieces of my tree art, eight in all, in a gallery collection. Almost every piece I’ve made over the past twenty years has been privately collected as soon as it was finished.
The Creighton Block Gallery in Big Sky, Montana, is located in a commercial center near the ski area. I very much appreciate that Colin Mathews and Paula Craver, the owners, have been enthusiastic hosts and promoters of my tree art.

 Here’s Colin trying out one of the chairs on the day I delivered them . He wants me to give each of them a mythological name ….
 Trestle plank table and armchair with the “Egyptian Chest” in the background.
 The other end of the table with second chair, and “The Magic Mushroom Table” and “Pagan Dancer” in the background.

The chairs and table go well together although they may be sold separately.
 “The Magic Mushroom Table” and “Pagan Dancer” are in the background.
 “The Magic Mushroom Table” and the sculpture “Pagan Dancer”
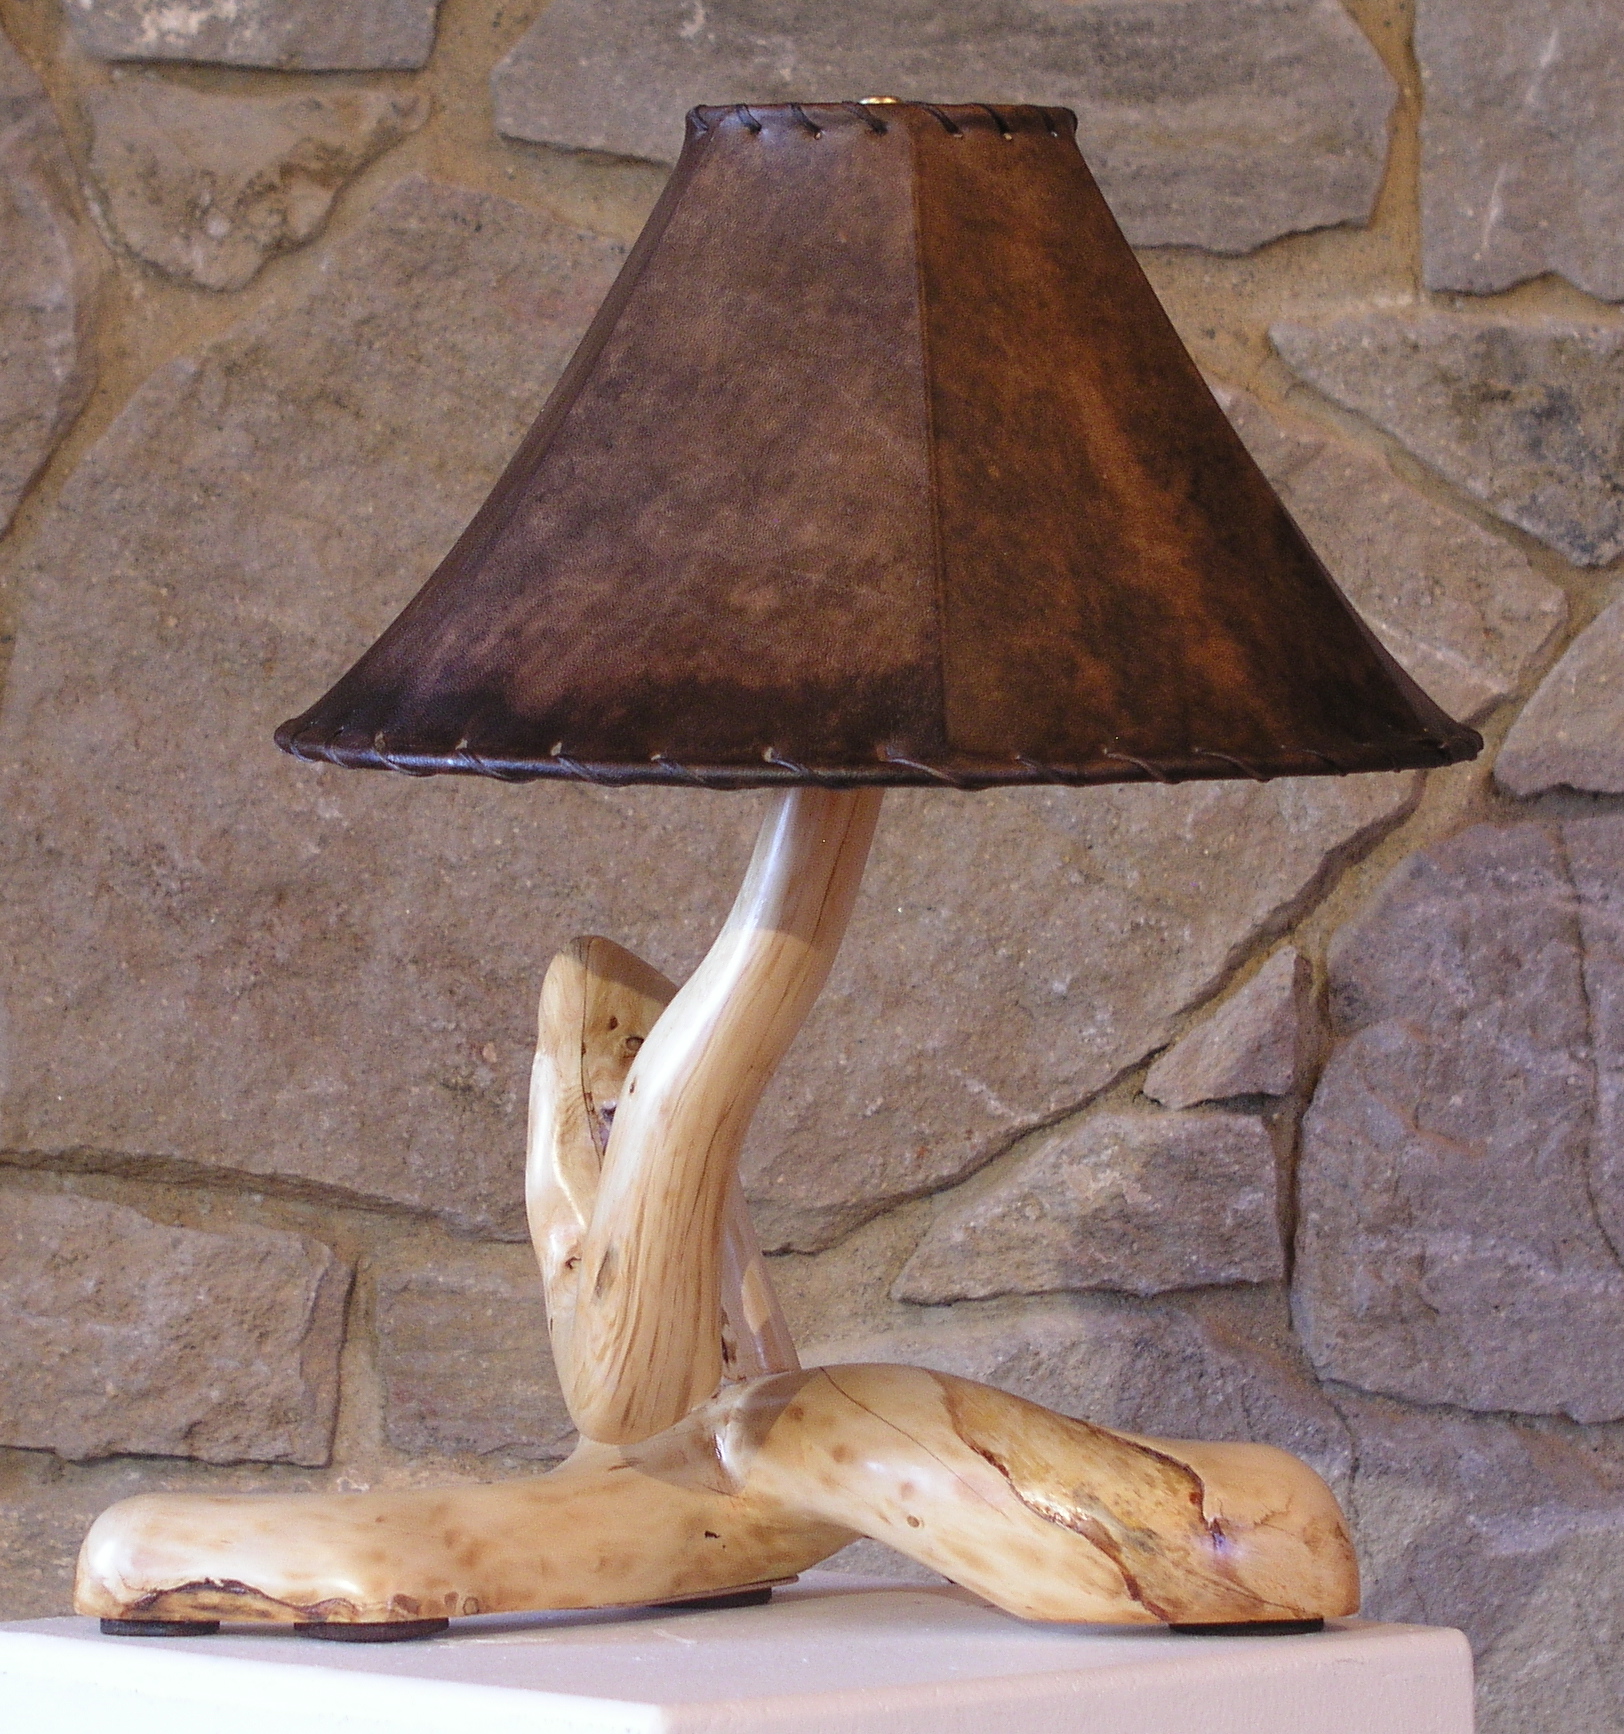
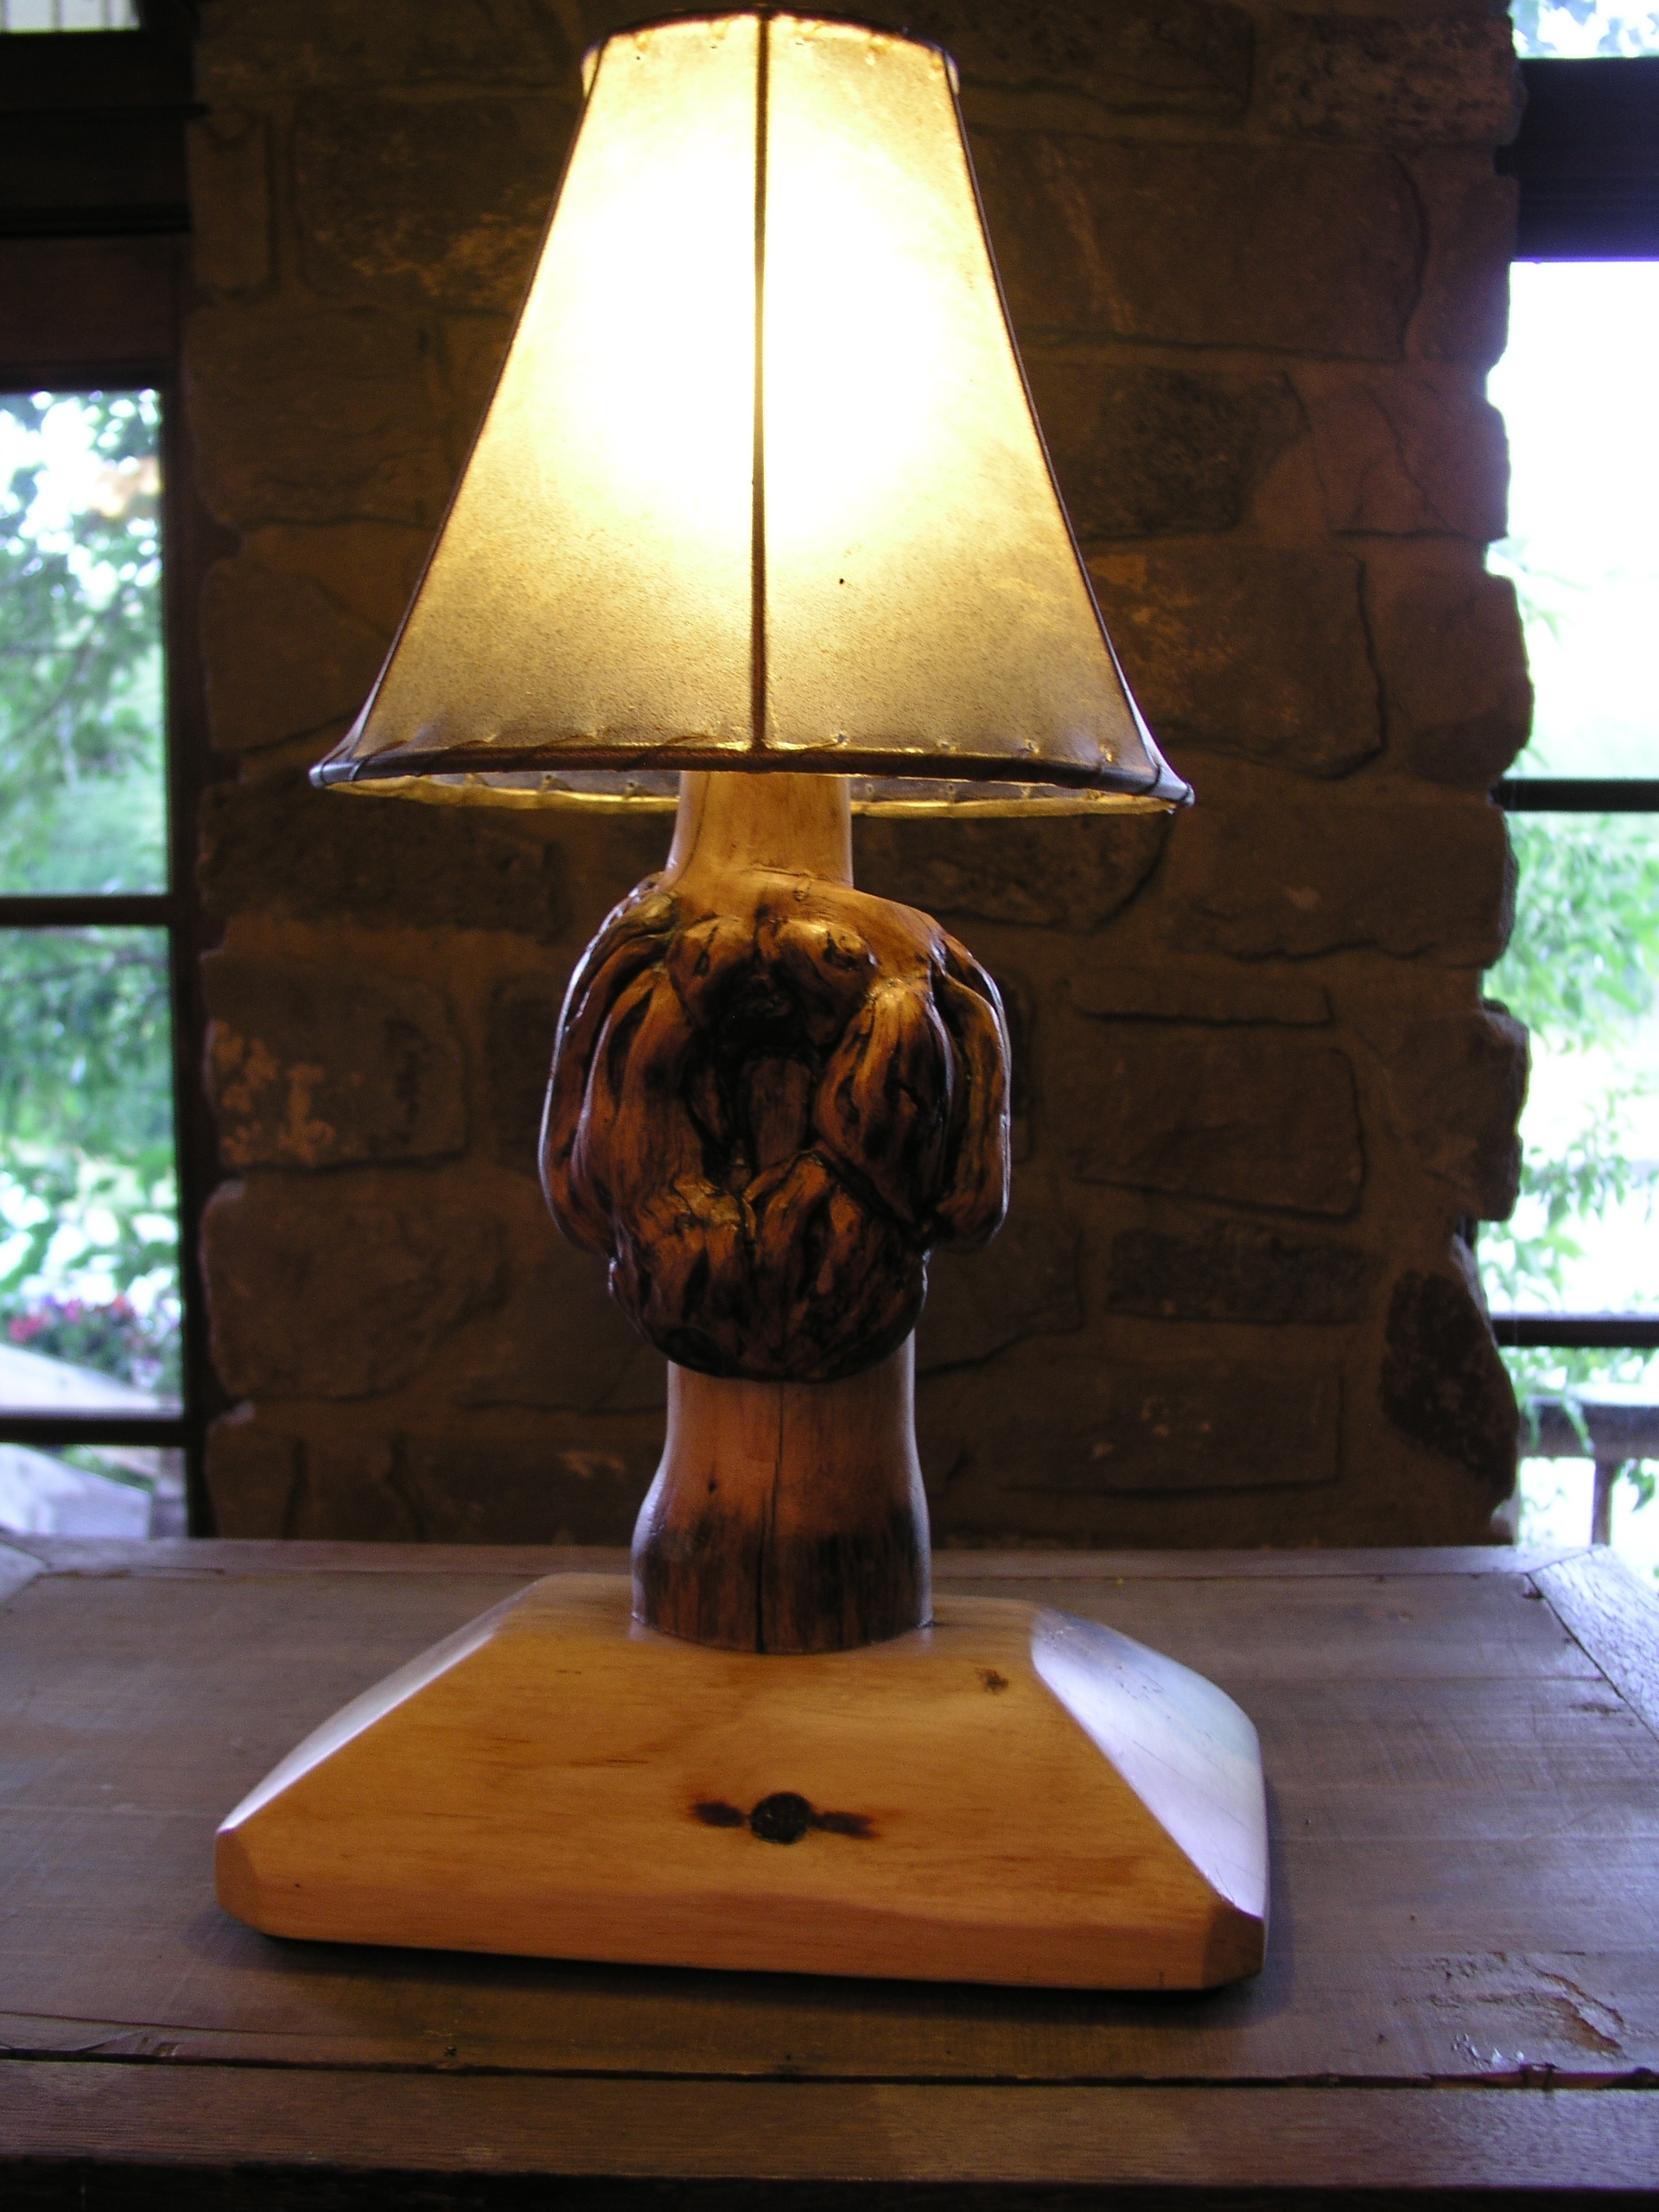
 “The Egyptian Chest” and table lamp.

I took a turn in the chair (I’d done that a few times before while making it) and Colin took the photo, which is now on my Facebook page.
Nineteen. Two ceremonial armchairs

A conversation of armchairs
These two armchairs were designed for several possible uses together: with the plank and trestle dining/conference table; or on opposite sides of the magic mushroom table; or in an entryway or other hallway. That’s the way most of my tree art pieces begin, with a very basic decision to make a particular piece of furniture, in this instance to make a chair, rather than a bed, or a table, etc.
I had one Douglas fir plank that was long enough to make two seats and two backrests, so I decided to make them “plank chairs” to possibly go with the plank trestle table. Then the challenge was to select components for the arms and legs. This is when the process I call “design by experiment” began. I tried a number of different tree pieces that didn’t work and were set aside for possible future use in another piece.
In the designing and making of these chairs, there were basic structural requirements and dimensions to consider. Beyond those, the challenge was to select and combine naturally grown tree trunks into a functional and sculptural assemblage. With both the design and the making of these chairs I tried to embody a tree art esthetic, visually and kinesthetically, that evokes a ceremonial “presence,” to enhance dining, conversation, or contemplation.
I wanted the back legs of both chairs to extend higher than the backrests. Fitting these tall back legs was done by “mate-cutting” each of them to the edges of the backrest planks. The legs and backrests were then glued and dowelled together.
The four arms of both chairs and the curved supports underneath for the front legs are all made from matching Lodgepole pine, naturally grown, tree trunks. I like the balanced look of repeated shapes of the curved arms and braces.

This photo details the mate cut chair leg and backrest. After the joint cured, I “sculpted” the leg and backrest with rasps, files, and sandpapers, to create a curving and flowing design detail. “Flow,” whether of the tree’s growth rings, or of the tree trunk shape, or of my sculpted joinery, is an essential element of all my tree art designs.

This photo shows a number of different details, especially of the “treeness” of the chair and of the joinery. The armrest is joined to the back leg with a full size tenon set deeply into a matching mortise, glued, and reinforced with a wooden dowel . The armrest support is joined to the seat plank, to the back leg, and to the underside of the armrest by the use of several mated cuts.
Other design details in the chairs include burned scars, sapwood rubbing scars, worm tunnels, knots, and multiple natural colorings due to age, insects, and fire.

This view is of the underside of one of the chairs (the other chair is assembled and joined in essentially the same way, and with matching tree shapes.) The front legs are a single “trident fork” of a Lodgepole pine tree trunk, joined to the seat with a full mortise and tenon joint. For additional support I added the curved brace, which is also joined to the legs piece with a full mortise and tenon joint. Each of these joints is reinforced, either by concealed wood screws or wooden dowels.
In the making of these chairs, I was aware of both the amount of work, and the challenges of workmanship, that are involved in the many processes of finishing my tree art pieces. There is a lot of tedious, cosmetic detailing that only has to do with appearances, a matter of removing or concealing flaws, none of which have any effect on the strength and durability of the chairs.
Eighteen. A Sculptural Pine Tree Biography

This little "Lodgepole" was found near Georgetown Lake, Montana. I must confess that it was alive when I came upon it. I admired it greatly and forced myself to walk away from it in search of other trees. Obviously I returned to it later, and in a heart-felt ceremony cut it and lifted in into my arms .... (The three photos in this post were taken by my gifted friend, Steve Hulse.)

This tree is in our home, a treasured piece of naturally grown sculpture. My time spent preparing it reinforced my admiration for what it had accomplished. I'm still living with a bit of guilt about taking it. In this photo, at the point of the first break in the tree coming out of the stone base, there is a round, cupped shape that I have never seen on any other tree. From there, upward, this little pine (about 30 inches tall in this photo) lived a truly tortuous (contorted) life. I consider its crooks, twists, and curls to be a heroic biography and figurative allegory.

According to Ed Ruppel, retired Montana State Geologist, the stone base is vessicular basalt from the Virginia City, Montana, lava field, 34 million years old. I thank my friend G. Karl Marcus for skillfully drilling the pilot hole in the stone.
Seventeen. The Magic Mushroom Table

Putting the finishing touches on "The Magic Mushroom Table"
In this studio photo, I’m applying the finishing touches to a table that took over 500 years to make.
The mushroom’s convex. umbonate cap and base are made of two burls sawn from an ancient Ponderosa pine. The trunk of the tree was over five feet in diameter. It was standing dead, and about to fall on a log home, in the mountains between Philipsburg and Georgetown Lake, Montana. The stem is a section of a burled Lodgepole pine tree trunk from the same area.
The three pieces are joined to create the look of an organic, sculptural whole, as if the table grew into its mushroom shape. I shaped a tenon at each end of the stem and inset them deeply into mortises cut into the base and cap. Inserting the burled stem into the burled base required over a hundred tries to achieve a tight fit. The joinery is reinforced with epoxy filler.
To make the mushroom functional as well as sculptural, I flattened the top of the cap and hollowed out two niches on opposite side of the rim. (I imagine the table in use between two arm chairs, with a lamp or candle on top, and a wine glass in each niche).
The finish is two topcoats of satin polyurethane applied over two penetrating base coats of Watco Danish Oil. Each coat revealed the complex swirls and natural colors of the burls’ flowing growth rings and woodgrains.
“The Magic Mushroom Table” weighs over 100 pounds, so I installed four furniture glides under the base. The finished height is about 27″ and the oval-like diameters of the cap and base average 24 inches.

The table will be delivered to Creighton Block Gallery in Big Sky, Montana, this coming weekend, and be for sale as part of Colin’s and Paula’s gallery exhibition of five pieces of my tree art.

Sixteen. Miscellaneous tree art

This piece was used onstage as a prop for a live theater performance. It was part of an "underworld" scene. The actor climbed up on it (I was in the audience), and it held her up. The legs are each old Lodgpole tree trunks. The seat is a Lodgpole slab.view shows the end with the Douglas fir burled post closer to the camera. These two photos were taken shortly after the table was placed in the Creighton Block Gallery, downtown Virginia City, Montana. I documented the table making with a blog (35 posts and over 120 photographs). You can visit the blog at http://www.cjackwallerjr.wordpress.com

Both the base and the post of this sculpture stand are of burled Lodgepole pine tree trunks. The top is a cross-cut section of Lodgepole cut after a standing dead tree was felled. The post is deeply inlaid into the base and also inlaid into the top.

The legs are all little (old), gnarly Lodgepole tree trunks. The top is upholstered with leather and tacks. A best friend commissioned this foot stool for his wife. It's now is use in the home in Truth Or Consequences, New Mexico.


